


EN
16
Installation
www.bora.com
1
L1
L2
2
3
N
PE
220 - 240 V~
220 - 240 V~
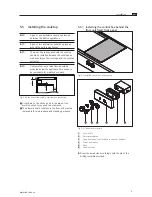
Fig. 5.16 Connection diagram 2-phase
1
L1
2
3
N
PE
220 - 240 V~
Fig. 5.17 Connection diagram 1-phase
X
X
Create the connection between the cooktop and the
control box.
X
X
Verify that the installation was done correctly.
X
X
Switch on the main switch/automatic circuit breaker.
X
X
Put the cooktop into operation
(see the Operation section).
X
X
Check all the functions are working correctly.
5.7 Handover to user
Once installation is done:
X
X
Explain the important functions to the user.
X
X
Explain all safety-relevant aspects of operation and
handling to the user.
X
X
Provide the user with the accessories and operating
and installation instructions to be kept in a safe place.
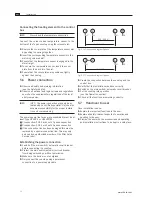
Connecting the heating element to the control
box
INFO
Never bend the temperature sensor line.
Connect the colour-coded temperature sensor to the
bottom of the Tepan cooktop using the relevant slot.
X
X
Remove the cover plate of the temperature sensor slot
by pushing the springs together.
X
X
Insert the corresponding temperature sensor into the
matching coloured slot.
X
X
Ensure that the temperature sensor is engaged in the
slot straight.
X
X
To secure the temperature sensor, insert the cover
plate from the back into the slot.
X
X
Ensure that the cover plates are positioned tightly
against the housing.
5.6 Power connection
X
X
Observe all safety and warning information
(see the Safety chapter).
X
X
Observe all national and regional laws and regulations
as well as the supplementary regulations of the local
utility companies.
INFO
INFO The power connection may only be es-
tablished by a certified specialist. He/she also
assumes responsibility for the proper installa-
tion and commissioning.
The power supply line for use (pre-assembled) must be at
least Type H05VV-F or H05VVH2-F.
Q
Q
Cross-section: 3G2.5 mm² with 1-phase connection
Q
Q
Cross-section: 4G2.5 mm² with 2-phase connection
Q
Q
If the connection line has been damaged this must be
replaced by a special connection line. This may only
be done by an authorized member of the After Sales
Service team.
Establishing the power connection
X
X
Switch off the main switch/automatic circuit breaker
before connecting the cooktop.
X
X
Protect the main switch/automatic circuit breaker
from being switched on without permission.
X
X
Make sure the device is not energised.
X
X
Only connect the cooktop using a permanent
connection to a power supply cable.
Summary of Contents for PT11UMEN-000
Page 23: ......


