


EN
10
Device description
www.bora.com
[1]
Control knob for the front grilling zone
[2]
Power level sleeve
[3]
Control knob for the back grilling zone
[4]
Operating indicator light
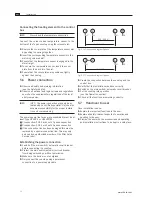
Display panel
Display
Meaning
Operating indicator
light
On
Tepan grilling zone
witched on
Off
Tepan grilling zone
switched off
Tab. 4.1: Meaning of display
4.2.1 Operation
The operating panel is equipped with two control knobs.
To operate the appliance, set the relevant control knob to
the corresponding power level.
4.2.2 Operating indicator light
If the indicator light illuminates, the allocated cooking zone
is switched on.
4.3 Functional principle
There are two heating elements under the grilling zone.
When the grilling zone is switched on, the heating element
generates heat that heats up the grill surface directly. The
power levels can be continuously adjusted between 1-9.
4.3.1 Power levels
The power output of the Tepan stainless steel grill heats
food extremely quickly. A slight adjustment is needed in
comparison to conventional cooking systems when
selecting the power level in order to avoid burning food.
Activity
Power level
Keeping cooked meals warm
1
Steaming fruit, e.g. apple slices,
peach halves, banana slices
2-3
Browning chopped vegetables,
fried eggs, veal, poultry
4-5
Browning breaded or battered fish,
pancakes, sausages, pork, lamb
5-6
Browning potato fritters, prawns,
corn on the cob and escalopes
6-7
Fast browning beef, fish, meatballs
8-9
Tab. 4.2: Recommendations for power levels
The specifications provided in the table are standard
values.
4 Device description
Observe all safety and warning information during operation
(see the Safety chapter).
The Tepan stainless steel grill has the following features:
Q
Q
Two grilling zones
Q
Q
Two control knobs
Q
Q
Cooking zone indicators
Q
Q
Control box with childproofing feature
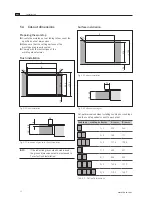
4.1 Structure
1
3
2
Fig. 4.1 Tepan stainless steel grill
[1]
Two grilling zones
[2]
Control knob for the back grilling zone
[3]
Control knob for the front grilling zone
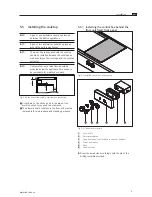
4.2 Operating panel and operating
principle
1
3
4
2
Fig. 4.2 Control knobs
Summary of Contents for PT11UMEN-000
Page 23: ......


