


EN
15
Installation
www.bora.com
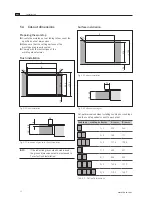
X
X
If applicable, insert the height adjustment plate [2].
2
1
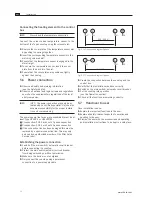
Fig. 5.15 Mounting brackets
[1]
Screw
[2]
Mounting bracket
X
X
Fasten the cooktop [1] using the mounting brackets
[2].
X
X
Tighten the mounting bracket screws [1] with
max. 10 Nm.
X
X
Verify that the alignment is correct.
X
X
Seal the devices with black heat-resistant silicone
sealing compound after the installation work is
completed.
Connecting the cooktop and the control box
X
X
Create the connection between the cooktop and the
control box.
X
X
Firstly connect the yellow/green earthing cable to the
indicated point on the control box.
Earthing symbol
X
X
Now connect the multi-pin, colour-coded plugs on
the relevant cooking zone to the corresponding
colour-coded sockets on the control box.
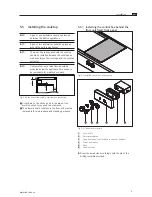
5.5.2 Installing the cooktop
1
2
Fig. 5.13 Insert the mounting rail and cooktop
[1]
Cooktop
[2]
Mounting rail
X
X
Place the mounting rail [2] in the worktop cut-out.
X
X
Insert the cooktop [1].
X
X
Align the cooktop [1] exactly.
X
X
Align the mounting rail [2] so that it is positioned
evenly under the cooktop and the cooktop extractor
PL540.
1
2
Fig. 5.14 Cooktop and height adjustment plates
[1]
Cooktop
[2]
Height adjustment plates
Summary of Contents for PT11UMEN-000
Page 23: ......


