background image

User Manual n°648261 – 

Page 9

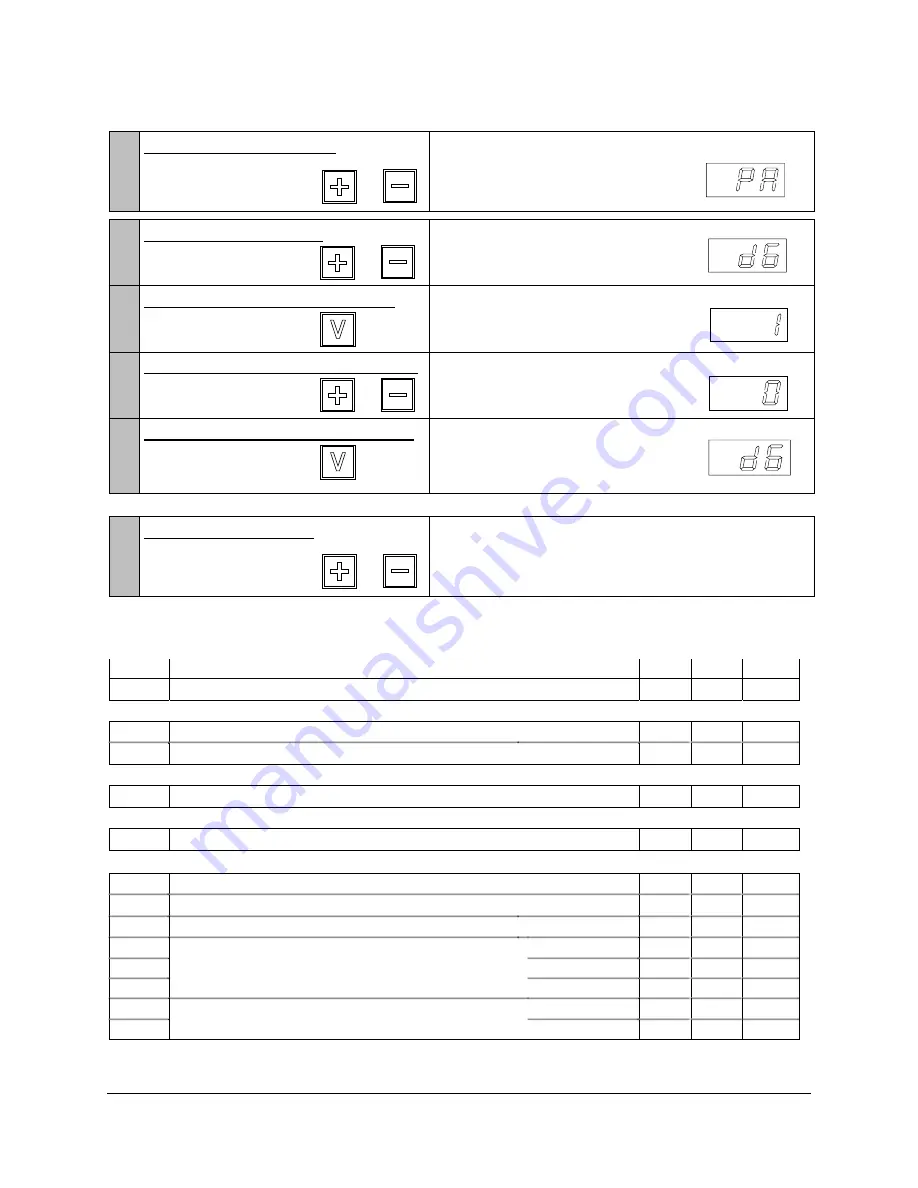
1.6  SPECIAL SETTINGS

1.6.1 PROGRAMMATION 

(The regulation is ON)

1

Access to programmation :
Press simultaneously
and for a few seconds


)


and

Beginning of the programmation mode.

Display of the indication

2

Selection of parameters :

Press simultaneously


)


or

Display of the parameters one after another.

Display of the parameters’ codes

3

Access to the selected parameter :

Press                     

)

Presetting display of the parameter

4

Modification of the parameter setting

Press successively


)


  or

Display of the parameter’s values one after another.

Display of the parameter’s values

5

Validation of the parameter’s setting :

Press                    


)

Display of the modified parameter’s
code

Start again stage 2 to 5 for the other parameters.

6

To exit programmation:
Press simultaneously
and for a few second


)


and

Restart of the system.

During or after programmation, the system

restarts automatically if no key is pressed in less

than 15 seconds.

The parameters’ modifications are definitively taken into account, even after the stop of the appliance

.

1.6.2  TABLE OF PARAMETERS

Code

Parameters

Min

Max

Fact.

PA

Password to access level 2

(reserved to installer)

-99

99

--

Temperature parameters

cA

Core probe temperature reading

(read only) °C

--

--

--

cc

Fragile products interior probe set-point

°C

-55

99

-15

Defrost parameters

d6

Defrost at the beginning of the prefunction cycle

0 = No, 1 = Yes

0

1

1

Ventilation parameters

F1

Ventilation with Fragile Products ON 

(1)

0 = Weak,1 = Strong

0

1

1

Printing parameters (with optional printer

)

i1

Printing frequency in chilling cycle

mn

0

60

5

i2

Printing frequency in preservation cycle

mn

0

60

30

i3

Printing at the beginning of the cycle

0 = No, 1 = Yes

0

1

1

i4

Date setting

Day

1

31

(2)

i5

Month

1

12

(2)

i6

Year

990

050

(2)

i7

Time setting

Hour

0

23

(2)

i8

Minute

0

59

(2)

(1) Except for MI3
(2) The configuration must be set during installation

Summary of Contents for BIOTRONIC TURBO MI 10

Page 1: ...REEZER BIOTRONIC TURBO Electronic Regulation CHILLER AND FREEZER MI 3 MI 6 MI 10 TECHNICAL MANUAL INCLUDING USER MANUAL INSTRUCTIONS BONNET GRANDE CUISINE Rue des Frères Lumière Z I Mitry Compans 77292 MITRY MORY cedex Tél 01 60 93 70 00 Fax 01 60 93 70 43 ...

Page 2: ...RECTO ...

Page 3: ... Electronic Regulation CHILLER AND FREEZER MI 3 MI 6 MI 10 CONTENTS Important recommendations 2 1 Use of the control panel 3 2 Use 10 3 Maintenance 11 4 Operation anomalies 12 BONNET GRANDE CUISINE Rue des Frères Lumière Z I Mitry Compans 77292 MITRY MORY cedex Tél 01 60 93 70 00 Fax 01 60 93 70 43 ...

Page 4: ...ems with the electrical circuit only the installer or the manufacturer should intervene Observe hygiene guidelines by regularly cleaning the following interior fittings door seal interior lining Do not use corrosive or acidic products Water splashing can cause damage To avoid the risk of splash damage do not clean with a hose or high pressure spray Do not locate the unit where it is exposed to the...

Page 5: ...SCRIPTION For the use of the keyboard see SIMPLIFIED GUIDE paragraph 1 4 page 5 DETAILED GUIDE paragraph 1 5 Start paragraph 1 5 1 page 6 Cycle with core probe paragraph 1 5 2 page 7 Cycle with timer paragraph 1 5 3 page 8 End of cycle paragraph 1 5 4 page 9 Fragile Products function paragraph 1 5 5 page 9 ALARMS and DEFECTS paragraph 1 6 page 9 Display Temperature Time h mn Coded defect On Off sw...

Page 6: ... is not used for a hot product sound alarm and the indication SP is displayed 1 3 3 CYCLE WITH TIMER When the use of the core probe is impossible a cycle with timer is possible factory settings 2 hours in chilling mode and 4h30 in freezing mode This can be modified case by case The cycle programming time depends on the type and the quantity of food to be cooled During the cycle the display indicat...

Page 7: ...de Sound alarm and the indication SP is displayed if the probe is not correctly used To modify the temperature of the set point at the end of the cycle CYCLE WITH TIMER without using the core probe Press on and or and if necessary or To select the cycle in chilling or freezing mode To modify the cycle duration FRAGILE PRODUCTS Press on To limit air temperature of a blast chilling cycle avoiding fr...

Page 8: ...ndition 2 Start of the compressor with production of cold air until the pre set temperature is reached 15 C The led indicates the running cycle and the temperature of the compartment is displayed in real time 3 Automatic end of cycle The Preservation after cycle led lights up The bell rings for a few seconds The appliance moves to the preservation stage waiting for the products to be loaded During...

Page 9: ...e until the end of the cycle except for MI3 6 Fragile products Press for a few seconds during the cycle Avoid frost deposit on the products by limiting the air temperature to 15 C blast chilling cycle This function can be set by modifying the factory settings with a different air temperature cc parameter and or except for MI3 a weak ventilation F1 parameter Attention This function must only be use...

Page 10: ...ation mode until the end of the cycle except for MI3 6 Fragile products Press for a few seconds during the cycle Avoid frost deposit on the products by limiting the air temperature to 15 C blast chilling cycle This function can be set by modifying the factory settings with a different air temperature cc parameter and or except for MI3 a weak ventilation F1 parameter Attention This function must on...

Page 11: ... During or after programmation the system restarts automatically if no key is pressed in less than 15 seconds The parameters modifications are definitively taken into account even after the stop of the appliance 1 6 2 TABLE OF PARAMETERS Code Parameters Min Max Fact PA Password to access level 2 reserved to installer 99 99 Temperature parameters cA Core probe temperature reading read only C cc Fra...

Page 12: ...dicates the type of defects The buzzer can be stopped by pressing 1 7 1 USE SECURITIES The core probe is not or not well introduced in the product The door is open The normal time is over Supply breakdown 1 7 2 OPERATION DEFECTS call for the repairer Regulation probe defect Core probe defect Refrigerating defect ...

Page 13: ... around the products The chilling or freezing time depends on the weight nature and thickness of the food therefore it is difficult to accurately define a loading capacity 2 3 CORE PROBE POSITION The core probe must be introduced as deep as possible in the product to be cooled 2 4 VENTILATION To guaranty refrigerating performance take care the fans grids and the funnel for air outlet have not been...

Page 14: ...ed daily To ease a complete cleaning it is possible to dismantle the interior fittings 1 Unhook the shelves runners c 2 Unhook the slides supports d 3 Unscrew the slides supports pins e and remove the braces f 4 Unscrew the braces pins g Do the opposite for the reassembly To obtain a 600x400 euronorm interior lining fix the slides supports pins e directly in the interior lining without the braces ...

Page 15: ...ted before the power plug The compressor operates intermittently Compressor security thermostat Check the operation of the condenser fan Check the condenser is not clogged Check the ambient temperature Ventilate if necessary The group unit compressor and condenser fan operates intermittently Security pressure sensitive switch cut Check the operation of the condenser fan Check the condenser is not ...

Page 16: ......

Page 17: ...ion Chiller and freezer MI 3 MI 6 MI 10 CONTENTS Important recommendations 2 1 Technical data 3 2 Installation 5 3 Operation 8 4 Interventions and repairs 10 5 Electrical diagrams 14 6 Spare parts 17 BONNET GRANDE CUISINE Rue des Frères Lumière Z I Mitry Compans 77292 MITRY MORY cedex Tél 01 60 93 70 00 Fax 01 60 93 70 43 ...

Page 18: ...ion on the electrical or refrigeration circuits and during cleaning The compressor condenser must be cleaned regularly every 3 to 6 months Water splashing can cause damage To avoid the risk of splash damage do not clean with a hose or high pressure spray Do not locate the unit where it is exposed to the elements After any intervention ensure that the original installation guidelines are respected ...

Page 19: ... can be reversed TECHNICAL DATA Delivered with a moulded plug The installer is responsible for protecting the appliance against overloads or electrical defects Ensure a circuit breaker or fuses are installed Voltage 1 230V 50 Cycle Input power 1400 W Protection aM 6 Load See appliance instruction plate Condenser Forced air Evaporator Fanned corrosion proof Defrost water Collection tray located und...

Page 20: ...ue type Radiused interior lining bottom and sides Polyurethane insulation foam 50 mm thick Thermal break between inner and outer structure 4 adjustable legs or optional casters Plain door Easy demountable magnetic door seal Door opening can be reversed TECHNICAL DATA Delivered with a moulded plug The installer is responsible for protecting the appliance against overloads or electrical defects Ensu...
Page 21: ...oque type Radiused interior lining bottom and sides Polyurethane insulation foam 50 mm thick Thermal break between inner and outer structure 4 adjustable legs or optional casters Plain door Easy demountable magnetic door seal Door opening can be reversed TECHNICAL DATA Delivered with a moulded plug The installer is responsible for protecting the appliance against overloads or electrical defects En...
Page 22: ...liance without its pallet it must be carried and not pulled 2 3 UNPACKING AND INSTALLATION 2 3 1 LOCATION When choosing the location make sure that there is sufficient air circulation around the appliance to allow correct cooling of the condenser and compressor Do not install near a source of heat 2 3 2 UNPACKING After the unpacking lift up the appliance and free the pallet c Level the appliance w...
Page 23: ... data The appliance is fitted with a supply cable that should not be removed This unit must be earthed see recommendations A circuit breaker or suitable fuses should be provided on the supply DEFROST WATER The collection tray can be replaced by a tube outlet Tube PVC Ø32 not supplied ...

Page 24: ...etting of all parameters see Table of parameters paragraph 3 3 2 of page 9 Parameters accessible at level 1 are also accessible at level 2 The parameters modifications at level 1 as well as at level 2 are definitively taken into account even after the stop of the appliance When the appliance is used for the first time it is necessary to program a code which must be set with the user and which must...

Page 25: ...the first parameter 6 Selection of parameters Press successively or Display of the parameters one after another Display of the parameters codes 7 Access to the selected parameter Press Pre setting display of the parameter 8 Modification of the parameter setting Press successively or Display of the parameter s values one after another Display of the parameter s values 9 Validation of the parameter ...

Page 26: ...cle preservation temperature set point C 55 99 20 c7 Ambient Core probe insertion check with cb 1 C 0 99 5 1 c8 Temperature level for countdown start C 0 99 63 c9 End of cycle buzzer alarm duration s 0 99 3 2 cA Core probe temperature read only cb Core probe insertion test according to c7 and cE 0 No 1 Yes 0 1 1 2 cc Fragile products ambient probe set point C 55 99 15 cd Temperature level for weak...

Page 27: ...r presence 0 no 1 yes 0 1 0 2 i1 Printing frequency in chilling cycle mn 0 60 5 2 i2 Printing frequency in preservation cycle mn 0 60 30 2 i3 Printing at the beginning of the cycle 0 no 1 yes 0 1 1 2 i4 Date setting Day 1 31 3 2 i5 Month 1 12 3 2 i6 Year 990 050 3 2 i7 Time setting Hour 0 23 3 2 i8 Minute 0 59 3 L NETWORK L1 Instrument address 1 15 1 L2 Instrument group 0 7 0 L3 Timeout link 2 250...

Page 28: ...utting the 2 rilsan rings 4 Clean the condenser f with a non metallic brush with soft hair 5 Refix the fan with 2 rilsan rings on the condenser cross 4 1 2 MI 6 and MI 10 MODELS 1 Unscrew the 2 screws g 2 Remove the grid h following candd 3 Unscrew the 2 star screws j and pivot the fan support following i 4 Clean the condenser f with a non metallic brush with soft hair 5 Refix the fan by screwing ...

Page 29: ...aximum opening of the fan support the interior lining should be removed See paragraph 3 2 of the user manual 4 3 REPLACING OF THE DOOR To replace or reverse the door opening 1 Remove the grid i see paragraph 4 1 2 Unscrew the hinge screw c 3 Remove the door d from the upper hinge following e 4 Refix the door including the washer f To reverse the door opening invert the supports g from right to lef...

Page 30: ...tor c from the female connector e located under the top g of the appliance 2 Replace the core probe d Nota The surmoulded connector e is located in a box f in the top insulation g To replace it it is necessary to make a connection with the cable introduced in the appliance insulation ...

Page 31: ...ting the appliance against overloads or electrical defects N SE146 Afficheur Display card Micro Electronic card Exten Extension card Sd A Ambient probe Sd P 5 point core probe Ip Door switch KMg Groupcontactorcoil Kmg Group contactor Cp Compressor R carter Casing resistance Vc Condenser fan Ve Evaporator fan C Condensator ...

Page 32: ...verloads or electrical defects N SE147 Afficheur Display card Micro Electronic card Extens Extension card Sd A Ambient probe Sd P 5 point core probe Ip Door switch HP Pressostat KMg Groupcontactorcoil Kmg Group contactor f1 Thermal relay Cp Compressor R carter Cp casing resistance Vc Condenser fan Ve Evaporator fan C condensator ...

Page 33: ...verloads or electrical defects N SE148 Afficheur Display card Micro Electronic card Extens Extension card Sd A Ambient probe Sd P 5 point core probe Ip Door switch HP Pressostat KMg Groupcontactorcoil Kmg Group contactor f1 Thermal relay Cp Compressor R carter Cp casing resistance Vc Condenser fan Ve Evaporator fan C Condensator ...

Page 34: ...e bearing z z z S061P02 Slides support brace axis z S630PM42 Stainless slides support brace H 328 z S630PN42 H 728 z S630PO42 H 1073 z z z S062P02 Slides support alu axis z S631PM42 stainless slides support H 315 3 levels pitch 80 z S632PM42 H 715 6 levels pitch 100 z S633PM42 H 1060 10 levels pitch 100 z S631PN42 Probe support slides support H 315 3 pitch 80 z S632PN42 H 715 6 pitch 100 z S633PN4...

Page 35: ...510 z z z S395P45 Display card casing z z z S228P02 Display card nylon brace z z z S416P42 Door contact switch fixing plate 6 2 REFRIGERATING ELECTRIC COMPONENTS MI 3 MI 6 MI 10 Code Designation z S080P40 Compressor CAJ2464Z z S081P40 TFH2511Z z S088P40 TAG2516Z z S136P40 Casing resistance CAJ z S057P30 Condenser 104270 z z S072P30 3N18T 45 plan 670516 z S073P40 Condenser fan 25W 254 31 z S075P40 ...

Page 36: ... z S864PA54 MI 10 z S896PA54 Control panel set MI 3 z z S898PA54 MI 6 MI 10 z z z S102P15 Compressor contactor LC1D1210M7 z z S076P15 LA1DN11 Auxiliary contact z S100P15 Thermal relay LR2D1310 z S115P15 LR2D1314 z z z S295P11 Control panel Lexan label z z z S196P20 Electronic regulation cards set z z z S198P20 Regulation microprocessor card z z z S199P20 Regulation extension card z z z S197P20 Reg...

Page 37: ...Instructions n 648261 Page 1 ...

Page 38: ...den Bestimmungen der elektromagnetischen Übereinstimmung richtlinie EWG 89 336 Il est également conforme aux dispositions de normes européennes harmonisées suivantes It is in compliance with the following harmonized standards Und entspricht ebenfalls der folgenden Europaïschen Norme EN 60335 1 Sécurité des appareils électrodomestiques et analogues Safety of houseold and similar electrical applianc...

Reviews: