background image

2

)

p

g

Installing Your Commercial Microwave Oven

1.  

Always install the oven at bench height (90cm) on a level stable surface. Installation 
at chest or head height is dangerous and can result in burns to the operator and also 
places excessive strain on the door hinges.

2.    Never block the air vents as the oven may overheat and automatically switch itself 

o

 . The oven will remain inoperable until it has cooled su

  ciently. Recommended 

ventilation space is 10cm behind the oven and 15cm to the sides and top of the oven.

3.    Remove all packing materials inside the oven including protective 

fi

 lm from the outer 

cabinet of the oven.

4.    For your personal safety, only plug the power lead into a 3-pin, 15amp, 240 Volt, 50Hz, 

AC earthed socket. If the power lead of this appliance is damaged, it must be replaced 
by the manufacturer or its service agent or a similarly quali

fi

 ed person in order to avoid 

any hazard.

5.   This microwave oven should be positioned so that the power plug is accessible.

Outdoor use

This microwave oven is not designed for outdoor use. It should only be installed indoors.

Recommendations

 • 


DO NOT install the microwave oven in hot or damp surroundings.
Example: Next to a traditional oven, stove or dishwasher.

 • 


The power supply speci

fi

 cations of the oven must be adhered to and any 

extension cable used must be of the same rating as the power cable 
supplied with the oven.

 • 


Wipe the interior and the door seal with a damp cloth before using your 
microwave oven for the 

fi

 rst time.

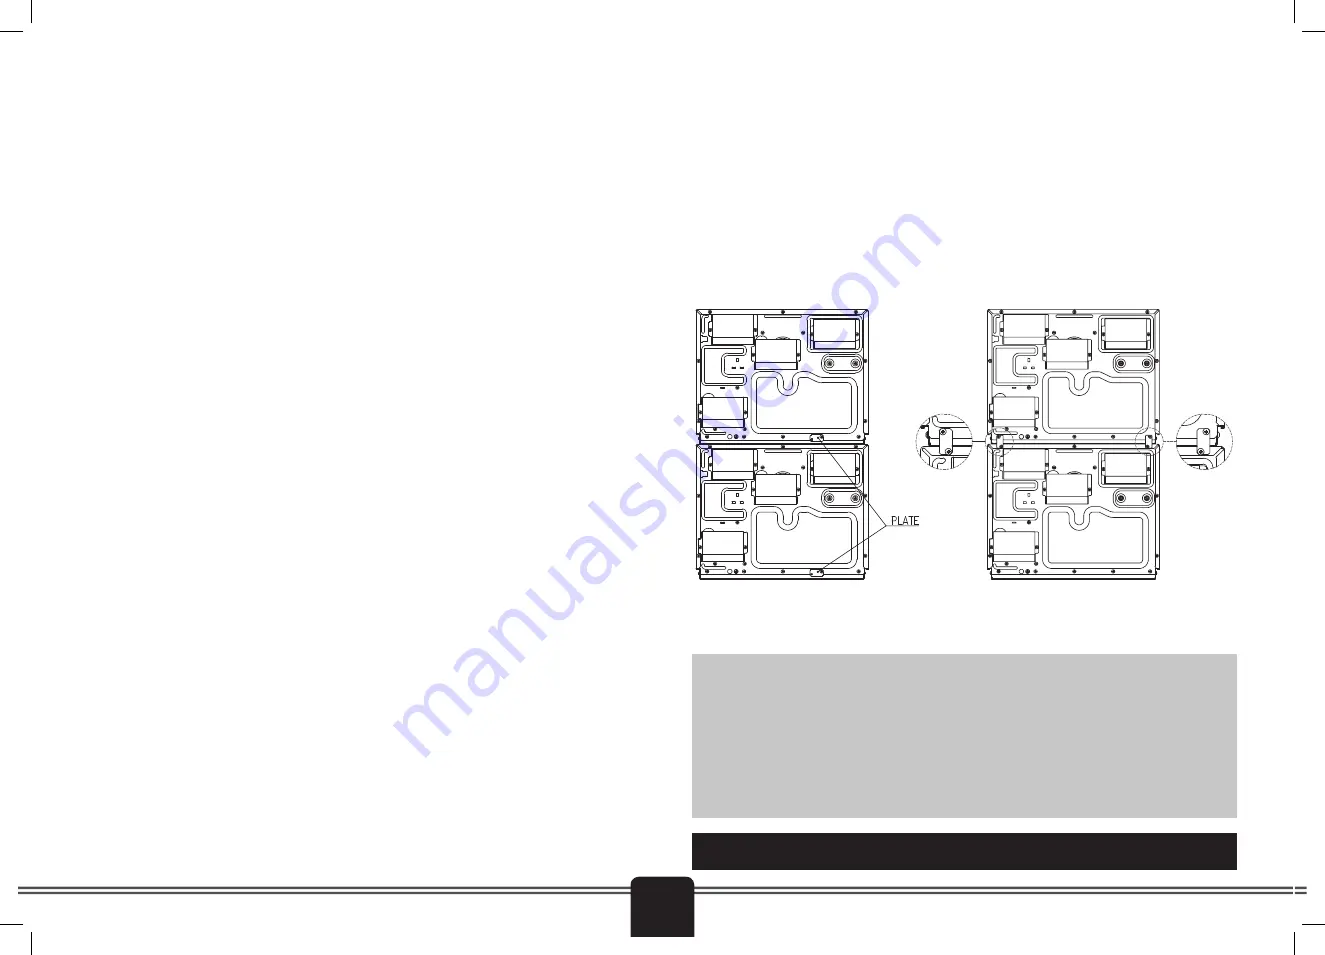
Stacking Instructions

1)  

Place one microwave oven on top of the other one, and remove the securing 
plates that are held by a single screw to the bottom-right corner at the rear of both 
microwaves. Secure in the above hole of the two microwaves.

2)  

Remove the two screws which are securing at both end of the cabinet of the lower 
microwave oven. Remove the two screws which are securing the bottom corner of the 
upper micowave oven.

3)  

Use the upper and lower plate screw holes to secure the upper and lower microwave 
ovens with the four screws.

4)  

Ensure the top oven is at a safe and workable height.

Important

The wires in this mains lead 

fi

 tted to this appliance are coloured in accordance with the following code.


  Green-and-yellow : Earth


  Blue : Neutral


  Brown : Live

As the colours of the wires in the mains lead of this appliance may not correspond with the coloured markings 
identifying the terminals in your plug, proceed as follows: the wire which is coloured green-and-yellow must be 
connected to the terminal in the plug which is marked with the letter ‘E’, the earth symbol or coloured green-and-
yellow. The wire which is coloured blue must be connected to the terminal which is marked with the letter ‘N’ or 
coloured black.
The wire which is coloured brown must be connected to the terminal which is marked with the letter ‘L’ or 
coloured red.

WARNING:

  This appliance must be earthed.

Summary of Contents for CM-1401T

Page 1: ...CM 1401T 1400 watts ...

Page 2: ...l 3 Manual Heating 3 Preprogrammed Heating 4 Changing Preprogrammed Button Settings 4 20 Sec Button 5 Changing Oven Options 5 Caring for and Cleaning your Commercial Microwave Oven 6 Air Filter Cleaning 6 Stirrer Cover Cleaning 6 Utensil Guide 7 Heating Tips 7 Before you call for service 8 Questions and Answers 8 Specifications 9 ...

Page 3: ...G it is hazardous for anyone other than a competent person to carry out any service or repair operation that involves the removal of a cover which gives protection against exposure to microwave energy f WARNING only allow children to use the oven without supervision when adequate instructions have been given so that the child is able to use the oven in a safe way g WARNING liquids and other foods ...

Page 4: ...ating as the power cable supplied with the oven Wipe the interior and the door seal with a damp cloth before using your microwave oven for the first time Stacking Instructions 1 Place one microwave oven on top of the other one and remove the securing plates that are held by a single screw to the bottom right corner at the rear of both microwaves Secure in the above hole of the two microwaves 2 Rem...

Page 5: ...and the percentage of power these relate to Power Level Display Approximate Percentage of Power HI 100 70 70 50 50 20 20 00 0 1 2 3 4 7 6 5 8 Manual Heating To heat food manually using a specific heating time and power level 1 Open the door and place food in the oven Close the door HELLO will show in the display 2 Press button When HI shows in the display the power level is full power The indicato...

Page 6: ...0 seconds to cool the oven down after operation Changing Preprogrammed Button Settings 1 Open the door Display turns off 2 Press and hold button for 5 seconds When the oven enters Programming mode PROGRAM will show in the display 3 Select the number button to be programmed 1 0 The display will show the program number selected See note below 4 Press button to select desired power level If HI shows i...

Page 7: ...tification Beep CODE 3 0 The oven will beep when multi stage heat changes to the next stage CODE 3 1 No beep when multi stage heating changes to the next stage Adjusting Maximum Possible Heating Time CODE 4 0 Maximum Heating Time is 60 minutes CODE 4 1 Maximum Heating Time is 10 minutes Changing Number Of Preprogrammed Heating Choices CODE 5 0 10 preprogrammed settings available 0 9 CODE 5 1 200 p...

Page 8: ...ensure stirrer cover is replaced should it become damaged or disfigured Air Filter Cleaning The air filter must be kept clean at all times Failure to keep it clean will result in oven overheating and possible oven repairs to the user 1 Remove the screws at the lower left and right sides of the Air Filter 2 Carefully remove filter 3 Wash filter in hot soapy water to remove all blockages 4 Wipe air ...

Page 9: ...n be used to retain moisture and prevent spattering Heating Tips Moisture Content Many fresh foods e g vegetables and fruit vary in their moisture content throughout the season For this reason heating times may have to be adjusted Dry ingredients e g rice pasta can dry out during storage so heating times may differ Density Porous airy foods heat more quickly than dense heavy foods Cling Film Cling ...

Page 10: ...ure in my microwave oven after heating A The moisture on the side walls of your microwave oven is normal It is caused by steam while heating food Q Does microwave energy pass through the viewing screen in the door A No The metal screen reflects the energy back into the oven cavity The holes in the door are made to allow light to pass through No microwave energy passes through Q Why do eggs sometim...

Page 11: ...thing Power Consumption 2200W Microwave Output Power 1400W Frequency 2450MHz Net Weight APPROX 31kg 75 1lbs Outside Dimensions W X H X D 465 X 370 X 599 mm Cavity Dimensions W X H X D 371 X 199 X 372 mm Timer 60 min Power Selections 5 LEVELS Speci cations are subject to change without notice ...

Page 12: ......

Page 13: ...MODEL CM 1401T B U Y E R COUNTRY 호주향 상업용 인 쇄 중국 MEMO 총 12p _pdf 받아서 작업 150629 총 2p 표지 9 150630 총 1p 9 150714 총 2p 표지 표4 _이승헌 님 연락처 VISION 담 당 방 문 수 chois TEL 730 0660 FAX 730 3788 VISION CREATIVE INC 서울 종로구 통의동 6번지 이룸빌딩 4층 ABOUT THIS MANUAL ABOUT THIS MANUAL ...

Reviews: