background image

2

SAFET

Y

 INFORMATION 


Please read and understand this entire manual before attempting to assemble, operate or install the 
product. Failure to follow the dangers, warnings and cautions contained in this owners manual may 
result in a fire or explosion causing damage to property, serious bodily injury or death. 

W

ARNING 

• The installation of this product must conform with local codes or, in the absence of local codes,with 

either the National Fuel Gas Code, ANSI Z223.1/NFPA 54, OR CAN/CGA-B149.1, National Gas 
and Propane Installation Code. 

• FOR OUTDOOR USE ONLY! This appliance shall be used only outdoors in a well-ventilated

space and shall not be used in a building, garage, or any other enclosed area. 

• USE PROPANE GAS ONLY! 
• Use only with a propane gas tank (sold separately). Do not attach to a remote gas supply. 
• Propane gas is not natural gas. Only use propane gas for this fire table. 
• The conversion or attempted use of natural gas in a propane unit or propane gas in a natural gas unit 

is dangerous and not recommended. Doing so may void your warranty. 

• Never use charcoal or any other solid fuel in the fire table. 
• During ignition procedure, you should never get your face close to the burner as an unnoticed flame 

may light up and cause injury. 

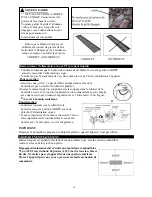
• LP GAS WARNING: Do not exceed 1/4 in. depth of lava rocks directly above burner holes.Apply -

ing too much media may result in unburned gas pooling in fire table. Ventilation is r equired to allow

 fresh air into enclosure and for any residual gas to escape. 

• If you see, smell or hear the hiss of escaping gas from the propane gas tank:  

1. Disconnect propane gas tank.  
2. Do not attempt to correct the problem yourself.  
3. Get to your gas supplier and/or the fire department for help. 

• Do not operate the fire table if there is a gas leak present. 
• Never use a flame to check for gas leaks. 
• The max. inlet supply pressure: max. gas supply 11 inch w.c. (2.74kPa). 
• The gas pressure regulator provided with the fire table must be used. 
• Use LP propane gas tanks only with these required measurements: 12 in. (diameter) x 18 in. ( tall) 

with 20 lb. capacity maximum. 

• Propane tank used must include a collar to protect the propane gas tank valve. 
• Never fill the propane gas tank beyond 80% full. 
• Propane gas tank supply system must be arranged for vapor withdrawal. 
• Do not use a propane gas tank with a damaged valve and any other worn out parts. A dented or 

rusty propane gas tank may be hazardous and should be checked by your gas supplier prior to use. 

• Do not burn any other materials than are supplied with and intended for use in this fire table. 
• Lava rocks could hit somebody’s face or eyes during initial start of this unit, so please keep away 

from the fire table for the first 20 minutes after it has been ignited. 

• Do not operate fire table unless it is completely assembled and all parts are in place. 
• Pay attention when operating the fire table. It is hot when in use and should never be left unattended. 

Do not move it while in operation. 

• Do not use this fire table for cooking. 
• Do not put any other fireplace cover or anything flammable on, beneath or around the fire table. 
• Users should be alerted to the hazards of high surface temperatures and keep a safe distance to

avoid burning or clothing ignition. 

• Do not sit on the fire table. Do not rest feet or hands on the fire table. 
• Never lean over the open fire table or place hands or fingers on the upper portion of an operational 

unit. 

• Keep any electrical supply cords and the fuel supply hose away from any heated surfaces. 
• Combustible materials should never be within 72 inches of the top, 48 inches of the back or sides of 

the fire table. 

• This fire table must be attended at all times! 

Summary of Contents for BH7001-4

Page 1: ...r must be discon nected when appliance is not in use OWNER S MANUAL READ BEFORE USE Model No BH7001 4 Item No 67906 WARNING Do not store or use gasoline or other flammable vapors and liquids in the vi...

Page 2: ...ate the fire table if there is a gas leak present Never use a flame to check for gas leaks The max inlet supply pressure max gas supply 11 inch w c 2 74kPa The gas pressure regulator provided with the...

Page 3: ...lit The maximum gas supply pressure is 250psi Clothing or other flammable materials should not be hung from the appliance or placed on or near the appliance Any guard or other protective device remov...

Page 4: ...the paper honeycomb board rounding the firebowl STEP 1 B 1 Turn the firebowl heads up on a flat ground 2 Cut off the binding tape on the paper honeycomb board and remove all the paper honeycomb board...

Page 5: ...er cap of the Electric Igniter place a AAA battery into the case Make sure the pole towards the cap Screw the cap back to the battery case tightly See Figure D 5 Evently distribute the lava rocks on t...

Page 6: ...cylinder valve is in the OFF position before disconnecting the gas supply Hold the regulator with the one hand and loosen the black coupling nut by turning it counter clockwise with the other hand See...

Page 7: ...to the PILOT position Continue to push the control to light the pilot flame Note For initial start or after any cylinder change hold Control Knob IN for 2 minutes to purge air from gas lines before pr...

Page 8: ...nd turn burner control knob clockwise to the PILOT position Normally burner will make a slight popping sound when extinguished Main burner will extinguish but Pilot flame will remain ON 2 To extinguis...

Page 9: ...is obstructed Check hose for bends or kinks Spider webs or insect nest in the venturi end of burner tube or pilot housing Clean the venturi or pilot housing Burner ports are clogged Insert an opened p...

Page 10: ...ner will not light using a match above IF YOU HAVE QUESTIONS OR CONCERNS PLEASE CALL BOND TOLL FREE 1 866 771 BOND 2663 EXPEDITE YOUR REQUEST FEEL FREE TO EMAIL US Customer service bondmfg com OR VISI...

Page 11: ...ontenir le mercure Ne la mettez pas dans le feu ni au rebut Jetez la pile comme d chet dangereux GUIDE D UTILISATION LIRE AVANT L UTILISATION No de mod le BH7001 4 No d article 67906 MISE EN GARDE Il...

Page 12: ...us du br leur Des quantit s excessives peuvent entra ner une accumulation de gaz non br l dans le foyer de jardin La ventilation est n cessaire pour permettre l air frais de p n trer et au gaz r sidue...

Page 13: ...la bouteille de propane lorsque le foyer de jardin n est pas utilis Ne rangez pas une bouteille de propane de rechange ou d branch e sous le foyer de jardin ou proximit du foyer de jardin ou de tout a...

Page 14: ...s de lave 2 Les pierres de lave peuvent frapper quelqu un au visage ou aux yeux lors du premier allumage de cette unit veuillez donc vous carter de l appareil pendant les premi res 20 minutes apr s so...

Page 15: ...foyer 3 Coupez l attache fixant le r gulateur au support en m tal et le laissez de c t pour l installation la bouteille de propane TAPE 2 1 V rifiez chaque pi ce avant d utiliser le produit Assurez v...

Page 16: ...lateur Ins rez le mamelon de l accouplement de la soupape dans le robinet de la bouteille et serrez l crou d accouplement en le tournant dans le sens horaire avec une main tout en tenant le r gulateur...

Page 17: ...R ALLUMER CONSEILS Avant de commencer Lire et bien comprendre les instructions V rifier et s assurer que toutes les pi ces soient pr sentes des fins de r f rence ult rieure garder ce livret d instruct...

Page 18: ...t rieur de l cran AVERTISSEMENT Les pierres de lave peuvent devenir tr s chaudes NE PAS les toucher moins qu elles soient compl tement refroidies 3 Localiser le bouton de contr le du br leur et s assu...

Page 19: ...faut d brancher la bouteille de propane et l entreposer l ext rieur avant qu on puisse entreposer l appareil l int rieur Utilisez uniquement les pi ces de rechange et accessoires approuv s ou fournis...

Page 20: ...v e Tourner le bouton OFF ARR T fermer la valve du r servoir de propane et d brancher le r gulateur du r servoir Tourner le bouton HIGH LEV Attendre 1 minute Tourner le bouton OFF ARR T Rebrancher le...

Page 21: ...contener mercurio No la ponga en un fuego o la basura Desh gase de la pila como desechos peligrosos MA LEER ANTES DE USAR No de modelo BH7001 4 No de art culo 67906 ADVERTENCIA No almacene ni use gaso...

Page 22: ...Si ve huele o escucha el silbido del gas que se escapa desde el tanque de gas propano 1 Descon ctelo 2 No intente corregir usted mismo el problema 3 Solicite ayuda a su proveedor de gas o al departam...

Page 23: ...mesa con fog n durante un per odo prolongado Limpie los contactos de la bater a y los del dispositivo antes de instalar la bater a No agrande los orificios de la v lvula ni los puertos del quemador c...

Page 24: ...de presi n y ensambles de manguera deber n ser espe cificados o provistos por BONDMANU FACTURING CO Revise la manguera antes de cada uso del aparato Si la manguera tiene indicios de craqueos abrasi n...

Page 25: ...tanque de Propano PASO 2 1 Revise cada pieza antes de usar el producto Aseg rese que el sistema de suministro de gas est APAGADO antes de montar V ase Figura C 2 Quite la caja que contiene la roca de...

Page 26: ...rte la boquilla del acoplamiento de la v lvula en la v lvula del cilindro y apriete la tuerca negra de acoplamiento gir ndola en el sentido de las agujas del reloj con una mano mientras mantiene el re...

Page 27: ...UGERENCIAS Antes de empezar Lea detenidamente y comprenda las instrucciones Verifique y aseg rese de que todas las piezas se encuentran presentes Guarde esta hoja de instrucciones para referencia futu...

Page 28: ...O las toque si no se enfriado completamente 3 Ubique la perilla de control del quemadory aseg rese que se encuentra en la posici n APAGADO OFF 4 Usando guantes antit rmicos coloque una cerilla larga e...

Page 29: ...es mantenga el encerramiento de la bombona limpio y sin residuos Cuando el quemador y las piedras de lava se hayan enfriados totalmente use un cepillo suave para deshacerse de manchas peque as sucieda...

Page 30: ...xceso de flujo Gire la perilla de control a la posici n APAGADO OFF cierre la v lvula del tanque LP y desconecte el regulador del tanque Gire la perilla de control a la posici n ALTO HI Espere 1 minut...

Reviews: