18
Cleaning
Cleaning
Cleaning
Cleaning and Maintenance
and Maintenance
and Maintenance
and Maintenance
WARNING:
WARNING:
WARNING:
WARNING:
•
Always disconnect the appliance from the power
supply before cleaning and user maintenance.
•
Do not use steam cleaners for cleaning the appli-
ance; moisture could enter electrical components.
Risk of electric shock!
Risk of electric shock!
Risk of electric shock!
Risk of electric shock! Hot steam could damage
the plastic parts.
•
The appliance must be dry before restarting oper-
ation.
CAUTION
CAUTION
CAUTION
CAUTION::::
•
Do not use a wire brush or other sharp, abrasive
items.
•
Do not use any acidic or abrasive detergents.
•
Do not damage the refrigerant circuit.
Cleaning the appliance including interior
Cleaning the appliance including interior
Cleaning the appliance including interior
Cleaning the appliance including interior
•
Clean the appliance interior, the exterior surfaces,
the accessories and the door seal regularly with
warm water and mild detergent.
•
Remove the appliance content and storage it at a
cool location.
•
Clean the surfaces with a clean sponge, hand
washing liquid and warm water; or with a clean,
damp microfibre cloth without cleaning agent.
•
Clean the thaw water discharge channel / opening
carefully e.g. with a pipe cleaner.
•
After everything was thoroughly dried, you can
restart the operation.
•
Wipe at least once a year the dust that has accu-
mulated on the appliance back and condenser
(metal grille). To do this, use a soft brush or a
vacuum cleaner.
Defrosting
Defrosting
Defrosting
Defrosting
The appliance has an automatic defrosting system.
During defrosting water drops drains off at the back
of the cooling chamber. The thaw water running
through a channel, is collected in a drip tray located
on the compressor, where it will evaporate. Make
sure the water discharge opening does not get
clogged. A light formation of ice on the interior back
during operation is normal.
Changing the bulb
Changing the bulb
Changing the bulb
Changing the bulb
LED
LED
LED
LED llllamp data: max. 10 W / 220
amp data: max. 10 W / 220
amp data: max. 10 W / 220
amp data: max. 10 W / 220----240V
240V
240V
240V
•
Loosen the lamp cover screw and remove the
cover.
•
Replace the defective bulb.
•
Replace the lamp cover and secure it.
Troubleshooting
Troubleshooting
Troubleshooting
Troubleshooting
Before you contact an authorized specialist
Before you contact an authorized specialist
Before you contact an authorized specialist
Before you contact an authorized specialist
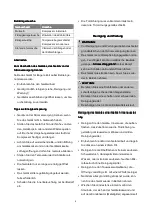
Problem
Problem
Problem
Problem
Cause / Action
Cause / Action
Cause / Action
Cause / Action
Unit is not
working
properly or
at all
∙ Check the power supply / temperature
setting / ambient temperature.
∙ Unblock the ventilation openings,
install the appliance freely.
Loading is
too warm
∙ Check the temperature setting / ambi-
ent temperature. ∙ Open the door only
as long as necessary.
Loud noise
during oper-
ation
∙ Check the appliance position.
∙ See the section “Operating noise”.
Water on the
appliance
bottom
∙ Check the temperature setting /
water
discharge channel or opening.
Light does
not work
∙ Check the power supply.
∙ See “Changing the bulb”.
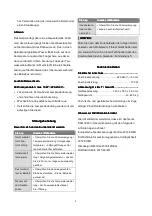
NOTE:
NOTE:
NOTE:
NOTE:
If a problem still persists after following the steps
above, contact your trader or an authorized techni-
cian.

