background image

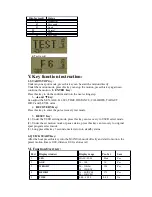
Display result

Status

 F1

Wonderful

F2

Very good

F3

Good

       F4

Normal

       F5

Poor

F6

Very Poor


● Test result

V.


Key function instruction:

1. START/STOP

 Key


Under anyone sport mode, press this key can be start the motion directly.
Under the motion mode, press this key can stop the motion, press this key again can 
continue the motion.  

2. ENTER  Key:

Press this key to do the confirm and into the next setting step. 

3.


and

 ▼ 

key:

Can adjust the SEX, AGE, H.t, W.t, TIME, DISTANCE, CALORIES, TARGET 
H.R.C and LEVEL value.

4.

RECOVERY Key: 

Press this key to enter the pulse recovery test mode. 

5.

RESET Key: 

(1). Under the USER setting mode, press this key can recovery to USER select mode. 
(2). Under the set motion mode or pause status, press this key can recovery to original
sport program select mode.
(3). Long press this key 3 seconds, meter return to standby status.

6. QUICK START Key:

After the boot press this key into the MANUAL mode directly and start to motion, the
preset motion time is 0:00, distance 0:00, calories is 0.

VI. Function Overview: 

Part 

Display window

Display range

Pre-Set 

Save

1

SEX

MALE/ FEM

Male

Yes

2

AGE

10 - 100 

30

Yes

3

WEIGHT

20 - 330(Lb)
10 - 150(KG)

150

Yes

4

HEIGHT

36 - 84(INCH)
90 – 210(CM)

175

Yes

5

TIME

0:00 - 99:59

 0: 00

No

Summary of Contents for EXT600

Page 1: ......

Page 2: ...102 Handle assembly left 1 103 Handle assembly right 1 108 Computer 1 114 Frame rear cover 1 115 Plastic pedal set left 1 116 Plastic pedal set right 1 117 Grab handle cover left front 1 118 Grab hand...

Page 3: ...2...

Page 4: ...on Nut M12xP1 75 19 2 138 Round head Philips screw M6X20 8 139 Truss Philips screw M4X12 20 140 Truss Philips screw M 4X16 2 141 Truss Philips screw ST4X16 16 142 Wrench SEA1013 1 143 Screwdriver Plas...

Page 5: ...1...

Page 6: ...sher 157 Nut 153 on Rear Stabilizer 70 and Frame 1 u u Control wire Control wire 2 Set Upper Frame Cover 39 on Upright 62 and connect Upper Controller Wire with Lower Controller Wire At the first plea...

Page 7: ...control wire that from 108 and then tight the fixed the computer 108 on the upright 62 with truss Philips screw 113 L R 4 First Set the Wave Washer 150 on the Frame 1 Then attach left and right Pedal...

Page 8: ...75 76 to Upright with Screw 151 and Washers 149 127 When assembly pay attention to the L and R tabs on the Handrails 6 Aim at the L and R tabs on Handrail and Rocker and then tight the left right Han...

Page 9: ...IONS 5 Set Grab handle cover 63 and Wave Washer 128 on the Upright Assemble left and right Rocker 75 76 to Upright with Screw 151 and Washers 149 127 When assembly pay attention to the L and R tabs on...

Page 10: ...he left right Handrail 102 103 and left right rockers 75 76 with Screw 131 Truss hex screw 134 Washers 163 130 and Nylon Nut 153 ASSEMBLY INSTRUCTIONS 7 Assemble left and right Rockers 75 76 and left...

Page 11: ...st frame s level let middle adjustment foot pad higher to the frame hang in the air Then adjust rear adjustment foot pad of the frame to let frame be level and adjust middle adjustment foot pad to flo...

Page 12: ...1 Assembly the Joint Pole Cover 122 123 on the left and right Rocker with Philips screw 139 Then assembly glide rail cover 121 with truss Philips screw 140 in glide rail Can be appropriately lay on th...

Page 13: ...th Philips screw 139 and the tighten the glide rail connecting rod cover 124 125 with Philips screw 141 ASSEMBLY INSTRUCTIONS 13 Insert Adapter 126 into power plug of Frame 1 Be sure to check the Adap...

Page 14: ......

Page 15: ......

Page 16: ...R key to confirm the select enter the SEX setting flashing display SEX on the right of the screen Press or key to select female and male 2 Press ENTER key to confirm the SEX enter the AGE setting flas...

Page 17: ...nce LEVEL setting press or key to setting the resistance level Press ENTER key to confirm the resistance level and enter the target TIME setting press or key to setting the target time Press ENTER key...

Page 18: ...LORIES setting Press or key to setting the calories value 2 If select the Tag Pres ENTER key to confirm select TAG and enter the target PULSE setting Press or key can setting the target pulse value Pr...

Page 19: ...ERY Key Press this key to enter the pulse recovery test mode 5 RESET Key 1 Under the USER setting mode press this key can recovery to USER select mode 2 Under the set motion mode or pause status press...

Page 20: ...No 8 SPEED 0 0 99 9 0 0 No 9 PULSE 30 200 bpm 0 No 10 RPM 0 250 rpm 0 No 11 USER U0 U4 U0 Yes 12 BRAKE RESISTANCE LEVEL L1 L24 L1 No VII Figure Instruciton 1 Program mode figure MANUAL PROGRAM FITNES...

Page 21: ...P4 P5 P6 P7 P8 P9 P10 P11 P12...

Page 22: ...3 H R C 55 75 90 Tag HRC 55 HRC 75 HRC 90 HRC Tag...

Page 23: ......

Reviews: