background image

 INSTALLING THE POOL LINER 


16


These instructions only apply to overlap liner installation. Follow the liner manufacturer’s instructions 
for other style liners.


IMPORTANT: 

Only attempt to install the liner on a warm and sunny day, preferably above 72 °F (22° 

C). Unfold the liner and put it in the sun for 2 hours. This helps to soften the liner. If the temperature is 
below 60° F (16° C), the liner will be hard and rigid and quite difficult to handle.


CAUTION: 

Have 2 or 3 helpers for the following liner installation steps.


Carefully place the liner inside the pool at the center of the pool floor. Do not to disturb the 
smoothed dirt floor. Extend it evenly until the seam between the wall and floor panels reaches the 
base of the pool in the center of the protective cove. Smooth out any wrinkles in the liner


(see diagram 22). Straighten the liner wall seam and so it is perpendicular to the ground.


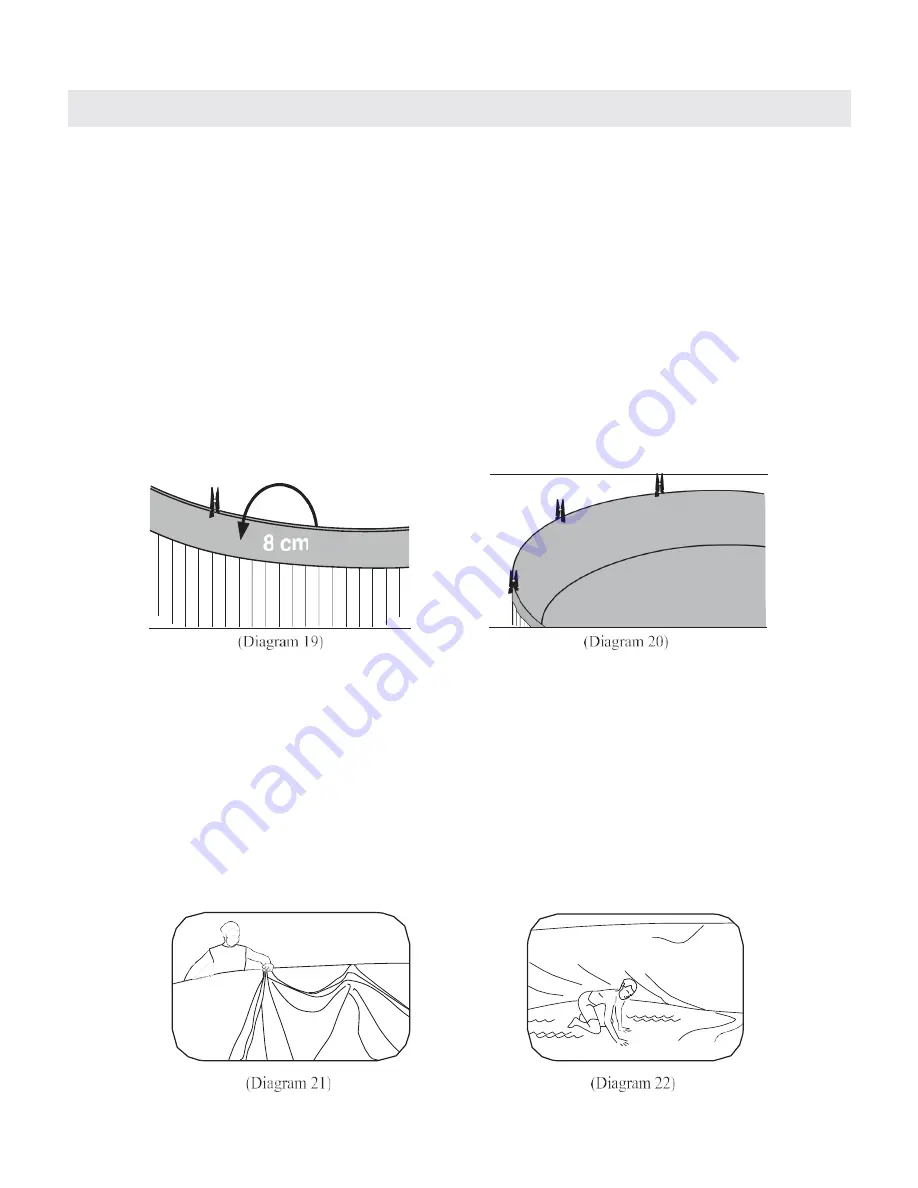
Drape the pool liner over the pool wall. There should be an overlap of about 3-in (8-cm) over the 
pool wall height (see diagram 19 and 20). Temporarily hold the overlap in place with clothes pins.


Confirm the pool liner is placed evenly inside the wall (see diagram 21). If the liner is tight, stretch it 
to fit smoothly on the inside of the wall. If the liner placement fails, it may not be centered properly 
in the pool.


Check if the overlap is uniform. The pool liner should only be touching the pool floor in the center 
of the pool. If it’s not, pull up an additional 3-in of the liner over the wall and re-pin with the 
clothes pins.


Start filling the pool and continue until there is about 1-ft of water in the pool. As the water 
stretches the liner down to the pool floor and against the pool wall , release some of the excess 
overlap material. Before preceding further, recheck to see if the water is level, if not, something is 
wrong, and the liner and the pool wall will need to be removed to re-level the pool area.


Summary of Contents for NB19784

Page 1: ...ALT AND CAPRI ROUND 36 IN AND 48 IN STEEL WALL POOL WITH 1 25 IN TOP RAIL INSTRUCTION MANUAL Questions problems missing parts Before returning to your retailer call our Consumer Hotline at 1 800 759 0...

Page 2: ...LIST 7 SELECTING A SUITABLE SITE 9 POOL SETUP 10 LEVELING THE AREA 11 ASSEMBLING THE POOL RAIL 12 INSTALLING THE POOL WALL 12 MEASURING THE POOL WALL 14 PROTECTIVE SAND CUSHION 15 INSTALLING THE POOL...

Page 3: ...e of issues during assembly or use of this product please contact our Consumer Hotline at 800 759 0977 for immediate assistance before contacting your retailer Please read the warranty information at...

Page 4: ...owning Extreme caution must be exercised to prevent unsupervised access by children To avoid accidents ensure that children cannot use the pool unless they are always supervised by an adult NEVER LEAV...

Page 5: ...bers near a phone and the pool Teach your children to swim Keep any object that could be used by a child to climb into the pool at least 4 ft away from the side of the pool Read these safety instructi...

Page 6: ...ion Flotation devices are not a substitute for adult supervision Do not leave toys near or in the pool with no supervision Always keep the water clear and sanitized Store the water treatment products...

Page 7: ...may differ Report missing or damaged parts immediately to have them replaced For damaged or replacement parts contact Blue Wave Customer Service at 800 759 0977 Pool Liner Top Bottom Rail Rail Connect...

Page 8: ...20 10 NBP6069 M6X11 BOLT 20191012 20 20 11 NBP6070 M6 WASHER 20191013 20 20 12 NBP6071 PLASTIC BOLT CAP 20191014 20 20 15 ft x 48 in Pools BW No Parts Description MFG No COBALT 15 ft x 48 in CAPRI 15...

Page 9: ...pump and other pool accessories Easy access to a water source Protection from wind if possible A site for easily watching children Not acceptable Sloping ground Concrete asphalt sandy gravel and swamp...

Page 10: ...e a helper hold a tape measure or a string and mark off the pool perimeter using flour chalk or spray paint Remove all sod inside the pool area to 1 ft 30 cm beyond the dimensions of the pool 2 If the...

Page 11: ...ensure that the site is completely level see diagram 4 Remove the higher ground rather than filling the low laying ground see diagram 5 Once the pool site is completely leveled debris removed and grou...

Page 12: ...TALLATION ON A WINDY DAY CAUTION It is advisable to wear protective gloves when handling the metal wall CAUTION Have 2 or 3 additional people for the installation of the pool wall into the bottom rail...

Page 13: ...ced on the base rail at the location you have selected for the electric supply of the filtration system For 36 in wall pools you should position the wall so that the 2 round holes are at the location...

Page 14: ...to make sure the differences of each diameter and width measured are within 0 8 in 2 cm see diagram 14 CAUTION Try not to damage any of the components if disassembling the pool wall to correct the gro...

Page 15: ...the pool wall see diagram 17 and 18 The size should be 6 in H x 6 in W so that it completely seals the bottom rail but does not distort the pool liner When the cove is complete re smooth the rest of t...

Page 16: ...nd so it is perpendicular to the ground Drape the pool liner over the pool wall There should be an overlap of about 3 in 8 cm over the pool wall height see diagram 19 and 20 Temporarily hold the overl...

Page 17: ...he circle until all top rails are joined together see diagram 24 Do not cut the excess liner overlap from the outside of the pool wall yet If you cut off the overlap it will make the next installation...

Page 18: ...m to prime the filter pump Once the filter skimmer and hose fittings have been installed continue filling the pool FILLING THE POOL WITH WATER Before filling the pool with water thoroughly check to se...

Page 19: ...gate closest to the pool TO ATTACH THE DECALS AND SIGNS 1 Peel the paper from the back of each decal or sign Position as indicated in the images to the right Diagram 27 Diagram 28 VE R 0 3 21 2 Press...

Page 20: ...and other instructions in the filtration system manual 4 Clean the liner regularly with non abrasive brushes or an approved vacuum system 5 Run filtration system at least one full day before using the...

Page 21: ...s The pool must be used for the intended recreational purposes only All transportation costs for components replaced under warranty are the responsibility of the pool owner Pool components being retur...

Page 22: ...date of purchase The warranty registration form is located in your safety and warning package All warranty claims must be submitted to Blue Wave Products 1745 Wallace Avenue St Charles IL 60174 At le...

Page 23: ...ET 48 POUCES AVEC RAIL SUP RIEUR DE 1 25 POUCE MANUEL D INSTRUCTIONS Des questions des probl mes des pi ces manquantes Avant de retourner chez votre d taillant appelez notre ligne d assistance aux con...

Page 24: ...ES PI CES 29 SCHOISIR UN EMPLACEMENT AD QUAT 31 INSTALLATION DE LA PISCINE 32 NIVELLEMENT DU SITE 33 ASSEMBLER LES RAILS 34 INSTALLER LE MUR DE LA PISCINE 34 MESURER LE MUR DE LA PISCINE 36 COUSSIN DE...

Page 25: ...utilisation de ce produit veuillez contacter notre service d assistance t l phonique aux consommateurs au 800 759 0977 pour obtenir une aide imm diate avant de contacter votre d taillant Pour plus de...

Page 26: ...dentelle Il faut faire preuve d une extr me prudence pour emp cher les enfants d y acc der sans surveillance Pour viter les accidents veillez ce que les enfants ne puissent utiliser la piscine que sou...

Page 27: ...tique Affichez les num ros de t l phone d urgence pr s d un t l phone et de la piscine Apprenez vos enfants nager Gardez tout objet qui pourrait tre utilis par un enfant pour grimper dans la piscine u...

Page 28: ...ulte Les dispositifs de flottaison ne remplacent pas la surveillance d un adulte Ne laissez pas de jouets pr s de la piscine ou dans la piscine sans surveillance Gardez toujours l eau claire et d sinf...

Page 29: ...gnalez imm diatement les pi ces manquantes ou endommag es pour qu elles soient remplac es Pour les pi ces endommag es ou de remplacement contactez le service la client le de Blue Wave au 800 759 0977...

Page 30: ...69 BOULON M6X11 20191012 20 20 11 NBP6070 RONDELLE M6 20191013 20 20 12 NBP6071 COUVRE BOULON EN PLASTIQUE 20191014 20 20 Piscines de 15 pieds x 48 Po BW No Description des pi ces MFG No COBALT 15 ft...

Page 31: ...scine Acc s facile une source d eau Une protection contre le vent si possible Un emplacement permettant de surveiller facilement les enfants Pas acceptable Sol en pente B ton asphalte gravier sableux...

Page 32: ...ir un ruban mesurer ou une corde et de d limiter le p rim tre de la piscine l aide de farine de craie ou de peinture en a rosol Enlevez tout le gazon l int rieur de la zone de la piscine jusqu 1 pied...

Page 33: ...s de long une planche de 2 pouces x 4 pouces pour vous assurer que le site est compl tement de niveau voir sch ma 4 Une fois le site de la piscine compl tement nivel les d bris enlev s et le sol liss...

Page 34: ...nseill de porter des gants de protection lors de la manipulation de la paroi m tallique ATTENTION Pr voyez 2 ou 3 personnes suppl mentaires pour l installation de la paroi de la piscine dans le rail i...

Page 35: ...r le rail de base l endroit que vous avez choisi pour l alimentation lectrique du syst me de filtration Pour les piscines paroi de 36 pouces vous devez positionner la paroi de fa on ce que les deux tr...

Page 36: ...er que les diff rences de chaque diam tre et de chaque largeur mesur s ne d passent pas 2 cm 0 8 pouce voir sch ma 14 ATTENTION Essayez de n endommager aucun des composants si vous d montez la paroi d...

Page 37: ...mme 17 et 18 La taille doit tre de 6 pouces de hauteur x 6 pouces de largeur afin de sceller compl tement la rampe inf rieure mais de ne pas d former le rev tement de la piscine Une fois la bordure te...

Page 38: ...sur le fond de la piscine au centre de la corniche de protection Redressez la couture de la paroi du liner pour qu elle soit perpendiculaire au sol Placez le rev tement de la piscine sur la paroi de l...

Page 39: ...s sup rieurs soient joints voir sch ma 24 Ne coupez pas encore le surplus de recouvrement du liner l ext rieur de la paroi de la piscine Si vous coupez le chevauchement cela rendra l tape d installati...

Page 40: ...tre Une fois le filtre l cumoire et les raccords de tuyau install s continuez remplir la piscine ol REMPLIR LA PISCINE D EAU Avant de remplir la piscine d eau v rifiez soigneusement s il n y a pas de...

Page 41: ...arri re la plus proche de la piscine POUR FIXER LES D CALCOMANIES ET LES PANNEAUX 1 D collez le papier au dos de chaque d calcomanie ou panneau Positionnez les comme indiqu dans les images droite Diag...

Page 42: ...manuel du syst me de filtration 4 Nettoyez r guli rement le liner avec des brosses non abrasives ou un syst me d aspiration approuv 5 Faites fonctionner le syst me de filtration au moins un jour comp...

Page 43: ...t me de filtration et les autres accessoires La structure de la piscine doit tre install e conform ment aux instructions du fabricant La piscine doit tre utilis e uniquement des fins r cr atives pr vu...

Page 44: ...antie se trouve dans votre trousse de s curit et d avertissement Toutes les demandes de garantie doivent tre soumises Blue Wave Products 1745 Wallace Avenue St Charles IL 60174 Au moins 6 photos montr...

Reviews: