background image

           Thank you for purchasing this fine-scale model!  This bridge has been designed for easy 
assembly, exceptional durability, and ease of mounting.  Please feel free to contact us if you have 
any comments or concerns. Should an issue arise, spare parts are available for purchase.  

  Glue:  Any medium CA (super) glue.  (Super glue accelerator might also come in handy.)
  Hobby Knife:  A sharp hobby knife is imperative for cutting etched metal pieces from the          

frame in which they come.  (Be careful with sharp blades; use eye protection while cutting!)

  File:  To remove any burs left behind when the parts are cut from their etched frame.
  Paint:  Any flat black paint.  We recommend using an air brush to apply the paint.  It is easy to 

cover the small details with paint applied by brush.  Silver & White paint are needed as well.

  Toothless Pliers:  To aid in bending things such as the ladder supports, signal heads, etc.  

*Toothless pliers decrease the risk of causing damage to delicate, etched-metal parts.

  Toothpicks:  Come in handy when applying glue or small dabs of “touch-up” paint.

Materials/Tools  Needed

Materials/Tools  Needed

Cantilever Signal Bridge Instructions

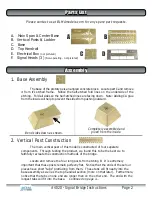
Please read through all instructions before assembling and painting this structure.

         Modeled after a common Santa Fe protoype, this 
Cantilever  Signal  Bridge  has  been  in  use  all  over  the 
country for well over a half century.  Sturdy construction 
and a solid design has allowed these bridges to last into 
the new millennium.  The photos to the right are of the 
prototype bridge this kit is modeled after.  Replaced on 
the 1st of August, 2006, this relic survived long enough 
to see BNSF come to power over Santa Fe rails.

THE PROTOTYPE

THE PROTOTYPE

#4020

#4020

THE MODEL

THE MODEL

     Our HO Scale model of this interesting bridge is an 
exact scale replica of the prototype.  If you look closely, 
you will notice that everything down to the rivet detail is 
in  place!    Because  a  solid  model  starts  with  solid 
dimensions  and  drawings,  all  of  the  information  used 
was  taken  directly  from  the  prototype.    The  model 
photos to the right were taken at the same angle as the 
prototype photos to show how exact this model is.

BLMA Models

16623 Pear Blossom Ct.

Whittier, California  90603

Phone: 562-712-7085

[email protected]

S

#4020 - Signal Bridge Instructions              
Summary of Contents for Cantilever Signal Bridge

Page 1: ...aterials Tools Needed Cantilever Signal Bridge Instructions Cantilever Signal Bridge Instructions Cantilever Signal Bridge Instructions Please read through all instructions before assembling and painting this structure Modeled after a common Santa Fe protoype this Cantilever Signal Bridge has been in use all over the country for well over a half century Sturdy construction and a solid design has a...

Page 2: ...led and glued from the inside 2 Vertical Post Construction The main vertical post of this model is constructed of four separate components Through testing the product we found this to be the best we to faithfully recreate the construction methods of the bridge Locate and remove the four long posts from etching B It is extremely important that these posts remain perfectly flat Notice that the ends ...

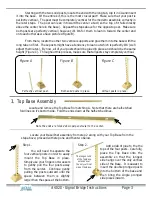
Page 3: ...l Figure A Perfectly vertical post Figure B Figure C Both solid posts in place All four posts in place Locate and remove the Top Base from etching A Note that there are half etched fold lines on it s bottom side Fold the ends down at the half etched lines Locate your Base Post assembly from step 2 along with your Top Base from the step above proceed with step one and then two below You will need t...

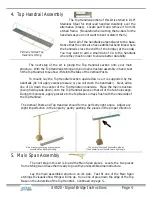
Page 4: ...mount lay the Top Handrail section upside down so it is supported by the handrails do not apply excess pressure or you will crush the handrails Next add a line of CA down the center of the Top Handrail underside Place the main structure being held upside down onto the Top Handrail piece so that all of the tab holes align During this process apply pressure to the Top Base so it lays flush with the ...

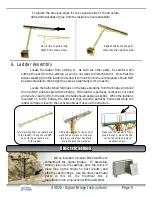
Page 5: ...e bridge the tabs will then become perfectly horizontal while the ladder will taper closer to the vertical posts as it rises up the structure Run a line of glue along dotted line see arrow Repeat the same steps to complete the opposite side Fold mounting tabs perpendicular to the ladder These should NOT be perfectly perpendicular to the ladder Add a dab of glue to the ends of each tab and place on...

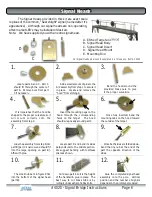
Page 6: ...the mounting tabs on the hood toward the outside of the target 6 5 4 7 8 9 12 11 10 Glue the assembly from step 6 into part B part C s narrow end should fit into the large opening on part B Affix with glue Locate part D and bend its sides perpendicular to the middle portion We suggest bending with toothless pliers as shown Once both sides are folded down bend the tiny nub at the end of the part th...

Reviews: