background image

7 BBL Insulated Hybrid Brewhouse V1 

© Blichmann Engineering, LLC 2018 

For replacement parts, visit: blichmannengineering.com/genuine-replacement-parts

7

Chillers:

 Sanitize the chiller by either pumping StarSan or similar copper friendly sanitizer through the chiller.  Alternately the chiller may be submerged 

(fittings up) into a pail of sanitizer.  Drain the chiller after the recommended time with the fittings facing down.  Connect the chiller per the instructions 

on the nameplate.  

Drain off the first gallon or so of wort from the boil kettle to a waste drain to eject any solids in the piping and to ensure only clear wort flows through the 

chiller, use the higher drain point to prevent plugging.  Then divert the flow to the chiller.  Adjust the wort flow and/or the cooling water flow to achieve 

the desired wort temperature to your fermentor.

IMMEDIATELY

 after use back-flush the chiller with hot water to eject any solids and wort.  IMMEDIATELY soak the chiller, with fittings up, in PBW or 

other copper friendly cleaning agents for 30 min or pump through the chiller.  Rinse with hot water and then soak in sanitizer.  Allow to drain, with fittings 

down, then store with the chiller horizontal.  Following this procedure consistently will give you a very long service life for your chiller.

Pumps:

 The pumps included with the system 

MUST NOT

 run dry or the impeller bearing surface will be damaged!  This is NOT covered under warran

-

ty.  Ensure the hoses and pump head are filled with liquid before turning on the pump.  If you hear a loud squeal stop the pump immediately!

Caution: 

NEVER restrict the inlet to the pump.  Always place flow throttling valves on the OUTLET of the pump ONLY.  Failure to do this will cause 

cavitation in the pump possibly leading to failure of the impeller.  If you hear any grumbling or grinding in the pump STOP IMMEDIATELY as this is 

cavitation.  Cavitation failures are NOT covered under warranty.

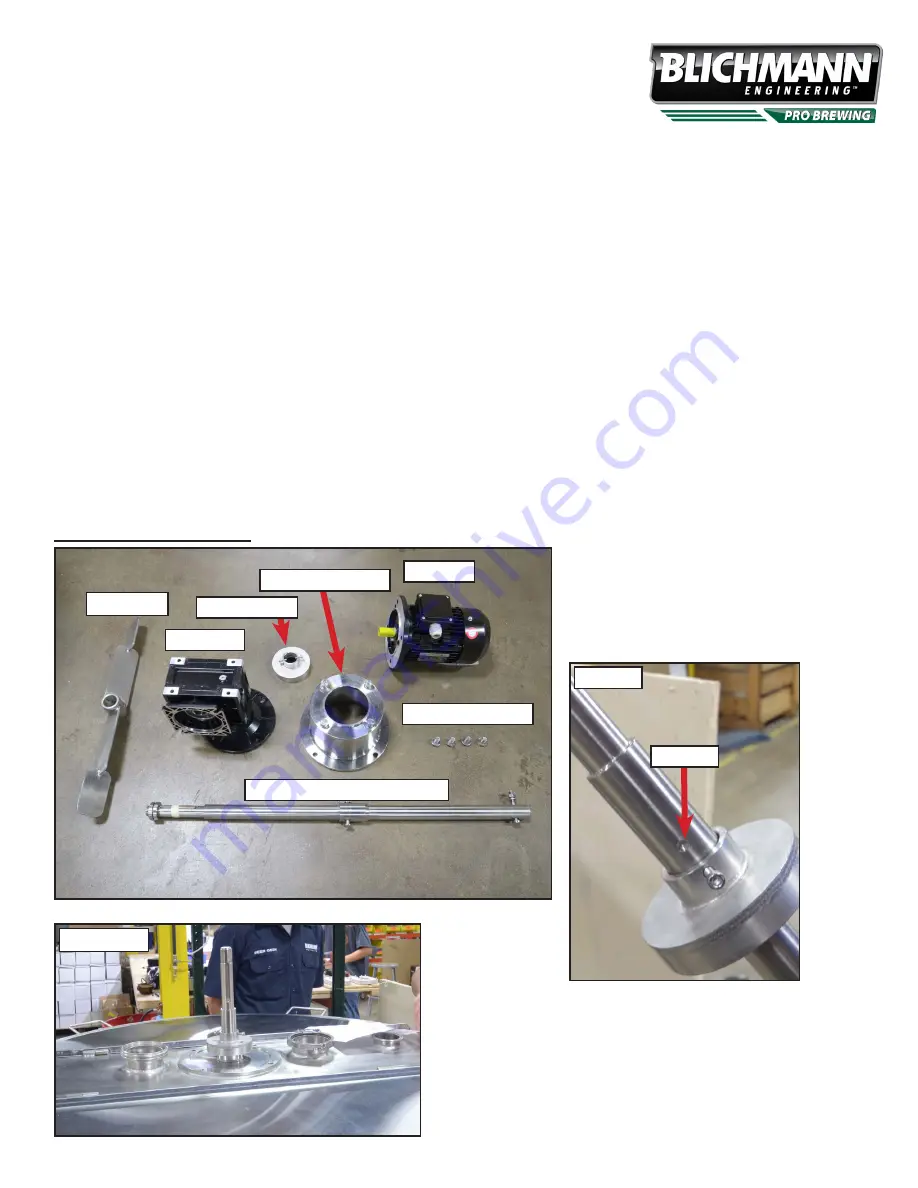
Installing the Mash Rake

Motor

Gear Box

Gear Box Mount

Impeller

Two Piece Impeller Shaft

Shaft Collar

Step 1:

 Dissasemble the two piece impeller shaft by 

removing the cotter pin. Remove the threaded nuts 

from the top of the impeller shaft. 

Slide the shaft collar over the impeller shaft as shown 

in 

Figure 1

. Screw the mounting bolts into the divots 

on the impeller shaft. 

Nuts and Bolts

Divot

Figure 1

Step 2:

  Place the shaft into the kettle as shown in Figure 2.

Figure 2

Summary of Contents for 7 BBL

Page 1: ...cifically be followed to ensure satisfactory results with the product WARNING CAUTION IMPORTANT IMPORTANTINFORMATION PLEASEREADANDTHOROUGHLYUNDERSTANDTHISMANUALPRIORTOUSE FORIMPORTANTSAFETYINFORMATION What sIntheBox Item Number Description Quantity BEPS BK 7BBL 7 BBLBoil Kettle 1 BEPS HLT 7BBL 7 BBLHot Liquor Tank 1 BEPS MLT 7BBL 7 BBLMash Tun with Mash Rake and Motor 1 Control Panel 1 Sanitary He...

Page 2: ... table below It is recommended that you consult your local codes and consult with a professional prior to purchasing or installing your ventilation equipment For recommendations on professional ventilations contact a Blichmann Engineering Pro Brewing representative Total power for the Boil Kettle is 36 KW Rules of Thumb Summary Heat Load Factor 1 CFM per 100 BTU hr gas or 34 CFM per KW electric Ho...

Page 3: ...7 BBL Insulated Hybrid Brewhouse V1 Blichmann Engineering LLC 2018 For replacement parts visit blichmannengineering com genuine replacement parts 3 CONTROL PANEL ...

Page 4: ...ply Main GFI Breaker Heating Element Breakers Heating Element Contactors Main Power GFI Breaker This industrial grade GFI ground fault interrupting breaker is the connection point for main power cables connected to the panel Consult your local codes to determine if you can utilize this breaker as a main disconnect as well In any case we highly recommend a suitable disconnect switch be installed pr...

Page 5: ...consult your local codes to determine what type of cable is acceptable what gauge is required and maximum lengths of flexible cable allowed Remove the purple jumper wire from BFS 1 and 24VDC and wire in the low level float switch for the Boil Kettle Remove the purple jumper wire from GFS 1 and 24VDC and wire in the low level float switch for the Hot Liquor Tank Float Switch Wiring RTD s The brewho...

Page 6: ...witches to the control panel use a continuity tester on the leads to ensure that the switch is open when in the down empty position and is closed has continuity in the up full position At that time wire to the panel CAUTION The low water level switches are a backup to an unintended energizing of the heaters They are NOT intended to be normal shutoff switches and solely relied upon to keep the heat...

Page 7: ... then soak in sanitizer Allow to drain with fittings down then store with the chiller horizontal Following this procedure consistently will give you a very long service life for your chiller Pumps The pumps included with the system MUST NOT run dry or the impeller bearing surface will be damaged This is NOT covered under warran ty Ensure the hoses and pump head are filled with liquid before turnin...

Page 8: ...aft Align the key with the groove in the gear box as you lower the gear box onto the shaft Use the 4 bolts to bolt the gear box to the gear box mount shown in Figure 4a Lift the impeller shaft on the inside of the kettle and tighten the nuts above the gear box Figure 4b Step 5 Place the star end of the gearbox adapter into the gear box as shown in Figure 5 Align the motor shaft with the gear box a...

Page 9: ..._______ B Limitations of Warranty 1 Any implied warranty that is found to arise by way of state or federal law including any implied warranty of merchantability or any implied warranty of fitness is limited in duration to the terms of this limited warranty and is limited in scope of coverage to this warranty Blichmann Engineering disclaims any express or implied warranty including any implied warr...

Reviews: