background image

5

AUDIO

VIDEO

-  IN  -

MODE

SCRN

MENU

V.SRC

TV-MONITOR WIDE VISION

MODE

SCRN

MENU

V.SRC

,,,

,,,

yyy

yyy

Video input terminal (AV-IN 2)

(3,5ø-Mono)

Audio input terminal (AV-IN 2)

(3,5ø-Stereo)

 Monitor Control Function

OPEN/CLOSE

,,,

,,,

yyy

yyy

,,,,

,,,,

yyyy

yyyy

,,,

,,,

,,,

,,,

yyy

yyy

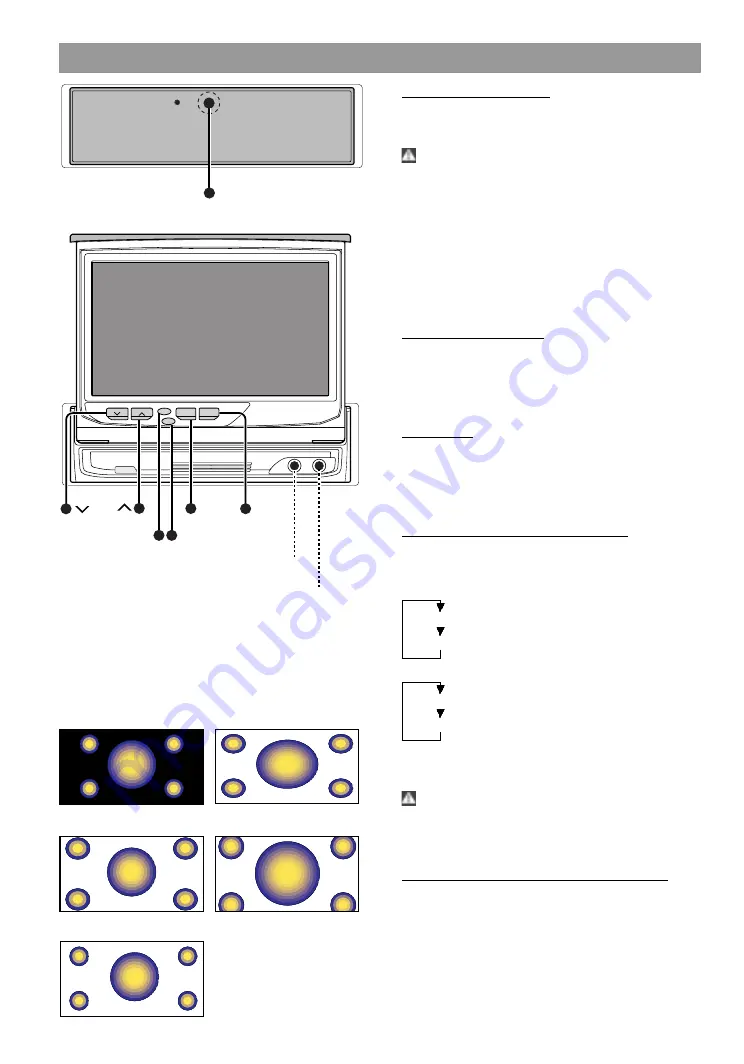
Normal mode

Full mode

Just mode

Zoom mode

Cinema mode

Opening the Monitor

1

Set the vehicle’s parking brake.

2

Press the OPEN/CLOSE button. The monitor will
open.

Caution!

The gearshift lever or other parts may interfere with the
monitor when it opens. If so, move the gearshift lever
(being sure to do so safely) before operating the set.
(The monitor is drawn back in automatically if it
cannot be opened normally due to an obstacle.)

Note

The monitor cannot be opened unless the parking
brake is set.

The position to which the monitor slides or angle
when the power is turned on can be set (Refer to
the angle control screen on (Page 7).

CIosing the Monitor

Press the OPEN/CLOSE button. The monitor will
close.

Note

The monitor cannot be opened unless the parking
brake is set.

Power Off

Hold down the OPEN/CLOSE button for one second or
more to turn the set’s power off.
Press the OPEN/CLOSE button to turn the power on.

Note

The monitor will not retract.

Switching the Monitor’s Picture

Each time you press the V.SRC button, the monitor’s
picture switches as follows:

AV IN setting during “VD” (Page 9)

Television or Video 1 or Video 2

Navigation (RGB pictures)

AV IN setting during “NAV” (Page 9)

Television or Video 1 or Video 2

Navigation (Video 1 pictures)

Note
The video 1 will not select when the, “IN-OUT’’ switch
is set to “OUT” (Page 31).

Caution!

You cannot view television and video pictures whilst
the vehicle is moving. To enjoy television and video
pictures, find a safe place to park and engage the par-
king brake.

Switching the TV/Video Picture Mode

Each time you press the MODE button, the picture
mode switches between full (FULL), zoom (ZOOM),
just (JUST), cinema (CINEMA) and normal (NORMAL).

Summary of Contents for TV-MONITOR wide vision TravelPilot DX

Page 1: ...Navigation TV MONITOR wide vision Operating instructions K7 VKD 8 622 402 815 02 2001...

Page 2: ...n 9 System Setting Screen 2 9 Setting the Auto Scroll Display Function SCROLL 9 Setting the Touch Sensor Tone BEEP 9 Setting the On Screen Display Function ON SCREEN 9 Returning to the Setting Screen...

Page 3: ...Y Search Screen 21 Disc Changer Control Function 22 Disc Changer Control Screen Main 22 Pausing and Restarting CD Play 22 Track Search 22 Fast Forwarding and Reversing Disc Play 22 Disc Search 22 Trac...

Page 4: ...xperience problems during installation con sult your Blaupunkt dealer If the unit does not seem to be working right try pressing the reset button first If that does not sol ve the problem consult your...

Page 5: ...en on Page 7 CIosing the Monitor Press the OPEN CLOSE button The monitor will close Note The monitor cannot be opened unless the parking brake is set Power Off Hold down the OPEN CLOSE button for one...

Page 6: ...urn the monitor s picture off Note The picture reappears when the one of the SCRN MENU MODE or V SRC buttons is pressed Switching to the Source Control Screen Press the MENU button to switch to the so...

Page 7: ...SCREEN to switch to the screen control screen Ending the Angle Control Screen Touch OK Brightness BRT Touch for a brighter screen Touch for a darker screen Red Green Level TIN Touch for a stronger gre...

Page 8: ...ayed in light pink Note Up to two disc changers can be operated Canceling the Menu Screen Touch RTN to switch to the source control screen for the current source Menu Screen System Setup Function RTN...

Page 9: ...uch to decrease the volume No display when the SP MODE is set to OFF Switching to the Setting Screen 2 Touch to switch to the setting screen 2 Ending the System Setting Screen Touch RTN to return to t...

Page 10: ...Touch RESET whilst the minute is below 30 rounds it off and whilst the minute is 30 or more rounds it up No display when the SYNC is set to ON Ending the Clock Adjustment Screen Touch RTN to return t...

Page 11: ...ansmit the signal You can start operating the unit again when Code AP PROVED appears in the display Ending the Code Security Screen Touch RTN to return to the setup menu screen System Setup Function N...

Page 12: ...ility the programme service name of the station is dis played along with the frequency advising you quickly which station is being received RDS Radio Data System stations also transmit frequency data...

Page 13: ...OFF to switch the function on and off ON AF function is turned on OFF AF function is turned off When no other stations with stronger reception are available for the same programme in the RDS network y...

Page 14: ...Screen 2 Touch to switch to the audio control screen 2 Turning the Loudness On Off LOUD This function amplifies low and high tones when the volume is turned down The LOUD indicator is displayed on th...

Page 15: ...ll not select when the IN OUT switch is set to OUT Page 32 Selecting the Channels Auto Seek Tuning AUTO1 Touch to seek for channels up the band Touch to seek for channels down the band Preset station...

Page 16: ...6 are shown in order When all the stations on a certain band have been stored in the preset memory the auto memory ent ry stops The tuner then plays the last station recei ved Selecting the Tuning Mod...

Page 17: ...se the channel Touch the right part to increase the channel The lower centre of the screen is touched whilst a TV video picture is displayed the audio source pic ture settings video out settings etc a...

Page 18: ...cies Touch to seek decreasing frequencies Preset Station Seek Tuning AUTO2 Touch to move to the next preset station i e the one with the next highest number and to move to the last preset station i e...

Page 19: ...touch of a button la ter This function is especially useful when you are travelling and do not know what station are availa ble Up to 6 frequencies can be stored this way 1 Select the band for auto me...

Page 20: ...ek function is turned on and reception starts to weaken the tuner automatically seeks stations with better reception If you are tuned to a station that is not a traffic in formation station itself but...

Page 21: ...nschaft S Varied Speech Verschiedenes S Pop Music Popmusik M Rock Music Rockmusik M Easy Listening Easy Listening Musik M Light Classics Leichte Klassik M Serious Classics Anspruchsvolle Klassik M Oth...

Page 22: ...the track function is turned on The first 10 seconds of each track are played tracks are played in order Stopping to Listen to the Track Being Scanned Touch or SCN again to stop the scan and keep on l...

Page 23: ...n selected play starts 2 To change the track being heard touch Another track is selected and played Note The random play function is cancelled when you stop playing a disc Magazine Random Play Functio...

Page 24: ...hrough the preset ting disc name function If you try to display the name of a disc that does not have one NO NAME is displayed instead If you try to display the title of a disc that does not have one...

Page 25: ...n enter up to 12 characters for each name To enter a space touch SPC A blank is inserted and the cursor moves to the right 6 Touch OK to finish name entry and leave the name preset mode Note If you wa...

Page 26: ...itor Note The button cannot be used Visual Function V SRC button Each time you press V SRC button the image video will switch between the navigation television and video MODE button Each time you pres...

Page 27: ...to auto 1 auto 2 and manual TUNE buttons Press the button to make decreasing seeks Press the button to make increasing seeks FM button Select and switch between the FM1 FM2 and FM3 bands AM button Sel...

Page 28: ...he ignition cables to a power source that can be turned on and off with the igniti on key If you connect the ignition cable to a power source that receives a constant voltage supply as with battery ca...

Page 29: ...osed to the front i e the embedding position is farthest back use the hard rubber frame Accessory 5 On cars where there is no compartment in the centre for installing a car audio unit Use the spacer A...

Page 30: ...30 Removing Unit Installation Accessory 4...

Page 31: ...ther than Travel Pilot DX N Wide Vision Set to OUT when connecting to another monitor When not connected to the FM AM TUNER wide vision this cable should be connected to the ground cable To car chassi...

Page 32: ...ve the protective strips from the antenna parts and the back of the antenna unit 3 Attach the double sided tape of the antenna pans and the antenna unit to the rear windshield glass Attach the double...

Page 33: ...anual dimmer is set The TV antenna and vehicle s radio are too close After Checking for short circuits in the cables replace the fuse with one ha ving the same rating Connect the same cable to the ign...

Page 34: ...into the disc magazine E 04 No disc has been loaded in the disc magazine Load a disc into the disc magazine The CD is quite dirty The CD is upside down The CD is scratched a lot Clean the CD and load...

Page 35: ...nna input 4 ch diversity 75 3 5 minijack External video input level miniplug 1 Vp p 75 External audio max input level miniplug 1 V 22 k External video input level RCA jacks 1 Vp p 75 External audio ma...

Reviews: