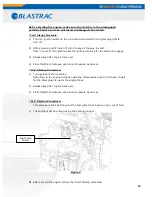

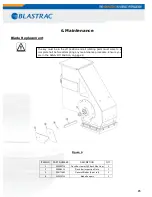
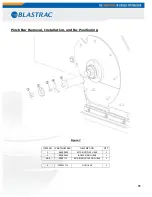
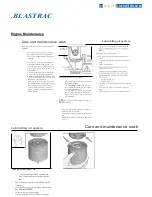


Pinch Bar Re-positioning:
MUST BE DONE EVERY 10 HOURS OF OPERATION.
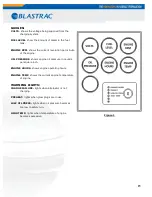
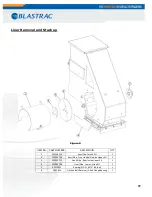
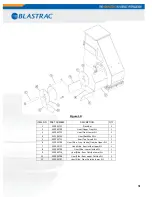
(See Figure 7 for item descriptions and locations)
1. Remove Item #1, Retainer/Outer Pinch Bar.
2. Rotate pinch bar, item #5, one notch. If the distance from the pinch bar to the blast
wheel blades is greater than 1/8” rotate the pinch bar another notch. Continue until
distance is no greater than
1/8”.
3. Reinstall Item #3.
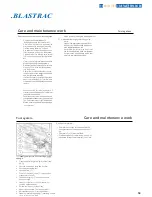
Pinch Bar Removal/Installation:
(See Figure 7 for item descriptions and locations)
1. Remove Item #3, Retainer/Outer Pinch Bar.
2. Remove Item #1, Retainer/Pinch Bar Indexer.
3. Remove Item #2, Indexer/Pinch Bar.
4. Insert slide hammer into the threaded hole in the end of the pinch bar, Item #1.
5. Withdraw the pinch bar from the blast head.
6. Blow out pinch bar area with compressed air.
7. Insert new pinch bar and tap into place with hammer.
8. Reinstall Item #2.
9. Reinstall Item #1.
10. Reinstall Item #3.
26
The key must be in the off position and all rotating parts must come to a
complete halt before attempting any maintenance procedure. Ensure you
are in the Safety Off Position, as described in page 8.
Summary of Contents for 1-16DB4-V2
Page 1: ...SERVICE MANUAL 1 16 DB4 V2 VERSION 1 1 www blastrac com 1 800 256 3440...
Page 36: ...Check for leaks after starting theengine...
Page 38: ...35...
Page 40: ...36...
Page 42: ...37...
Page 44: ...38...
Page 46: ...39...
Page 50: ...BLASTRAC RS IN SURFACE PREPARATION Figure 12 43...
Page 57: ...BLASTRAC VATORS IN SURFACE PREPARATION Blast Head Assembly Figure 14 48...