6
BLACOH Industries
Installation for Pump Discharge Pulsation
Depending on individual system conditions, dampener may require bracing. If necessary, a support fixture must be installed before dampener
operation. The dampener tee and system piping must be of sufficient strength for high pressure applications. An isolation valve of proper
pressure rating can be installed between the dampener and the tee to aid in dampener maintenance and repair.
Step 1 Installation Position
Install the dampener inline as close to the pump discharge as possible to absorb the pulse at its source and before any downstream equipment
such as risers, valves, elbows, meters or filters. Dampener installation should be no more than ten pipe diameters from pump discharge. If using
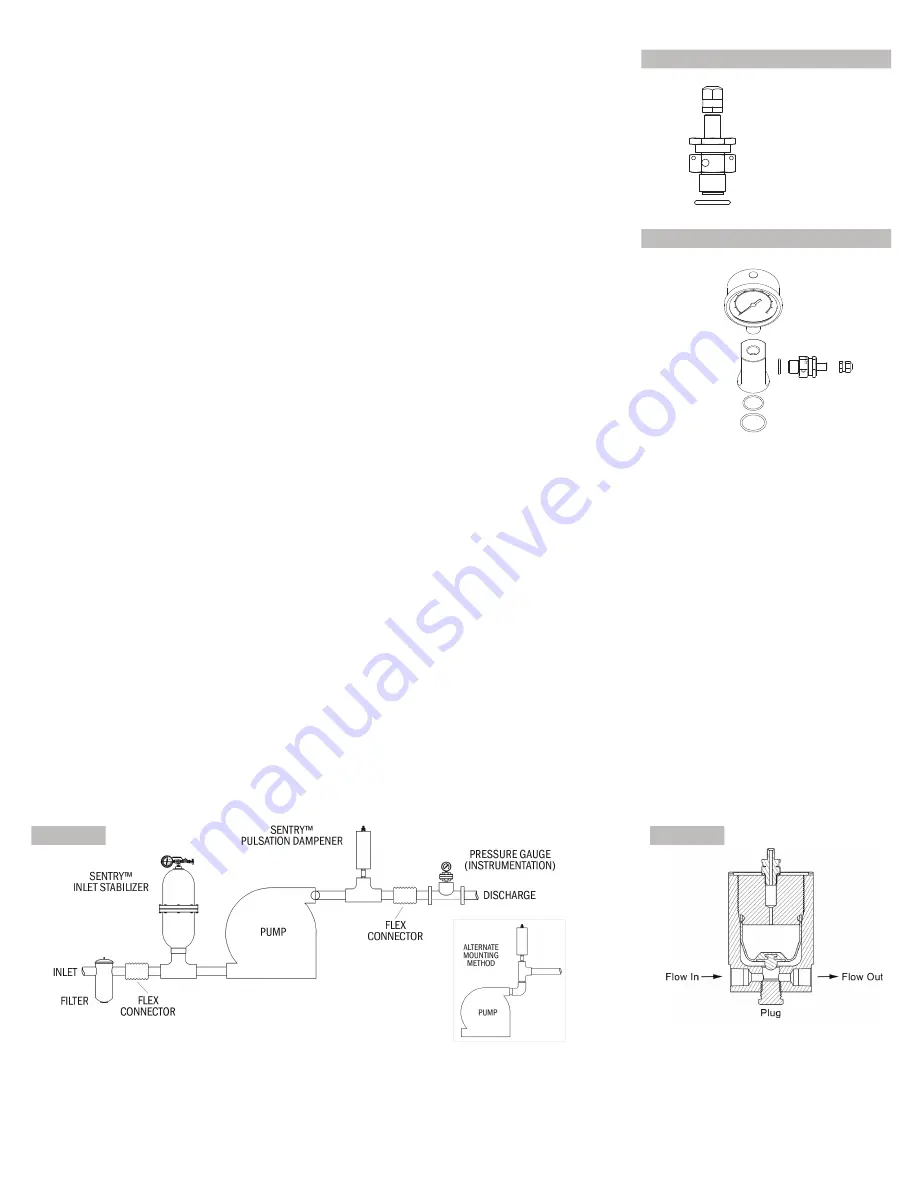
a flexible connector on the discharge side of the pump between the pump and system piping, the dampener should be installed at the pump
discharge manifold. The flexible connector should be attached to the dampener’s tee and system piping (Figure A). Since pressure is equal in
all directions, the dampener can be installed in a vertical, horizontal or upside-down position. A vertical installation is recommended for better
drainage of the dampener. Limitations for horizontal and upside-down mounting include high specific gravity, high viscosity, or settling of solid
material which could result in shortened bladder/bellows life and/or reduced dampening performance.
XPH Models with Flow Through Inlets:
XPH dampeners can be connected with the fluid inlet on one side and the outlet on the other side,
or connected with the fluid inlet on the bottom and the outlet on either side. For best performance, manufacturer recommends that the fluid
outlet be on the side and not on the bottom. Dampener will work with the outlet on the bottom but dampening performance may be slightly
reduced. Dampener will function as a standard dampener with one inlet/outlet on any of the three dampener ports; however, high frequency
dampening performance may be reduced. If a single inlet/outlet configuration is desired, best performance will be obtained from the bottom port.
Performance in this configuration will be essentially the same as a standard XP model dampener with a single inlet port. XPH dampener models
ship with factory installed plug in the bottom port (Figure B). This plug can be moved to any of the other two ports as needed. Any of the three
dampener ports can be the inlet or outlet port, or the dampener can be used as a tee using all three ports.
Figure A
Figure B
Step 2 Startup
Start the pump and observe the system pressure gauge, which should be mounted downstream of dampener. After approximately one minute,
pressure fluctuations should be reduced to a minimum. If pulsations are not minimal, the probable cause is an improper pressure charge in
dampener. Turn off the pumping system and repeat the steps in the
Charging Instructions
section above, making certain dampener charge
is at 80% of system pressure.
Note:
Dampener pressure charge may need to be adjusted slightly above or below the 80% level to maximize
performance.
Cap
Valve Opening Nut
O-Ring
Figure 1
Charging Valve
Fitting
Charging
Valve
O-Rings
Figure 2
Gauge Adapter Assembly
Pressure Seal Check
After charging, test for Nitrogen leaks by spraying a solution of soap and water on charging
valve and cap threads.
If any leaks are observed, refer to Maintenance, Inspection & Repair
section below to remove all pressure from dampener before proceeding.
After all pressure
has been removed from dampener, follow steps below to determine cause of leaks and repair
before recharging. Repeat pressure seal check until no leaks observed.
1. If bubbles appear at charging valve opening, charging valve needs to be tightened. Use a
suitable wrench to turn charging valve opening nut clockwise until it is tightly closed (Figure 1).
If bubbles appear at base of charging valve, check that charging valve is properly tightened into
dampener cap. Use a 3/4” (19 mm) deep socket and torque wrench to thread charging valve
and torque to specifications below based on dampener maximum allowable working pressure
(MAWP). Pressurize dampener and repeat pressure seal check. If leaks continue, proceed to
next step.
Torque Specifications:
0 to 10,000 psi
23-25 ft lbs (32-34 Nm)
10,001 to 15,000 psi
30–35 ft lbs (41-47 Nm)
2. Use a 3/4” (19 mm) deep socket to remove charging valve. Inspect charging valve O-ring
and replace if damaged. For models with optional Gauge Adapter Assembly (Figure 2), use a
suitable wrench to remove assembly fitting from dampener cap. Inspect assembly O-rings and
replace if needed. Pressurize dampener and repeat pressure seal check. If leaks continue,
proceed to next step.
3. If bubbles appear around cap threaded holes, there is a problem with the bladder/bellows
seal with the cap. Refer to
Maintenance, Inspection & Repair
section below to disassemble
charging valve and dampener cap. Inspect and replace parts as instructed.


