W
I R E L E S S
L
A U N D R Y
S
Y S T E M
I
N S T A L L A T I O N
O
V E R V I E W
Laundry Installation and Setup Guide
30
W
I R E L E S S
L
A U N D R Y
S
Y S T E M
I
N S T A L L A T I O N
O
V E R V I E W
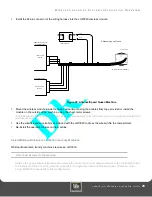
1
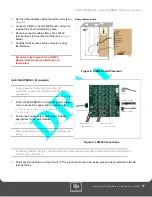
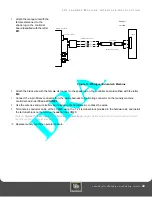
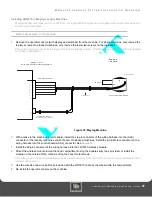
Attach the orange wire with the female disconnect to the spade lug on the controller board identified with the letter
M1
(see
Figure 21
).
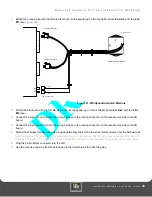
Figure 21: Whirlpool/Advantech Machine
2
Attach the black wire with the female disconnect to the spade lug on the controller board identified with the letter
M2
(see).
3
Connect the 4-pin connector from the wiring harness to the mating connector on the laundry machine controller
board.
4
Connect the 6-pin connector from the wiring harness to the mating connector on the laundry machine controller
board.
5
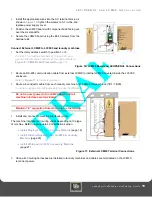
Mount the Wireless Interface Module using double-sticky tape or the two-sheet metal screws from the hardware kit.
Select a location near an outer panel and away from any heat source. The location must not exceed the reach of
the wiring harness (3 ft.). The LWI should be orientated vertically to get maximum range from the RF transceiver.
6
Plug the 22-pin Molex connector into the LWI.
7
Use the wire ties and wire tie blocks included in the hardware kit to dress the wires.
1
2
3
4
1
2
3
4
5
6
22-pin Connector
Wireless Interface Module
Female Spade Lugs
6-Pin Molex Connector
4-Pin Molex Connector
M1
M2
ORG
BLK

