Black BLK-CPT235VH User Manual Download Page 13

9

High Performance IR CCTV Bullet Camera User Manual

SECTION 3: SOFTWARE SETUP 


NOTE

When SENS-UP is activated, the increased magnification can induce noise and pixelation. 

RETURN:

 Select RET to save changes and return to the EXPOSURE menu, or END to close the SETUP menu.
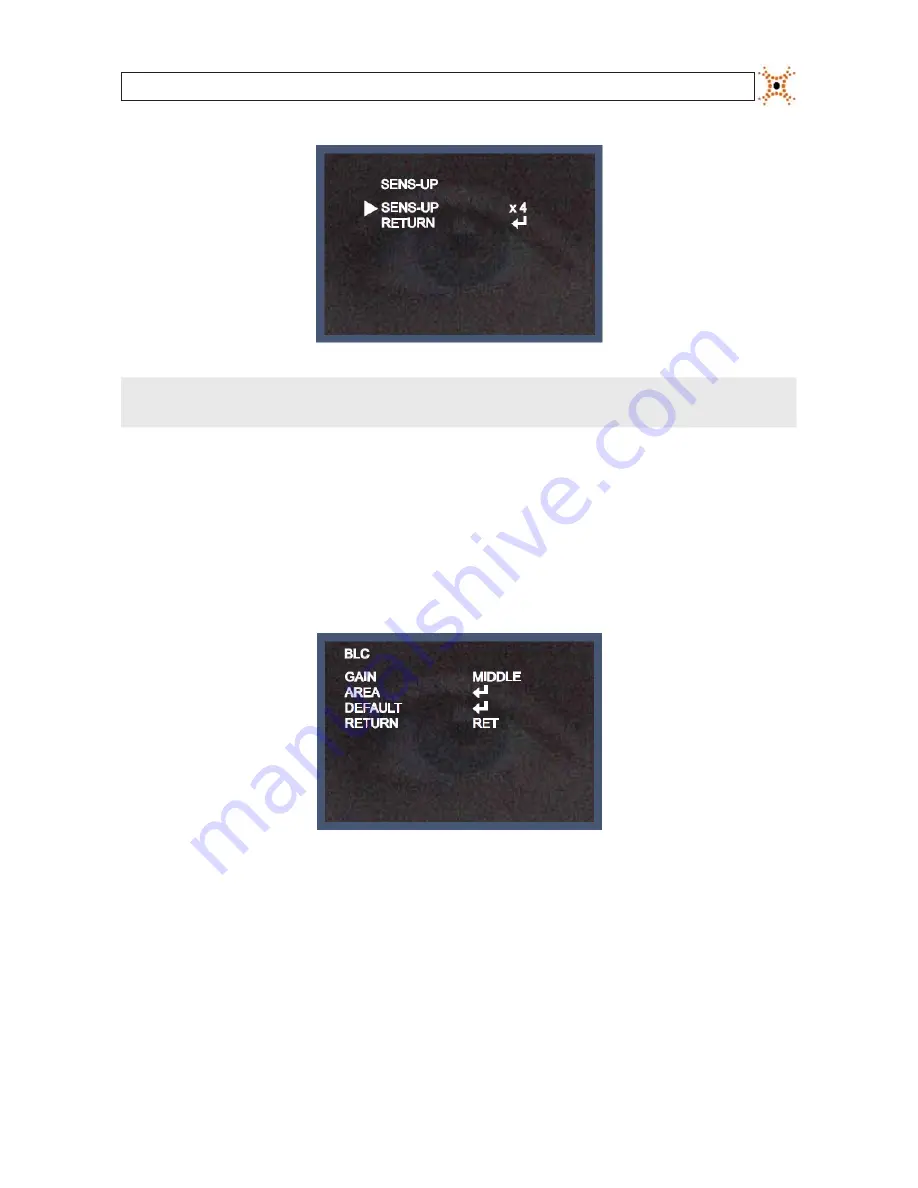
BLC

: Backlight control. This feature enables the camera to compensate for strong back light conditions.

OFF

: The BLC function is disabled. 

BLC

: The BLC function is enabled. Use the sub-menu to setup options. When selected, an area of the image where BLC is 

applied can be defined. 

GAIN

: Select LOW, MIDDLE, or HIGH. The current selection is applied to the image. 

AREA

: Select AREA to enter a graphical sub-menu for defining the position and size of the part of the image where 

BLC is applied. 

Summary of Contents for BLK-CPT235VH

Page 1: ...mera User Manual Products BLK CPT235VH BLK CPT237VH BLK CZT242VH BLK CZT243VH Please read this manual before using your camera and always follow the instructions for safety and proper use Save this ma...

Page 2: ...nterference at his own expense LEGAL NOTICE DIGIOP products are designed to meet safety and performance standards with the use of specific DIGIOP authorized accessories DIGIOP disclaims liability asso...

Page 3: ...2 Mounting the camera 4 2 3 Camera adjustments 5 SECTION 3 Software Setup 7 3 1 LENS 7 3 2 EXPOSURE 8 3 3 WHITE BAL 12 3 4 DAY NIGHT 13 3 5 3DNR 16 3 6 SPECIAL 16 3 7 Adjust 21 3 8 RESET 22 3 9 EXIT...

Page 4: ...e humidity is high Very high humidity levels can reduce image quality Do not install the camera under unstable lighting conditions Severe lighting change or flicker can cause the camera to work improp...

Page 5: ...High resolution color 600 TV Lines B W 650 TV Lines Next generation 3D DNR with 3D Filter Maximum sens up 258 0 Lux of minimum illumination OSD control functions DC auto iris varifocal lens 32 digital...

Page 6: ...2 www digiop com BLK CPT237VH CZT242VHCameras BLK CZT243VHCamera SECTION 1 INTRODUCTION...

Page 7: ...g surface Four 4 machined screws to secure the camera bracket to the base plate Hex wrench for adjusting the camera bracket Camera video test port to BNC adapter Power source adapter cable This manual...

Page 8: ...nting the camera The camera can be mounted on any surface with sufficient strength to support it The video power drop cable from the camera can be routed either through the cable hole in the center of...

Page 9: ...wide rings to frame the video image 8 Apply power to the camera 9 If using a hand held CCTV video setup monitor with your camera a Remove the cover to the OSD control panel by unscrewing it counter cl...

Page 10: ...e cameras is preset at the factory However an adjustment screw is provided on the OSD panel of the BLK CPT237VH BLK CZT242VH and BLK CZT243VH cameras for installations where the image brightness in da...

Page 11: ...owing BLK CPT235VHOSDControlPanel BLK CPT237VH BLK CZT242VH BLK CZT243VHOSDControlPanel Use the SETUP joy stick on the OSD control panel to navigate through the menu system Press the joy stick in towa...

Page 12: ...is used to select automatic AUTO or manual shutter speed control An FLK option is also provided to reduce flickering caused by the frequency of electric lighting If the FLK option is selected the SENS...

Page 13: ...ght control This feature enables the camera to compensate for strong back light conditions OFF The BLC function is disabled BLC The BLC function is enabled Use the sub menu to setup options When selec...

Page 14: ...or lower the bottom edge of the AREA Rock the joystick left and or right to contract or expand the AREA horizontally Press the joystick in twice to return to the BLC menu DEFAULT Select DEFAULT to rev...

Page 15: ...ition the upper left corner of the HSBLC area then push the joystick in to confirm your selection and enter the SIZE graphical submenu In the SIZE graphical submenu rock the joystick up or down to rai...

Page 16: ...D WDR is preset with default LOW LEVEL and HIGH LEVEL settings for normal outdoor lighting condition These settings can be adjusted in the OUTDOOR sub menu RETURN Select RETURN to return to the EXPOS...

Page 17: ...balance should be re adjusted MANUAL This option is used to make fine adjustments to the white balance setting To use this option Set the white balance using ATW or AWC Select MANUAL Rock the joystick...

Page 18: ...enu BURST Burst ON sends a color signal to the monitor in B W mode This signal does degrade the clarity of the image from the camera IR SMART This option controls the IR LED output level to compensate...

Page 19: ...u In the SIZE graphical submenu rock the joystick up or down to raise or lower the bottom edge of the AREA Rock the joystick left and or right to contract or expand the AREA horizontally Press the joy...

Page 20: ...noise in a low luminance environment OFF Deactivates 3DNR noise reduction ON Activates the noise reduction feature Selecting this option opens the 3DNR sub menu where the level of noise reduction can...

Page 21: ...position To move to a character position in the title highlight f or g to move left or right then press the joystick in To clear all entries in the title highlight CLR then press the joystick in To p...

Page 22: ...t the D ZOOM to a number greater than 1 Similarly adjust the PAN and TILT options to move to the portion of the image you want to zoom in on RETURN Select RETURN to return to the D EFFECT menu NEG IMA...

Page 23: ...to expand or contract the area horizontally Rock the joystick down or up to expand or contract the area vertically Press the joystick in twice to return to the MOTION submenu Move the cursor to SENSI...

Page 24: ...stick up down left or right to move the rectangle to the area you want to block then press the joystick in to select it In the SIZE display rock the joystick up or down to shorten or lengthen the heig...

Page 25: ...ation RETURN Select RET to return to the SPECIAL menu or END to close the SETUP menu 3 7 Adjust Use the adjust feature for perfecting the image from your camera SHARPNESS With the cursor pointing at S...

Page 26: ...u select RET to return to the SETUP menu or END to close the SETUP menu 3 8 RESET Use RESET to revert the camera configuration settings to the factory default values FACTORY Select FACTORY to reset th...

Page 27: ...23 High Performance IR CCTV Bullet Camera User Manual SECTION 3 SOFTWARE SETUP...

Page 28: ...ace with a soft cloth moistened with a mild detergent solution then rinse and dry it with a soft cloth Remove all foreign particles such as plastic or rubber materials attached to the camera housing T...

Page 29: ...ce ATW AWB Manual AWC g SET Electronic Shutter Speed AUTO 1 50 sec 1 60 sec 1 120 000 sec Sense Up Off Auto selectable limit 2 258x Gain Control High Middle Low Off selectable 3 DNR Off On 1 50 level...

Page 30: ...BLK CPT237VH BLK CZT242VH BLK CZT243VH Operating Temperature Humidity 4 F 140 F 20 C 60 C RH 95 Max StorageTemperature Humidity 4 F 140 F 20 C 60 C RH 95 Max Dimension 2 68 W 3 82 H 9 45 D 3 46 W 4 53...

Page 31: ...r If you have an intermediate device set the impedance 75 Hi Z properly and check the cable con nections The camera is not working properly and the surface of the camera is hot Verify that the camera...

Page 32: ...28 www digiop com APPENDIX B CAMERA DIMENSIONS APPENDIX B Camera Dimensions BLK CPT235VH 360 180 360 9 45 3 82 2 68...

Page 33: ...29 High Performance IR CCTV Bullet Camera User Manual APPENDIX B CAMERA DIMENSIONS BLK CPT237VH and BLK CZT242VH 360 180 360 3 46 4 53 9 65...

Page 34: ...30 www digiop com APPENDIX B CAMERA DIMENSIONS BLK CZT243VH 360 180 360 11 42 7 40 2 68 6 30 3 94 5 28 3 82 3 46...

Reviews: