background image

5

HOW TO USE

This product is for household  
use only. 

GETTING STARTED

• Remove all packing material, any stickers, 
and the plastic band around the power 
plug. 
• Remove and save literature.
• Please visit www.prodprotect.com/
blackanddecker to register your warranty.
• Wash all removable parts as instructed 
in CARE AND CLEANING section of this 
manual. 

CAUTION:

 Handle the s-blade and disc 

carefully. They are very sharp. 
• Select a level dry countertop where the 
appliance is to be used allowing air space 
on all sides to provide proper ventilation 
for the motor.

ASSEMBLING THE 
FOOD PROCESSOR 

Important:

 Always make sure your food 

processor is unplugged and placed on a flat, 
level surface before starting to assemble. 

Important: 

For your protection this 

appliance has an interlock system. The 
processor will not operate unless the cover 
is properly locked in place. 
1.  Fit the spindle to the top of the motor 

unit.

2.  Lower the workbowl onto the motor 

unit, aligning the   with the unlocked 
symbol  .  Then turn the workbowl 

clockwise, to lock it in place, aligning 
the   with the locked symbol  .

3.  Choose and install the attachment 

you need.

4.  Hold the workbowl cover with the feed 

chute slightly behind the workbowl 

handle, set it on the workbowl, then 

turn it clockwise, to lock the tab into 

the top of the handle.

5.  Insert the food pusher into the feed 

chute. 

6.  Make sure the control dial is turned to 

OFF (0). Plug in the appliance to turn 

it on. It is now ready to use. 

7.  Once finished, switch the appliance 

OFF (0) and unplug it.

8.  Turn the workbowl counter-clockwise 

and lift it off the motor unit.
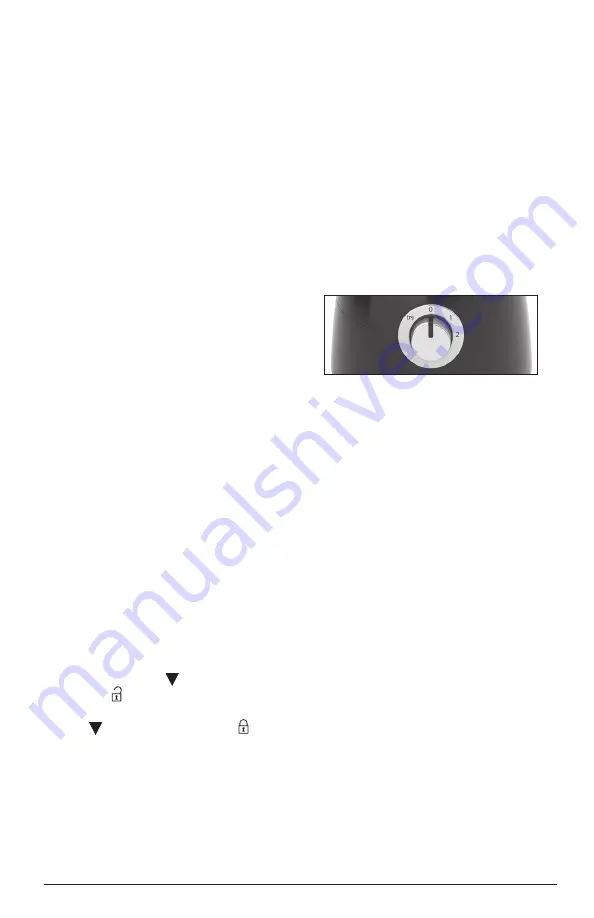
CONTROL DIAL 

Note:

 If the food processor does not 

run, make sure the workbowl and lid are 
properly locked and on the base. 

OFF

Turn the dial to OFF (0) to stop the food 
processor when it is running on LOW or 
HIGH. 

LOW

When the dial is turned to LOW (1), the 
processor will run at a low speed until the 
dial is turned to OFF.

HIGH

When the dial is turned to HIGH (2), the 
processor will run at a high speed until the 
dial is turned to OFF.

PULSE

Use PULSE for short processing tasks using 
the S-blade. This lets you control the size 
and uniformity of foods being chopped. 
• In order for the appliance to operate 
in PULSE mode, turn the speed control 
counter-clockwise to (( 

P

)) . This will give 

you a short burst at high speed. In this 
direction, the knob is spring-loaded. When 
you let go, it will return to 0

Summary of Contents for FP5500BC

Page 1: ...2 IN 1 FOOD PROCESSOR AND BLENDING SYSTEM ROBOT CULINAIRE ET M LANGEUR 2 EN 1 FP5500BC...

Page 2: ...urn to the store Si vous avez des questions ou des pr occupations propos de votre nouveau produit veuillez communiquer avec notre Service la client le au 1 800 465 6070 tats Unis et Canada Veuillez ne...

Page 3: ...e This product is designed for household use only Do not open lid until blade or disc stops completely The maximum rated wattage for this product was obtained with the blender blade This appliance is...

Page 4: ...20102000000301 7 Workbowl part no 2050200023 8 Spindle part no 2050201211 9 Control dial 10 Motor unit 11 S blade part no 2050201221 12 Dough blade part no 20102000006601 13 Creamer part no 2010200001...

Page 5: ...and install the attachment you need 4 Hold the workbowl cover with the feed chute slightly behind the workbowl handle set it on the workbowl then turn it clockwise to lock the tab into the top of the...

Page 6: ...lock it then lift it off Caution The S blade attachment is very sharp Use caution when handling and storing Important Never use your fingers to direct food through the feed chute 7 Turn the control di...

Page 7: ...slicing round fruits and vegetables through the processor cut a thin slice from the bottom so food will be more stable Place food cut side down in the feed chute Always remove seeds core and pits bef...

Page 8: ...ders c Soft foods d Hard foods e Ice 4 Place the lid on the jar Align the pips on the cap with the slots in the hole in the lid fit the cap and turn it clockwise to lock it 5 Plug power cord into outl...

Page 9: ...To crush ice fill blending jar 1 3 full of ice cubes Cover Using quick pulses pulse 6 to 8 times Allow ice to fall back towards blades between pulses Run blender on Low for 5 to 6 seconds to finish c...

Page 10: ...d nonabrasive cleaner Do not immerse base in liquid All removable parts can be washed by hand in hot water with dish soap or in the dishwasher top rack only Hand washing of plastic parts will help to...

Page 11: ...ss on Low for about 30 seconds or until desired consistency is reached 3 Serve with tortilla chips Look for cans of diced tomatoes with green chilies in the Mexican or International section of the gro...

Page 12: ...3 Put the remaining ingredients and 1 3 4 cup of the shredded cheese into the bowl with the diced jalape o Process on High for about 30 seconds to reach a smooth consistency 4 Pour the mixture into an...

Page 13: ...ith a reasonably similar replacement product that is either new or factory refurbished How do you get support Save your receipt as proof of date of sale Visit the online service website at www prodpro...

Page 14: ...bien fix le bol en place S assurer que le couvercle est bien verrouill avant d utiliser l appareil Cet appareil est quip d un dispositif de protection L appareil ne fonctionnera pas si le bol ne repo...

Page 15: ...u personnel des centres de service autoris s CORDON D ALIMENTATION a Un cordon d alimentation court est fourni pour viter qu un cordon long s emm le ou fasse tr bucher b Des rallonges lectriques sont...

Page 16: ...Disque minceur d chiqueteur pi ce n 2050200024 6 Arbre d entra nement pi ce n 20102000000301 7 Bol pi ce n 2050200023 8 Tige pi ce n 2050201211 9 Cadran de r glage 10 Bloc moteur 11 Lame en S pi ce n...

Page 17: ...ssoire souhait 4 Maintenir le couvercle du bol auquel est rattach l orifice d alimentation l g rement derri re la poign e du bol le placer sur le bol puis le tourner en sens horaire pour verrouiller l...

Page 18: ...er le couvercle le tourner en sens antihoraire pour le d verrouiller puis le soulever Mise en garde La lame en S est tr s tranchante Faire preuve de prudence pendant sa manipulation et son rangement I...

Page 19: ...aire 7 Tourner le couvercle du bol en sens antihoraire pour le retirer 8 Retirer soigneusement le disque minceur d chiqueteur Retirer le bol du bloc moteur 9 D brancher l appareil quand il ne sert pas...

Page 20: ...treenplacelorsquel appareilfonctionne Mise en garde Ne pas d poser le r cipient sur le socle lorsque le moteur est en marche 1 Placer le socle moteur sur une surface stable et plane 2 Placer le r cip...

Page 21: ...etits morceaux de 2 cm po et moins avant de les mettre dans le m langeur Au cours de la pr paration d aliments n cessitant l ajout de plusieurs ingr dients diff rents s assurer de toujours verser les...

Page 22: ...5 minutes avant de verser dans le r cipient ENTRETIEN ET NETTOYAGE Cet appareil ne contient aucune pi ce r parable par l utilisateur Confier la r paration un technicien qualifi Important Toujours d br...

Page 23: ...llants ne fournissent pas de services de r paration CONSEILS POUR LE NETTOYAGE Pour effectuer un nettoyage rapide verser dans le bol du robot culinaire ou le r cipient du m langeur 250 ml 1 tasse d ea...

Page 24: ...nce d sir e 3 Servir avec des croustilles au ma s Vous trouverez des bo tes de tomates en d s avec piments verts dans le rayon des produits mexicains ou internationaux de l picerie Hummus aux haricots...

Page 25: ...omage r p aux jalapenos en d s dans le bol M langer vitesse lev e pendant environ 30 secondes pour obtenir une consistance lisse 4 Verser le m lange dans un plat allant au four et lisser Garnir avec l...

Page 26: ...du service Conserver son re u de caisse comme preuve de la date d achat Visiter notre site web au www prodprotect com blackanddecker ou composer sans frais le 1 800 465 6070 pour obtenir des renseigne...

Page 27: ...27...

Page 28: ...of The Black Decker Corporation used under license All rights reserved BLACK DECKER et les logos et noms de produits BLACK DECKER sont des marques de commerce de The Black Decker Corporation utilis es...

Reviews: