background image

18

1.877.877.2269

BLACKBOX.COM

NEED HELP?

LEAVE THE TECH TO US

LIVE 24/7

TECHNICAL

SUPPORT

1.877.877.2269

CHAPTER 4: RS-VIEWER ESSENTIAL SETUP

4.3 DISPLAY SETTINGS 


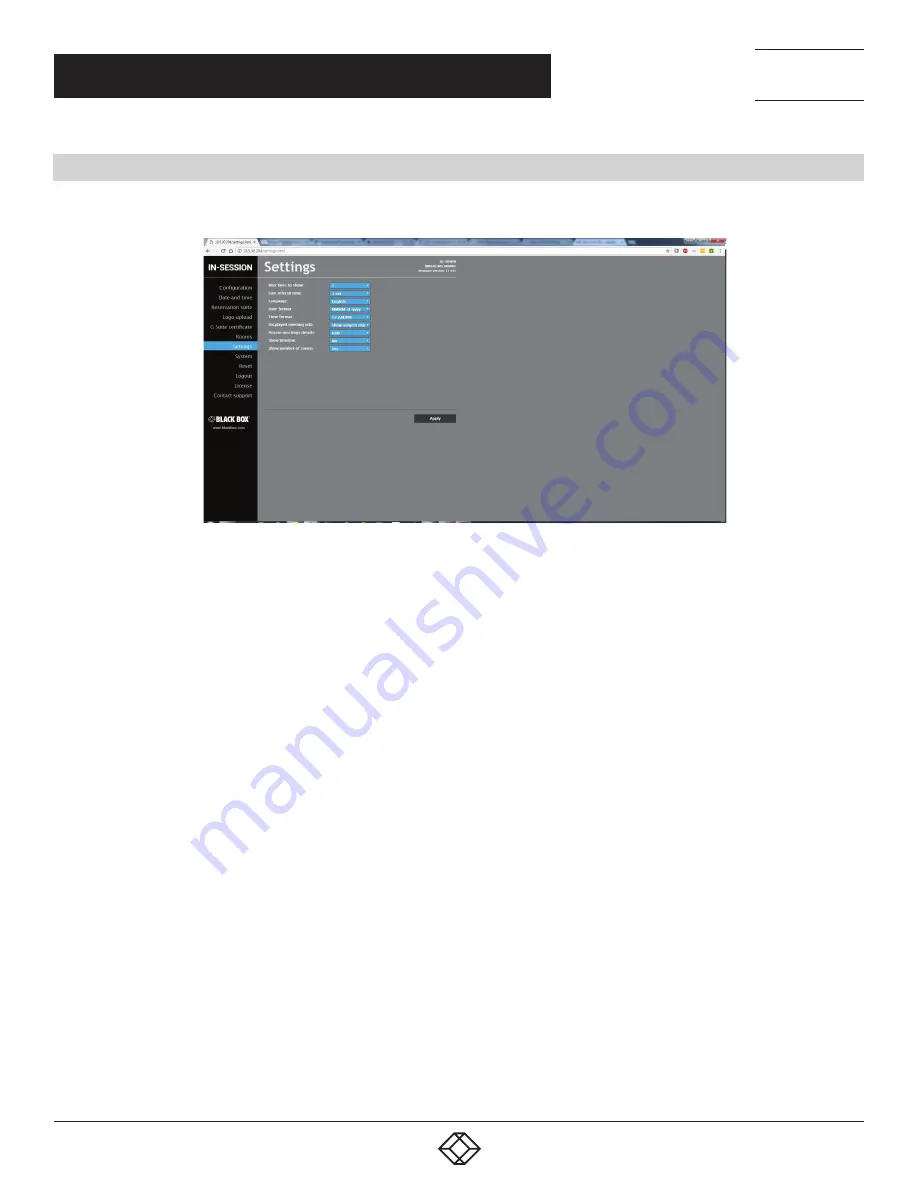
For more detailed room display settings, choose the item “Settings” in the left menu. 

FIGURE 4-4. DISPLAY SETTINGS SCREEN

It offers the following options:

Š

Š

Max lines to show: this indicates the maximum number of rooms (lines) shown on the display. The number has to be within the 

range 7–14. If you wish to display more rooms, the list of rooms will scroll.

Š

Š

Line refresh time: if the list of rooms scrolls, here you can set the interval for which the scrolling will stop between two shifts by one 

line. The options are 3, 5, 7, 10, 15 and 20 seconds.

Š

Š

Language: here you can set the language in which the room list will be shown on the display.

Š

Š

Date format: here you can set the desired format of date. Options include MMMM-d-yyyy (e.g. March 4, 2017) or d-MMMM-yyyy 

(e.g. 4 March 2017).

Š

Š

Time format: here you can choose whether you want time to be shown in the 24-hour format or the 12-hour format (12 AM/PM).

Š

Š

Displayed meeting info: here you can set how meeting information is displayed on the panel. You can choose to view both the 

subject and the organizer, only the subject or only the organizer. The default option is to display both the subject and the organizer.

Š

Š

Private meeting details: planned meetings can be marked as private in the calendar. In this item you can select whether in meetings 

marked this way the full description and details will be shown (the “Show” option) or whether people will see only the indication 
“Private meeting” (the “Hide” option). You can also select “Hide except current meeting”. In this case, details will be shown only for 
the current or the immediately following private meeting whereas details of other planned private meetings will be hidden. The 
default value is “Hide.”

Š

Š

Show timeline: the display may show either just the current or next meeting (the “No” option), or a timeline with current and future 

meetings may also be displayed (the “Yes” option). The default value is “No.”

Š

Š

Show number of rooms: here you can set whether the total number of free and occupied rooms will be displayed in the upper left 

corner of the screen. The default value is “Yes.”

Summary of Contents for RS-VIEWER

Page 1: ...24 7 TECHNICAL SUPPORT AT 1 877 877 2269 OR VISIT BLACKBOX COM IN SESSION ROOM VIEWER RS VIEWER USER MANUAL Power LED SD OTG R eset...

Page 2: ...the Reservation Suite 9 3 4 IP Settings 11 3 5 Date and Time Settings 14 4 RS VIEWER ESSENTIAL SETUP 16 4 1 Choosing the Rooms to be Displayed 16 4 2 Inserting the Company Logo 16 4 3 Display Settings...

Page 3: ...1 HDMI 1 USB 2 0 1 USB 2 0 OTG 1 3 5mm Audio 1 Antenna Male 1 SD Card 1 Barrel Plug Display Type HDMI output or display connection Resolution 1920 x 1080p Indicators 1 Power LED Interface Reset Butto...

Page 4: ...erly Google Apps for Work subscription Google Apps Free edition also known as Standard edition is not supported It is also possible to use the default applications of these services to make a reservat...

Page 5: ...nication with DHCP server and for IP address assignment if DHCP is used An open UDP port 1900 Opening this port is not mandatory it is used to make the reservation system units visible in the Windows...

Page 6: ...N SESSION Room Scheduler Setup Guide G Suite To set the RS VIEWER unit using Essential Setup you need to Prepare accounts on the specific server using the guides above Configure the IN SESSION panels...

Page 7: ...in Web pages are available in the English language only 3 1 ACCESSING ADMIN WEB To access the Admin Web of IN SESSION units you need a computer with an internet browser The computer must be connected...

Page 8: ...Fi if your computer has a wireless connection to the network or Ethernet if your computer is connected through a cable in the left half of the screen If you are connected by cable click on your netwo...

Page 9: ...SERVATION SUITE First you need to join the RS VIEWER unit to the existing reservation suite In the left menu select Reservation suite and then click on Join to existing suite FIGURE 3 4 JOIN EXISTING...

Page 10: ...N SUITE SCREEN In the field indicated enter the password you have chosen when creating the reservation suite Then join the RS VIEWER unit to the selected reservation suite FIGURE 3 6 JOIN SELECTED RES...

Page 11: ...servation suite units It is factory set and in most cases needs not be changed If you do need to change it you have to make sure the new name is unique within the given local network FIGURE 3 8 CHANGE...

Page 12: ...the primary and secondary server DNS of your network If the assignment of IP address through DHCP is enabled the entered setting of the IP address mask etc is taken as the alternate configuration i e...

Page 13: ...er certificate file and upload it The following certificate types are supported PKCS 12 and x509 PEM DER You can also upload a private key file if the private key is not part of the user certificate I...

Page 14: ...the current time click on Current date and time in the upper part of the screen The current date time and time zone are shown on the Current time line The applicable boxes can be selected to enter ch...

Page 15: ...ernet time servers select Internet clock Here you can change the names or IP addresses of the primary NTP server and the secondary NTP server The default setting of the servers is time nist gov and ta...

Page 16: ...essing the Apply button before leaving the page otherwise they will not be saved FIGURE 4 1 ROOMS SCREEN 4 2 INSERTING THE COMPANY LOGO The RS VIEWER unit enables the user to insert a company logo in...

Page 17: ...ELECT A PNG FILE WITH LOGO TO UPLOAD After the logo is uploaded the following screen is shown Here you can check the logo at this moment it is shown both on the website and on the display If you want...

Page 18: ...ur format or the 12 hour format 12 AM PM Displayed meeting info here you can set how meeting information is displayed on the panel You can choose to view both the subject and the organizer only the su...

Page 19: ...E 4 5 FREE AND OCCUPIED ROOMS SCREEN A display showing the current or next meeting and total number of free and occupied rooms FIGURE 4 6 CURRENT OR NEXT MEETING AND FREE AND OCCUPIED ROOMS SCREEN A d...

Page 20: ...by clicking the button Check for a new firmware The IN SESSION unit verifies whether newer firmware is available on the Black Box website It will be downloaded to the touch panel when automatically in...

Page 21: ...e right part of the screen FIGURE 5 2 RESET SCREEN 5 3 FACTORY DEFAULT If you need to put the RS VIEWER unit into the factory default mode delete all user settings and leave the reservation suite choo...

Page 22: ...877 877 2269 CHAPTER 5 OTHER SETTINGS OF THE RS VIEWER UNIT If you choose License in the left menu you will see a page describing the EULA software license Selecting Contact support enables you to sen...

Page 23: ...We will be able to provide more efficient and accurate assistance if you have a complete description including the nature and duration of the problem when the problem occurs the components involved in...

Page 24: ...d and used in accordance with the instruction manual may cause harmful interference to radio communications Operation of this equipment in a residential area is likely to cause harmful interference in...

Page 25: ...tes que impidan el flujo de aire por los orificios de ventilaci n 10 El equipo el ctrico deber ser situado fuera del alcance de fuentes de calor como radiadores registros de calor estufas u otros apar...

Page 26: ...e consequential or cost of cover damages resulting from any errors in the product information or specifications set forth in this document and Black Box Corporation may revise this document at any tim...

Page 27: ...____ __ ________________________________________________________________________________________________ __ ____________________________________________________________________________________________...

Page 28: ...NEED HELP LEAVE THE TECH TO US LIVE 24 7 TECHNICAL SUPPORT 1 877 877 2269 COPYRIGHT 2018 BLACK BOX CORPORATION ALL RIGHTS RESERVED RS VIEWER_USER_REV1 PDF...

Reviews: