background image

25

CHAPTER 3: Print Server

3.2 Add a Network Printer

After installing the print server client tool, you need to add the network printer to
your PC. 

1. Click the 

Start

button. Choose 

Setting 

and

Printers

.

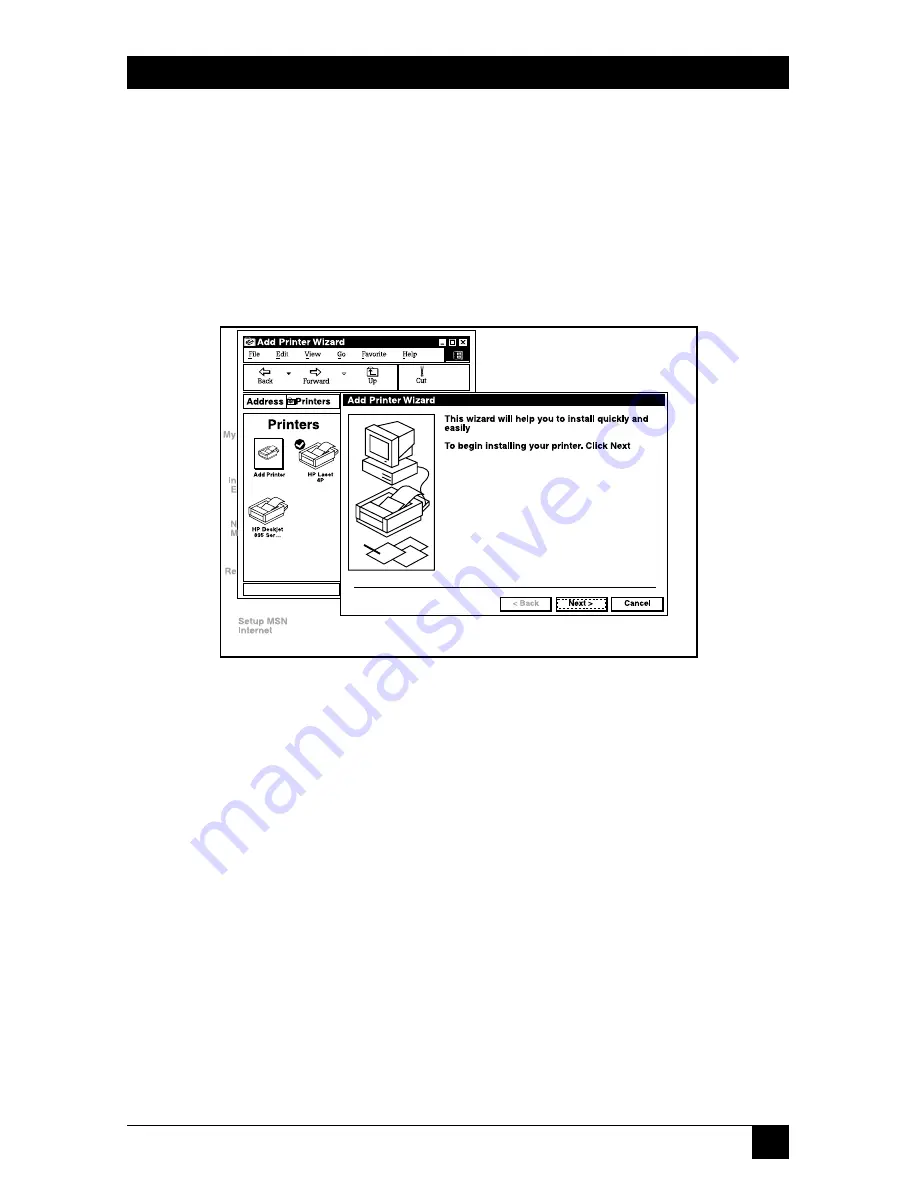
2. Double-click on 

Add Printer

. See Figure 3-7. Click on 

Next

to continue.

Figure 3-7. Add Printer window.

>>

Summary of Contents for LR9603A

Page 1: ...1000 Park Drive Lawrence PA 15055 1018 724 746 5500 Fax 724 746 0746 Copyright 2004 Black Box Corporation All rights reserved ...

Page 2: ...746 5500 FREE technical support 24 hours a day 7 days a week Call 724 746 5500 or fax 724 746 0746 Mailing address Black Box Corporation 1000 Park Drive Lawrence PA 15055 1018 Web site www blackbox com E mail info blackbox com JULY 2004 LR9603A Pure Networking Broadband Router Quick Install Guide ...

Page 3: ......

Page 4: ... is operated in a commercial environment Operation of this equipment in a residential area is likely to cause interference in which case the user at his own expense will be required to take whatever measures may be necessary to correct the interference Changes or modifications not expressly approved by the party responsible for compliance could void the user s authority to operate the equipment Th...

Page 5: ...l fabricante 7 El aparato eléctrico debe ser montado a la pared o al techo sólo como sea recomendado por el fabricante 8 Servicio El usuario no debe intentar dar servicio al equipo eléctrico más allá a lo descrito en las instrucciones de operación Todo otro servicio deberá ser referido a personal de servicio calificado 9 El aparato eléctrico debe ser situado de tal manera que su posición no interf...

Page 6: ...r una antena externa deberá ser localizada lejos de las lineas de energia 16 El cable de corriente deberá ser desconectado del cuando el equipo no sea usado por un largo periodo de tiempo 17 Cuidado debe ser tomado de tal manera que objectos liquidos no sean derramados sobre la cubierta u orificios de ventilación 18 Servicio por personal calificado deberá ser provisto cuando A El cable de poder o ...

Page 7: ...TRADEMARKS USED IN THIS MANUAL Windows is either a registered trademark or a trademark of Microsoft Corporation in the United States and or other countries Any other trademarks mentioned in this manual are acknowledged to be the property of the trademark owners ...

Page 8: ... 6 2 Quick Setup Wizard 8 2 1 Setup 8 2 2 Time Zone 8 2 3 Broadband Type 9 2 3 1 Cable Modem 11 2 3 2 Fixed IP xDSL 12 2 3 3 PPPoE xDSL 14 2 3 4 PPTP xDSL 16 3 Print Server 19 3 1 Install the Print Server Network Driver 19 3 2 Add a Network Printer 25 ...

Page 9: ... that you can obtain an IP address automatically NOTE Make sure that the Pure Networking Broadband Router s DHCP server is the only DHCP server available on your LAN If there is another DHCP server on your network then you ll need to switch one of the DHCP servers off 3 Once your PC has obtained an IP address from your router enter the default IP address 192 168 2 1 the router s IP address into yo...

Page 10: ...tains the router s Web based management screens that allow you to configure your Pure Networking Broadband Router Click on LOGIN NOTE By default there is no password For security reasons we recommend that you add a password as soon as possible Figure 1 3 The Enter Your Password screen 5 Follow the instructions in Chapters 2 and 3 ...

Page 11: ...ed to fill in only the information necessary to access the Internet Once you click on the Quick Setup Wizard in the Home page you should see the screen shown in Figure 2 1 2 2 Time Zone The Time Zone allows your router to base its time on the settings configured here This will affect functions such as log entries and firewall settings Figure 2 1 Set Time Zone screen Table 2 1 describes the router ...

Page 12: ...e Use the drop down menu to select the day you want to start Daylight Savings Time End Daylight Savings Time Use the drop down menu to select the day you want to end Daylight Savings Time Next button Click on this button to save your changes and go on to the next screen Click on Next to proceed to Broadband Type 2 3 Broadband Type In this screen you ll select one of four types of connections that ...

Page 13: ...meters Menu Type of Connection Cable Modem Your ISP will automatically give you an IP address Fixed IP xDSL Your ISP has given you an IP address already PPPoE xDSL Your ISP requires you to use a Point to Point Protocol over Ethernet PPPoE connection PPTP xDSL Your ISP requires you to use a Point to Point Tunneling Protocol PPTP connection Back button Click on this button to go back to the previous...

Page 14: ...your ISP will automatically give you an IP address Some ISPs may also require you to fill in additional information such as Host Name and MAC address see Figure 2 3 NOTE The Host Name and MAC address section is optional You can skip this section if your ISP does not require these settings for you to connect to the Internet Figure 2 3 IP Address Info Cable Modem Table 2 3 lists the cable modem s ho...

Page 15: ...using To find out what the PC s MAC address is see Appendix A in the users manual Release button Click on this button to release the WAN IP address Renew button Click on this button to renew the WAN IP address Back button Click on this button to go back to the previous screen OK button Click on this button to save your changes and go on to the next screen Click OK when you have finished the config...

Page 16: ...s fixed IP xDSL parameters Parameter Description IP This is the IP address that your ISP has given you Gateway IP This is the ISP s IP address gateway DNS This is the ISP s DNS server IP address Subnet Mask Enter the subnet mask provided by your ISP for example 255 255 255 0 Back button Click on this button to go back to the previous screen ...

Page 17: ...e configuration for the Fixed IP xDSL connection is complete You can start using the router now If you want to use some of the advanced features supported by this router see Chapters 6 7 and 8 of the users manual on the CD ROM that s included with the router 2 3 3 PPPOE XDSL Select PPPoE xDSL if your ISP requires the PPPoE protocol to connect you to the Internet Your ISP should provide all the inf...

Page 18: ...Type in the maximum size of your transmission packet to the Internet Leave it as is if you do not want to set a maximum packet size Maximum Idle Time Type in an idle time threshold minutes for the WAN port This means that if no packets have been sent no one using the Internet during this specified period the router will automatically disconnect the connection with your ISP Auto reconnect If you ch...

Page 19: ... for the PPPoE connection is complete You can start using the router now If you want to use some of the advanced features supported by this router see Chapters 6 7 and 8 in the users manual 2 3 4 PPTP XDSL Select PPTP xDSL if your ISP requires the PPTP protocol for connecting you to the Internet Your ISP should provide all the information required in this section See Figure 2 6 Figure 2 6 IP Addre...

Page 20: ...es called a connection ID Password Type in the password provided by your ISP for the PPTP connection PPTP Gateway If your LAN has a PPTP gateway then type in that PPTP gateway IP address here If you do not have a PPTP gateway then enter the ISP s Gateway IP address Idle Time Out You can type in an idle time threshold minutes for the WAN port This means that if no packets have been sent no one is u...

Page 21: ... example no time restriction always On Click OK when you have finished the configuration above The configuration for the PPTP connection is complete You can start using the router now If you want to use some of the advanced features supported by this router see Chapters 6 7 and 8 in the users manual ...

Page 22: ... the Print Server Network Driver 1 In Windows open the Command Prompt program 2 Type WEClient exe at the prompt and the PrintServer Network Driver Setup Program window will appear See Figure 3 1 Figure 3 1 PrintServer Network Driver Setup Program window ...

Page 23: ...d specify the destination folder where the utility will be installed See Figure 3 2 Or click on the Cancel button to cancel the setup Figure 3 2 Choose Destination Location window Table 3 1 lists the button functions shown in Figure 3 2 Destination Folder D PrintServer Network driver Browse ...

Page 24: ...hrough the available destination folders Back Click on this button to go back to the previous screen Next Click on this button to save your changes and go on to the next screen Cancel Click on this button to cancel your changes 4 Click on the Next button and specify the program folder where the program icons will be added See Figure 3 3 ...

Page 25: ...Program folder parameters Parameter Description Program Folders Type in the program folder name Existing Folders Scroll through the existing folders list Back button Click on this button to go back to the previous screen Next button Click on this button to save the changes and go on to the next screen Cancel button Click on this button to cancel the changes ...

Page 26: ... print server Next you ll add a remote port for the print server Click on the Add button to add a remote port See Figure 3 4 Or click on the Delete button to cancel or the Exit button to exit Figure 3 4 Remote Port Setup window 7 You have to assign a print server name and enter the print server s IP address You can only select P1 or P2 the router has only two print ports After filling in the data ...

Page 27: ...ch are separated by a hyphen For example if you assign PtrSvr as the print server name and select port P1 then the remote port s name will be PtrSvr P1 You can click Add to add another remote port Click Delete to delete a selected remote port When you have finished setting the remote port click Exit to exit the setup tool See Figure 3 6 Figure 3 6 Remote Port Setup window 9 Print server client too...

Page 28: ...ter After installing the print server client tool you need to add the network printer to your PC 1 Click the Start button Choose Setting and Printers 2 Double click on Add Printer See Figure 3 7 Click on Next to continue Figure 3 7 Add Printer window ...

Page 29: ... ROUTER QUICK INSTALLATION GUIDE 3 Select Local Printer and click Next See Figure 3 8 Figure 3 8 Add Printer Wizard 4 Select the suitable printer manufacturer and model then click Next See Figure 3 9 Figure 3 9 Choosing a Printer ...

Page 30: ...print server s remote port that was created in Section 3 1 and click Next See Figure 3 10 Figure 3 10 Choosing the Print Server s remote port 6 Complete the rest of the questions that will appear on screen to finish the network printer setup ...

Reviews: