13
CHAPTER 3: Installation
3.2 Mounting Instructions
3.2.1 M
OUNTING IN A
R
ACK
You will need an
1
⁄
4
-inch nut driver to install the RISC Router Expandable
in a rack. Follow these steps:
1.
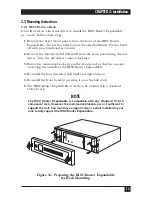
Remove the bezel (front panel) from the front of the RISC Router
Expandable. The bezel is held by four threaded ball studs. Pry the bezel
off with your hands and set it aside.
2.
Remove the four threaded ball studs from the front panel using the nut
driver. Turn the nut driver counterclockwise.
3.
Rotate the mounting bracket from the front panel so that the cut-outs
are facing the outside of the RISC Router Expandable.
4.
Re-install the four threaded ball studs and tighten them.
5.
Re-install the front bezel by pressing it onto the ball studs.
6.
The RISC Router Expandable is ready to be mounted in a standard
19-inch rack.
NOTE
The RISC Router Expandable is compatible with any standard 19-inch
component rack. However, the rack-mount brackets are not sufficient to
support the unit. You must have support rails or a shelf installed in your
rack to fully support the RISC Router Expandable.
Figure 3-1. Preparing the RISC Router Expandable
for Rack Mounting.
Summary of Contents for LR5000A
Page 2: ......


