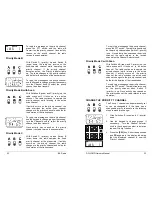
background image


38                                                                                            BK Radio


Master 

Clone


Master 

Switch 

When the Master’s Command Group is cloned 
to a slave, the channel data that is ‘pointed to’ 
by the Command Group is transferred to a 
target group (not the Command Group) in the 
slave.  The target group’s label in the slave 
will be set to ‘

CMND CLN

’. 

NOTE:

  Some groups may be “locked” by PC 

programming to prevent them from 
being overwritten.  Only “unlocked” 
groups will accept incoming clones. 

1.


Make sure the battery packs for both 
radios are charged. 

2.


Attach the master switch end of the 
cloning cable to the side connector of the 
Master radio.  

NOTE:   

One plug of the cloning cable 
has a push-button master 
switch. This plug must be 
attached to the Master radio. 

3.


Turn on the Master radio. 

4.  Put the Master radio in Programming 

Mode by pressing and holding the master 
switch then pressing and holding the 

[FCN]

 key until the display shows 

PSWRD-******

’.


Enter the password of the 

selected group. The display shows ‘

PRG 

CH 00

.’ 

5.


Connect the other plug of the cable to the 
side connector of the radio you want to 
clone. 

6.  Turn on the clone and set it to the desired 

channel group. 

7. Press the 

[*]

 key on the Master radio 

keypad. The radio will respond showing 
the prompt ‘

PROG|DPHCMD

’ on the first 

line and ‘

Group XX

’ on the second line, 

where XX is the currently selected group. 


PSWRD-****** 


CMND CLN 

PRG 

  ch          00


 PROG|D

PROG|D

PROG|D

PROG|DPHcmD

PHcmD

PHcmD

PHcmD    

 Group 01 


Press and Hold

 [#]

 Key 

to Change Data 

 DPH-CMD Owner’s Manual                                                                7              

RF EXPOSURE COMPLIANCE AND CONTROL GUIDELINES 
AND OPERATING INSTRUCTIONS 

To control your exposure and ensure compliance with the 
occupational/controlled environment exposure limits always adhere to 
the following procedures. 

Guidelines: 


Do not remove the RF Exposure Label from the device. 


User awareness instructions must accompany device when 
transferred to other users. 


 Do not use this device if the operational requirements described 

herein are not met. 

Operating Instructions: 


Transmit no more than the rated duty factor of 50% of the time.  To 
transmit (talk), push the Push-To-Talk (PTT) button.  To receive calls, 
release the PTT button.  Transmitting 50% of the time, or less, is 
important because this radio generates measurable RF energy 
exposure only when transmitting (in terms of measuring for standards 
compliance).   


Hold the radio in a vertical position in front of face with the 
microphone (and the other parts of the radio, including the antenna) 
at least one inch (2.5 cm) away from the nose.  Keeping the radio at 
the proper distance is important because RF exposures decrease 
with distance from the antenna.  Antenna should be kept away from 
eyes. 


When worn on the body, always place the radio in a BK Radio 
approved clip, holder, holster, case, or body harness for this product.  
Using approved body-worn accessories is important because the use 
of BK Radio or other manufacturer’s non-approved accessories may 
result in exposure levels which exceed the FCC’s 
occupational/controlled environment RF exposure limits. 


If you are not using a body-worn accessory and are not using the 
radio in the intended use position in front of the face, then ensure the 
antenna and the radio are kept at least one inch (2.5 cm) from the 
body when transmitting. Keeping the radio at the proper distance is 
important because RF exposures decrease with increasing distance 
from the antenna. 


Use only BK Radio approved supplied or replacement antennas, 
batteries, and accessories.  Use of non-BK Radio approved 
antennas, batteries, and accessories may exceed the FCC RF 
exposure guidelines.   For a list of BK Radio approved accessories 
visit the following website : 

http://www.relm.com

.


CONTACT INFORMATION 

For additional information on exposure requirements or other 
information, visit website http://www.relm.com. 

Summary of Contents for DPH- CMD

Page 1: ...TABLE RADIO Owner s Manual Copyright 2006 RELM Wireless Corporation All rights reserved P N 7001 30978 200 07 06 BK Radio 7100 Technology Drive West Melbourne FL 32904 Telephone 321 984 1414 FAX 321 984 0434 www relm com ...

Page 2: ...T Push To Talk RTA Repeater Talk Around RTX Channel Ready to Transmit Channel RX Receive SCN Scan SQ Squelch Squelch A control that eliminates background noise Talkback Scan When scanning if a signal is present the scan will stop and you will hear the signal If you can then push the PTT switch to talk back to the person you are in Talkback Scan Mode Time Out Timer A feature that limits the duratio...

Page 3: ...requencies signaling codes etc and will be there to meet your communications needs as your system expands SAFETY PRECAUTIONS Do not operate the transmitter in close proximity to blasting caps Do not operate the radio in an explosive atmosphere petroleum fuels solvents dust etc unless your radio is an intrinsically safe model designed for such use DPH CMD Owner s Manual 41 3 Remove battery pack fro...

Page 4: ...exposure and can exercise control over their exposure to meet FCC limits This radio device is NOT authorized for general population consumer or any other use This 2 way radio uses electromagnetic energy in the radio frequency RF spectrum to provide communications between two or more users over a distance It uses radio frequency RF energy or radio waves to send and receive calls RF energy is one fo...

Page 5: ...plies with the following RF energy exposure standards and guidelines United States Federal Communications Commission Code of Federal Regulations 47 CFR 1 1307 1 1310 2 1091 and 2 1093 American National Standards Institute ANSI Institute of Electrical and Electronic Engineers IEEE C95 1 1992 Institute of Electrical and Electronic Engineers IEEE C95 1 1999 Edition INDUSTRY CANADA COMPLIANCE This Cla...

Page 6: ...t accompany device when transferred to other users Do not use this device if the operational requirements described herein are not met Operating Instructions Transmit no more than the rated duty factor of 50 of the time To transmit talk push the Push To Talk PTT button To receive calls release the PTT button Transmitting 50 of the time or less is important because this radio generates measurable R...

Page 7: ...our dealer to backlight the display when a signal is received or when a key is pressed The time duration of the backlighting can also be programmed CHANNEL AND GROUP LABELS The radio can be programmed with a label for each of the 25 channel groups and a label for each of the 20 channels within each group To display a group label turn scanning functions off then 1 Press the key on the keypad to dis...

Page 8: ...er s Manual 9 BASIC OPERATION RECEIVE 1 Turn power on by turning the Volume knob clockwise A beep sounds indicating the radio is operational The LCD display shows the current channel 2 Select a channel by rotating the Channel Selector knob When the unstopped channel selector is rotated past the highest 20 th channel the radio will emit a beep and remain on the highest channel When rotated past the...

Page 9: ...the TGID DPH CMD Owner s Manual 35 BUSY CHANNEL INDICATION The yellow Busy Channel Indicator glows if there is carrier activity on the selected channel If the selected channel is a Channel Guard channel and the proper Channel Guard value is not detected the Busy Channel Indicator remains on for the duration of the carrier activity and no message is heard During Scan and Priority Scan operation the...

Page 10: ... Digital Mode each channel can be programmed to use either Normal squelch or Selective squelch 1 Normal squelch is used to mimic analog operation Signals are only qualified with the programmed NAC TGIDs and P25 Unit IDs are ignored Each digital channel is programmed with a receive NAC and a transmit NAC When an incoming signal s NAC matches the channel s programmed receive NAC the radio unmutes Th...

Page 11: ...t item is displayed does NOT associate the UTGID with the selected channel Programming of the list if programming is not locked out by PC software can be accomplished as follows 1 While viewing the list press and hold the FCN key until the PRG annunciator lights 2 Press CLR and then enter the new TGID Valid entries are 1 65535 Press ENT to store the new value and return to the list viewer 3 Select...

Page 12: ...with that channel whenever the channel is selected The UTGID Pick List can be viewed by pressing FCN then 4 FCN then G The display will show TGID 01 XXXXX Tgid 01 14 LABEL 20 G8 DPH CMD Owner s Manual 13 MIXED MODE OPERATION The receiver and transmitter are capable of operating in analog wide band 25 kHz channel spacing analog narrow band 12 5 kHz channel spacing and APCO Project 25 Digital Mode E...

Page 13: ... operating in the Command Group Once 20 channels are entered subsequent presses of the key followed by the ENT key will cause the radio to beep and momentarily display the message CMND FULL When operating in the Command Group the continuously rotating channel selector will stop at the highest programmed channel CMND full CMND CHAN 5 RX CH 12 Press PTT During Hold Time while the RX annunciator is l...

Page 14: ... channel whenever the channel is TONE 01 000 00 1 2 3 4 5 6 7 8 9 0 CLR FCN PRI ENT LABEL 20 N18 DPH CMD Owner s Manual 15 For example if only 4 channels are programmed when the channel selector is rotated past the 4 th channel the radio will beep and remain on the 4 th channel OPERATING FROM THE COMMAND GROUP The Command Group can be entered by pressing the key twice Operation in the Command Grou...

Page 15: ... the TX Digital switch When receiving a qualified emergency call the radio will beep The 1 st line of the display will alternately flash the word EMERGENCY RX and then the active channel s label for the duration of the reception and during any hold time If the radio is configured to show the caller s TGID or Unit ID 1 on the 2 nd line that information will be displayed along with the emergency mes...

Page 16: ...nel Selector is changed the Emergency Mode will follow to the newly selected channel Cycle power to return the radio to normal operation PRG D 145 1 2 3 4 5 6 7 8 9 0 CLR FCN PRI ENT LABEL DPH CMD Owner s Manual 17 Your dealer can also assign more than one function to the same top switch For example both low power select and RTA could be enabled by the same switch NOTE Assume for this manual that ...

Page 17: ...nit To Unit callback is enabled and a Unit To Unit call is received on the Ready to Transmit RTX channel the user may press PTT before the hold time expires causing the radio to enter Unit To Unit Mode and transmit using the received ID as the destination ID If the callback timer expires before PTT is pressed the radio will return to normal Operating Mode but the bell icon will flash until the key...

Page 18: ...s pressed twice putting the radio in Unit To Unit Mode displaying the last active ID LABEL Last Active Was Unit On Call List D Prompt For Manual ID Entry RX LABEL Incoming Call From Unit On Call List D 145 Last Active Was Unit Not On Call List CH 5 Missed Call Incoming Call From Unit Not On Call List RX D 145 ENT ADD CHAN UNIT CALL DPH CMD Owner s Manual 19 When the PTT switch is released the radi...

Page 19: ...al 25 When a correctly addressed Unit To Unit call is received the radio will beep twice If the calling unit s ID matches one of the Call List IDs the associated label will be displayed along with the RX and bell icon Otherwise the numeric ID will be displayed along with the RX D and bell icons If the calling unit is not the same unit displayed before the call was received the calling unit s ID wi...

Page 20: ...Unit To Unit calls and if RX Mode is set to mixed analog signals Incoming Call From Unit on Call List RX LABEL 1 2 3 4 5 6 7 8 9 0 CLR FCN PRI ENT GROUP LABEL UID 785 Radio Unit ID DPH CMD Owner s Manual 21 Either priority channel can be programmed as a fixed channel tied to the Channel Selector knob or programmed OFF If the radio is programmed to transmit on the first priority channel transmissio...

Page 21: ...l at the preset rate If activity occurs on the priority channel the radio changes to the priority channel and holds for the duration of the transmission PR RX SCN LABEL 3 DPH CMD Owner s Manual 23 To reply to a message on the priority channel press the PTT switch The radio transmits only on the priority channel when Switch C priority is up Once activity has ceased on the priority channel the radio...

Page 22: ...DPH CMD Owner s Manual 43 NOTES ...

Page 23: ......

Reviews: