background image


Rev. 1.01 

- 7 - 

SRP-350IIOBE 

 Table of Contents 

 
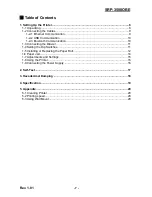
1. Setting Up the Printer .................................................................................................. 8


1-1 Unpacking ................................................................................................................. 8 
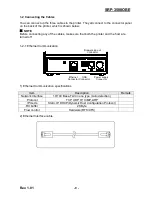
1-2 Connecting the Cables ............................................................................................. 9 

1-2-1 Ethernet Communication .................................................................................. 9 
1-2-2 USB Communication ...................................................................................... 10 
1-2-3 Bluetooth Communication .............................................................................. 10 

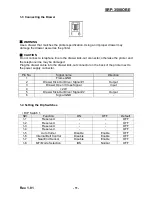
1-3 Connecting the Drawer ........................................................................................... 11 
1-4 Setting the Dip Switches ......................................................................................... 11 
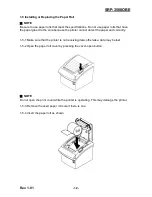
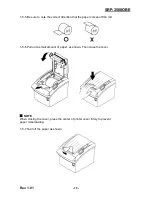
1-5 Installing or Replacing the Paper Roll ..................................................................... 12 
1-6 Paper Jam .............................................................................................................. 14 
1-7 Adjustments and Settings ....................................................................................... 15 
1-8 Using the Printer ..................................................................................................... 15 
1-9 Connecting the Power Supply ................................................................................ 16 


2. Self-Test ...................................................................................................................... 17


3. Hexadecimal Dumping .............................................................................................. 18


4. Specification .............................................................................................................. 19


5. Appendix .................................................................................................................... 20


5-1 Cleaning Printer ...................................................................................................... 20 
5-2 Printing speed ......................................................................................................... 20 
5-3 Using Wall Mount .................................................................................................... 20 
Summary of Contents for SRP-350IIOBE

Page 1: ...User s Manual SRP 350IIOBE Thermal Printer Rev 1 01 http www bixolon com ...

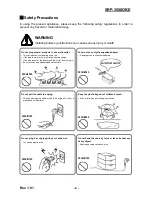
Page 2: ... plastic bag out of children s reach If not a child may put the bag on his head Do not pull the cable to unplug This can damage the cable which is the origin of a fire or a breakdown of the printer You must use only the supplied adapter It is dangerous to use other adapters Do not plug several products in one multi outlet This can provoke over heating and a fire If the plug is wet or dirty dry or ...

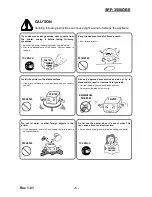
Page 3: ...mble repair or remodel it for yourself Call your dealer when you need these services Do not touch the blade of auto cutter Install the printer on the stable surface If the printer falls down it can be broken and you can hurt yourself Keep the desiccant out of children s reach If not they may eat it If you observe a strange smoke odor or noise from the printer unplug it before taking following meas...

Page 4: ...ircuit different from that to which the receiver is connected Consult the dealer or an experienced radio TV technician for help 2 Changes or modifications not expressly approved by the manufacturer could void the user s authority to operate the equipment This device complies with Part 15 of the FCC Rules Operation is subject to the following two conditions 1 This device may not cause harmful inter...

Page 5: ...m other types of wastes and recycle it responsibly to promote the sustainable reuse of material resources Household users should contact either the retailer where they purchased this product or their local government office for details of where and how they can take this item for environmentally safe recycling Business users should contact their supplier and check the terms and conditions of the p...

Page 6: ...ters can be scaled up to 7 times compared to its original size 7 Bar code printing is possible by using a bar code command 8 Different print densities can be selected by DIP switches Please be sure to read the instruction in this manual carefully before using your new SRP 350IIOBE NOTE 1 The socket outlet shall be near the equipment and it shall be easy accessible 2 This Bluetooth mark and QD ID B...

Page 7: ...etooth Communication 10 1 3 Connecting the Drawer 11 1 4 Setting the Dip Switches 11 1 5 Installing or Replacing the Paper Roll 12 1 6 Paper Jam 14 1 7 Adjustments and Settings 15 1 8 Using the Printer 15 1 9 Connecting the Power Supply 16 2 Self Test 17 3 Hexadecimal Dumping 18 4 Specification 19 5 Appendix 20 5 1 Cleaning Printer 20 5 2 Printing speed 20 5 3 Using Wall Mount 20 ...

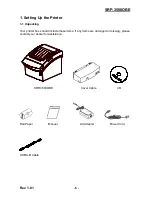
Page 8: ...g Up the Printer 1 1 Unpacking Your printer box should include these items If any items are damaged or missing please contact your dealer for assistance SRP 350IIOBE Cover Cable CD Roll Paper Manual AC Adapter Power Cord USB A B Cable ...

Page 9: ... both the printer and the host are turned off 1 2 1 Ethernet Communication 1 Ethernet Communication specifications Item Description Remark Network Interface 10 100 Base T All in one type Auto detection Protocol TCP UDP IP ICMP ARP IP mode Static IP DHCP Dynamic Host Configuration Protocol RX buffer 2 KByte Flow control Hardware RTS CTS 2 Ethernet Interface cable Drawer kick out Connector Power sup...

Page 10: ...ction Shell Shield Drain Wire Frame Ground 1 VBUS Red Host Power DC5 V 500 mA 2 D White Differential Data Line 3 D Green Differential Data Line 4 GND Black Signal Ground 1 2 3 Bluetooth Communication 1 Bluetooth Communication specifications Title Description Frequency 2 402 2 480 GHz Version 2 1 EDR Module Type Class 1 2 Bluetooth Connection The printer can be connected to devices equipped with Bl...

Page 11: ...r kick out connector on the back of the printer next to the power supply connector Pin No Signal name Direction 1 Frame GND 2 Drawer Kick Out Driver Signal 1 Output 3 Drawer Open Close Signal Input 4 24V 5 Drawer Kick Out Driver Signal 2 Output 6 Signal GND 1 4 Setting the Dip Switches DIP Switch 1 SW Function ON OFF Default 1 1 Reserved OFF 1 2 Reserved OFF 1 3 Reserved OFF 1 4 Reserved OFF 1 5 A...

Page 12: ...e because the printer cannot detect the paper end correctly 1 5 1 Make sure that the printer is not receiving data otherwise data may be lost 1 5 2 Open the paper roll cover by pressing the cover open button NOTE Do not open the print cover while the printer is operating This may damage the printer 1 5 3 Remove the used paper roll core if there is one 1 5 4 Insert the paper roll as shown ...

Page 13: ...correct direction that the paper comes off the roll 1 5 6 Pull out a small amount of paper as shown Then close the cover NOTE When closing the cover press the center of printer cover firmly to prevent paper miss loading 1 5 7 Tear off the paper as shown ...

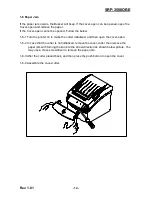
Page 14: ...urn the printer on to make the cutter initialized and then open the cover open 1 6 2 In case that the cutter is not initialized remove the cover cutter then remove the paper jam with turning the knob to the arrow direction as shown below picture You may use a cross screwdriver to remove the paper jam 1 6 3 After the cutter placed back and then press the push button to open the cover 1 6 4 Assemble...

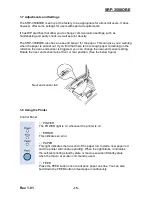
Page 15: ...g on the roll when the near end sensor is triggered you can change the near end sensor setting Rotate the near end sensor tab at front or rear position See the below figure 1 8 Using the Printer Control Panel POWER The POWER light is on whenever the printer is on ERROR This indicates an error PAPER This light indicates the near end of the paper roll Install a new paper roll and the printer will co...

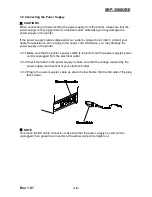
Page 16: ...cord Otherwise you may damage the power supply or the printer 1 9 1 Make sure that the printer s power switch is turned off and the power supply s power cord is unplugged from the electrical outlet 1 9 2 Check the label on the power supply to make sure that the voltage required by the power supply matches that of your electrical outlet 1 9 3 Plug in the power supply s cable as shown below Notice t...

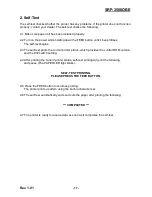
Page 17: ...st prints the current printer status which provides the control ROM version and the DIP switch setting 2 4 After printing the current printer status self test printing will print the following and pause The PAPER LED light blinks SELF TEST PRINTING PLEASE PRESS THE FEED BUTTON 2 5 Press the FEED button to continue printing The printer prints a pattern using the built in character set 2 6 The self ...

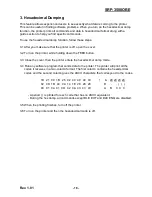
Page 18: ...olding down the FEED button 3 3 Close the cover then the printer enters the hexadecimal dump mode 3 4 Run any software program that sends data to the printer The printer will print all the codes it receives in a two column format The first column contains the hexadecimal codes and the second column gives the ASCII characters that correspond to the codes 1B 21 00 1B 26 02 40 40 40 40 02 0D 1B 44 0A...

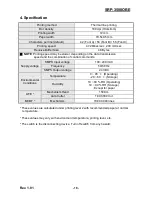
Page 19: ...ination of control commands Supply voltage SMPS Input voltage 100 240 VAC Frequency 50 60 Hz SMPS Output voltage 24 VDC Environmental Conditions Temperature 0 45 Operating 20 60 Storage Humidity 10 80 RH Operating 10 90 RH Storage Except for paper LIFE Mechanism Head 150 Km Auto Cutter 1 800 000 Cut MCBF Mechanism 70 000 000 lines These values are calculated under printing level 2 with recommended...

Page 20: ...aper roll and close the printer cover The remained amount of paper detected by paper near end sensor varies with the diameter of the paper core To adjust the remained amount contact your dealer 5 2 Printing speed When the paper is about to run out the printing speed may become slower while printing Press the Push button open and then close the cover to print at the normal speed until all the paper...

Reviews: