Bissell 2147 SERIES User Manual Download Page 6

www.BISSELL.com

6

Step 3: Turn your SmartClean® Connected ON

MACHINE WILL NOT CHARGE IF THE POWER SWITCH IS OFF.

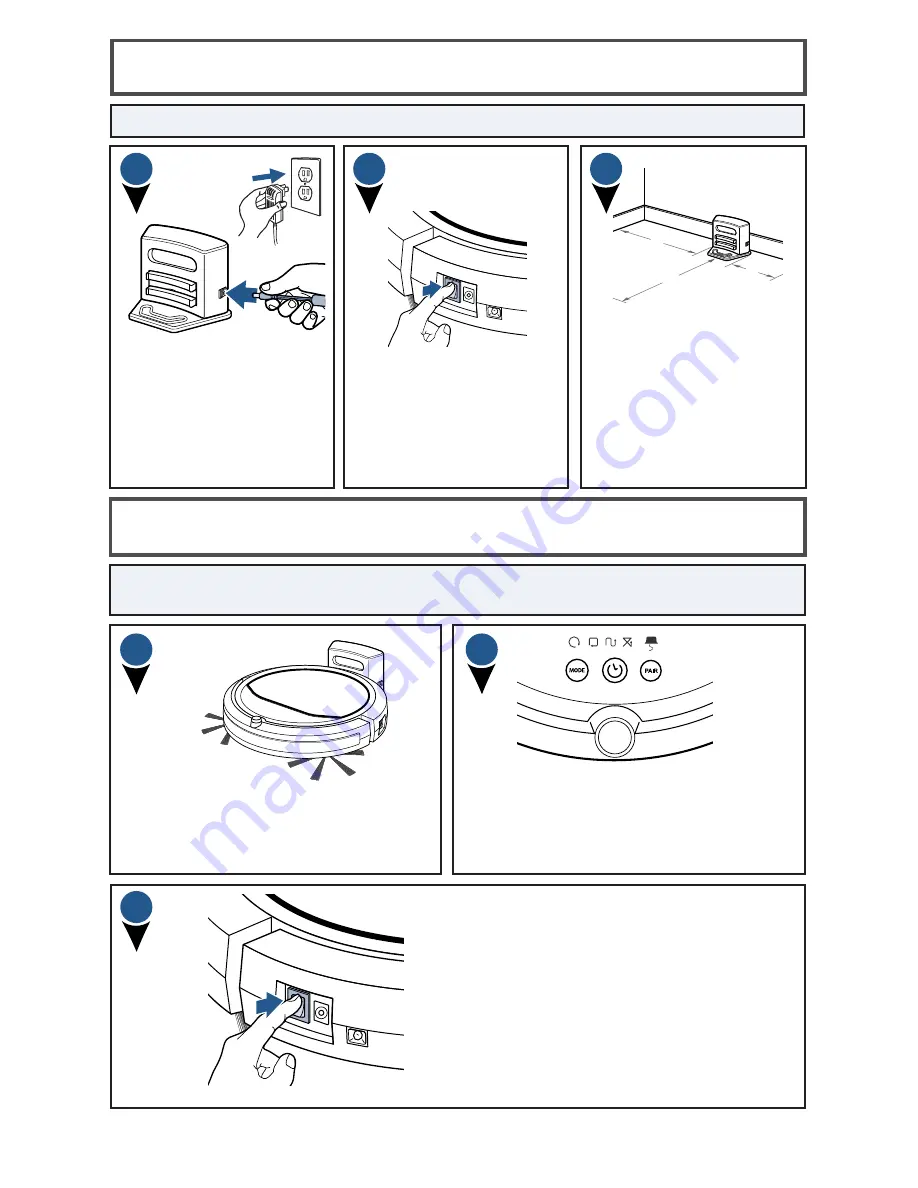
Insert the adapter plug 

directly into the docking 

station jack, then plug the 

power adapter into the 

wall outlet. 

Turn the Power Switch 

to ON. The unit will not 

charge if the Power Switch 

is OFF.

When charging begins, ‘00’ will display on 

the screen and will start counting up (‘01’, 

‘02’, ‘03’…). The battery is fully charged 

when the clock icon (between the MODE & 

PAIR buttons) is illuminated in green.  

Make sure the docking 

station is installed correctly 

with at least 40 inches 

to one side, 12 inches to 

the opposing side and no 

obstructions in front of the 

docking station. Do not 

position docking station 

near stairs or cliff edges.

1

2

12"

40"

79"

3

Make sure the Power Switch is ON. Place 

the robot on the docking station so that 

the contact points on the robot and the 

docking station are touching.

Step 4: Charge Your SmartClean® Connected

NOTE: 

Charge the battery for 4-5 hours.

1

2

To activate low power mode (sleep 

mode), put your robot on the docking 

station with the Power Switch in the OFF 

(O) position. Turn the Power Switch from 

OFF to ON (I) six times consecutively, 

leaving the robot in the ON position. ‘SP’ 

will read on the display. The robot will not 

function manually or from the app while in 

sleep mode. To turn sleep mode OFF, turn 

the Power Switch OFF and then back ON. 

3

Summary of Contents for 2147 SERIES

Page 1: ...SMARTCLEAN CONNECTED Robotic Vacuum ___________ USER GUIDE 2147 SERIES More of a video person Look for this icon and go online for an instructional how to video at www BISSELL com videos ...

Page 2: ...ymeasuresreducetheriskofstartingthe applianceaccidentally Rechargeonlywiththechargerspecifiedbythe manufacturer Achargerthatissuitableforonetype ofbatterypackmaycreateariskoffirewhenused withanotherbatterypack Useappliancesonlywithspecificallydesignated batterypacks Useofanyotherbatterypacksmay createariskofinjuryandfire Whenbatterypackisnotinuse keepitawayfrom othermetalobjects likepaperclips coi...

Page 3: ...plies with FCC IC radiation exposure limits set forth for an uncontrolled environment and meets the FCC radio frequency RF Exposure Guidelines and RSS 102 of the IC radio frequency RF Exposure rules This equipment should be installed and operated keeping the radiator at least 20cm or more away from person s body Package Contents Safety Instructions 2 Product View 4 Assembly 5 6 Operations 7 9 Main...

Page 4: ...rging 2 Top Cover Dust Bin inside 3 Power Switch 4 Charging Port 5 Navigation Sensor 6 LED Control Panel WIFI Indicator 7 Bumper 8 IR Receiver for docking station 9 Docking Station 10 LED Cliff Sensors 11 Front Wheel 12 Edge Cleaning Brushes 13 Brush Roll 14 Rear Wheels 15 Wheel Cover Plates 16 Battery Cover Plate 1 2 10 5 4 ...

Page 5: ...ery cover and slide forward to insert the battery 1 To install the side brushes push the brush into the holder You may hear a click that indicates that the brush is in place Getting Started There are 4 steps to set up your robot Step 1 Install the Battery Step 2 Install the Side Brushes Step 3 Turn ON the Power Switch on the side of the robot Step 4 Charge your SmartClean Connected Install the bat...

Page 6: ...de 12 inches to the opposing side and no obstructions in front of the docking station Do not position docking station near stairs or cliff edges 1 2 12 40 79 3 Make sure the Power Switch is ON Place the robot on the docking station so that the contact points on the robot and the docking station are touching Step 4 Charge Your SmartClean Connected NOTE Charge the battery for 4 5 hours 1 2 To activa...

Page 7: ...mpts on the App Screen For additional set up help please visit bissell com for support videos 1 2 Getting Ready to Clean There are 2 options for cleaning Option 1 Schedule cleanings using the BISSELL Connect App Option 2 Manual cleaning using the robot s control panel or the BISSELL Connect App NOTE Before using this device pick up objects like clothing loose papers and power cords Pull cords for ...

Page 8: ...n to the docking station 8th Press 60 minute run time will not return to the docking station Selecting the Navigation Press the Mode button to select cleaning pattern Operation Control Panel Display What It Does 1st Press Spot Robot will work in circles until it encounters an obstacle once it encounters an obstacle it will switch to Auto mode 2nd Press Auto Robot will cycle through various cleanin...

Page 9: ...ng Station it may not return automatically Use the Invisible Wall to keep the robot within range of the docking station TIP Run time and performance may vary based on the amount of debris present Use the Invisible Wall to limit the allowed range in messier rooms Requires4AAbatteries Batteriessoldseparately Maintenance To keep your SmartClean Connected robot running at peak performance the followin...

Page 10: ...w Dust Bin to fully dry before placing on unit Lift the Cleaning Tool out from the lid of the Dust Bin Empty the dust and dirt from the Dust Bin 1 2 3 4 5 6 WARNING Do not operate robot vacuum with damp or wet Filters or without Filters or the Dust Bin in place Allow components to dry before reassembling the Dust Bin Once clean reinstall the Filter and close the Dust Bin lid Place Dust Bin back in...

Page 11: ...ging Cable or Dock and the Power Switch is in the OFF position Using the Cleaning Tool located in the Dust Bin lid remove any hair or debris from the Brush Roll To remove the Brush Roll lift the Brush Roll Cover off the unit and slide the Brush Roll out Insert the clean Brush Roll by fitting the round end of the Brush Roll into the round end of the Brush Roll compartment Push the round end inward ...

Page 12: ...d the Power Switch is in the OFF position Cleaning the Sensors Cleaning the Side Brushes The Side Brushes can be rinsed and if they become crooked you can soak them in hot water to make them return to the original shape Replace the brushes after they have completely dried Turn OFF the Power Switch and make sure the unit is unplugged Place bottom of the cleaner upward on a flat surface Hold the Bru...

Page 13: ...t charging Power Switch is not in the ON position Flip the switch to the ON position and place the robot on the charging base or plug in the power cord directly LED display says ERROR E1 E2 E3 E4 E5 E6 and Beep 2 times or 3 times Please refer to the table on page 14 for solving the problems If the problem is not fixed turn OFF the Power Switch and then turn the switch back ON Doesn t return to bas...

Page 14: ...unit does not fix automatically turn the unit OFF and back ON E3 Bumper is stuck Remove robot from obstacles robot will detect the error and fix automatically E4 Unit is lifted up from floor Put robot back on the floor E5 Color of floor is too dark Remove robot from the flooring and use the Invisible Wall to keep the robot off of the flooring where the error occured E6 Battery is not installed pro...

Page 15: ...the User s Guide is not covered BISSELL IS NOT LIABLE FOR INCIDENTAL OR CONSEQUENTIAL DAMAGES OF ANY NATURE ASSOCIATED WITH THE USE OF THIS PRODUCT BISSELL S LIABILITY WILL NOT EXCEED THE PURCHASE PRICE OF THE PRODUCT Some states do not allow the exclusion or limitation of incidental or consequential damages so the above limitation or exclusion may not apply to you EXCEPTIONS AND EXCLUSIONS FROM T...

Page 16: ...ly earn points for discounts and free shipping on future purchases Faster Service Supplying your information now saves you time should you need to contact us with questions regarding your product Product Support Reminders and Alerts We ll contact you with any important product maintenance reminders and alerts Special Promotions Optional Register your email to receive notice of offers contests clea...

Reviews: