


WIRING MOTOR
(A) All power saws are wired at the factory for 220 volts or 440 volts as specified on original order. Be sure motor
specificaitons (voltage, cycle, phase) match power supply line. Be sure line voltage is up to specification.
(B) Connect leads to machine in a manner that will be approved by local electrical inspectors.
(C) We recommend not less than No. 12 wire. If leads are too light, machine may not have sufficient cutting
power and/or speed.
(D) The V-belt is packed loose in machine to prevent deformation, and must be installed on pulleys at time of
installation.
(E) Motors are dual voltage and can be changed according to wiring diagram on motor nameplate. Be sure the
correct AEG contactor and overload is installed to match the selected volts and amps.
(F) FAILURE TO USE THE PROPER CONTACTOR AND OVERLOAD FOR MOTOR VOLTAGE WILL CAUSE
IRREPARABLE DAMAGE TO THE CONTACTOR.
(G) The BIRO Manufacturing Company is not responsible for permanent wiring, connection or installation.
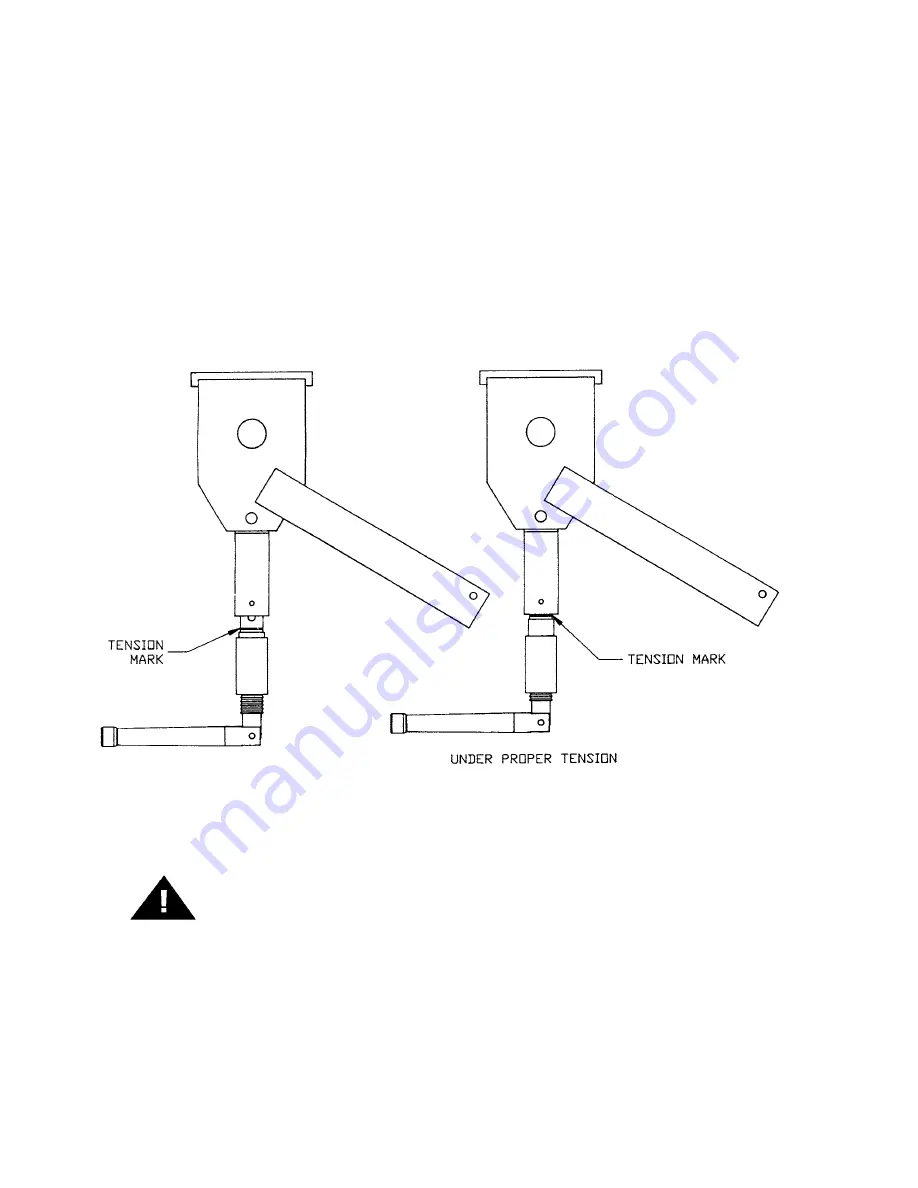
5. Be sure saw blade is properly installed on the saw wheels and set at proper tension. Turn the blade tensioning
handle clockwise until the tension mark is even with the bottom of the upper wheel hinge plate as shown.
6. Make sure the saw guide bar is in its lowest position. Close head and base doors and latch.
7. Push the start button and check for proper phasing of the motor. Blade should be traveling down through the
saw guide.
8. Watch for proper tracking of the saw blade. Back of blade should be centered in the hole in saw guide in
stationary bar (Item No. 119A). Push the stop button to stop machine.
9. Check placement of all warning labels, wall chart and Manual. Machine is ready for trained operators to process
product.
10. Contact your local Distributor or
BIRO
directly if you have any questions or problems with installation or
operation of this machine.
4
KEEP HANDS CLEAR OF SHARP MOVING BAND TYPE SAW
BLADE
Summary of Contents for 55
Page 5: ...3 ...
Page 7: ...WARNING LABELS FOR BIRO POWER SAWS SEE PAGE 11 FOR LOCATIONS ON MACHINE 5 ...
Page 14: ......
Page 15: ...13 ...
Page 19: ... NOTES 17 ...
Page 21: ......
Page 26: ...Wing nut 7 16 14 SS ...
Page 27: ......


