background image

BP-002 User's Manual 

- 5 - 


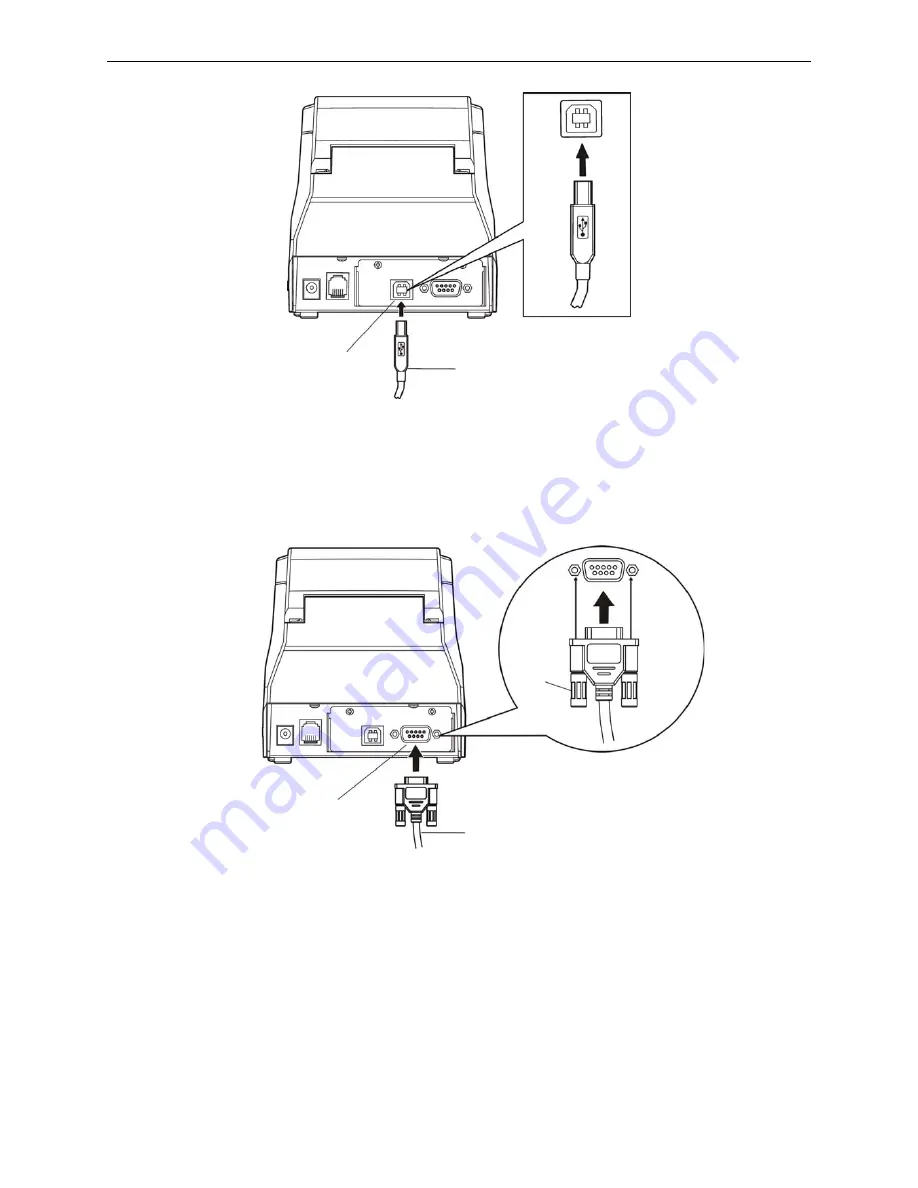
2.3.4 Connecting the Serial Interface Cable 

1. Make sure the computer and the printer are both turned off, connect the serial interface cable to the 

connector of the printer. Tighten the connector screws as shown in Figure 2-5.   


2. Connect the other end of the cable to the computer’s serial interface and tighten the screws. 


2.3.5 Connecting the Ethernet Interface Cable 

Plug the crystal end of the Ethernet interface cable (RJ-45) into the printer's Ethernet interface, plug 

the other end into the LAN’s entrance as shown in Figure 2-6. 


Figure 2-5 Connecting the serial interface cable 

Figure 2-4 Connecting the USB interface cable 

Serial Interface


Serial Interface Cable

Screws

USB Interface 

USB Interface Cable

Summary of Contents for BP-002BF

Page 1: ......

Page 2: ...the cord or the plug is mangled please stop using and get a new one replaced Make sure the old one is far away from the printer so it can avoid someone who does not know the inside story getting damag...

Page 3: ...Manual ii Notice The contents of this manual are subject to change without notice All the parts of the printer can be recycled When it is abandoned we can call it back freely Please contact us when y...

Page 4: ...2 5 Installing the Driver 7 2 6 Installing Bluetooth Interface Driver 9 2 7 Ethernet Settings 11 2 7 1 Connecting Printer 12 2 7 2 Setting IP Address 12 2 8 Wi Fi Setting 14 2 8 1 Connect to the Prin...

Page 5: ...erface 33 5 2 4 Serial Interface 33 5 2 5 Ethernet Interface 34 5 2 6 Power Supply Inlet 35 Chapter 6 Troubleshooting and Maintenance 36 6 1 Maintenance 36 6 2 Error Message on the Control Panel 36 Ch...

Page 6: ...interface cable Black BP 002BR USB interface Serial interface Serial interface cable Black BP 002BN USB interface Ethernet interface Ethernet interface cable Black BP 002BT USB interface Bluetooth in...

Page 7: ...BP 002 User s Manual 2 Note According to the specific interface standards Figure 1 2 Back interfaces of the printer Data interface Cash drawer interface Power supply inlet...

Page 8: ...SB interface Wi Fi According to specific interface standards Please contact your local dealer to change the interface with added expense if needed Connect the printer to your computer as described bel...

Page 9: ...wire clips as shown in Figure 2 3 2 Connect the other end of the cable to the computer Tighten the connector screws 2 3 3 Connecting the USB Interface Cable 1 Plug the USB cable A end flat shape into...

Page 10: ...her end of the cable to the computer s serial interface and tighten the screws 2 3 5 Connecting the Ethernet Interface Cable Plug the crystal end of the Ethernet interface cable RJ 45 into the printer...

Page 11: ...AC adapter and then plug the other end of power cord into the grounded electrical outlet Note 1 If the rated voltage doesn t match the outlet voltage contact your dealer for assistance Do not plug in...

Page 12: ...2 The installing steps of parallel interface for Windows 7 are as follows 1 Click Start Device and Printers 2 Click Add Printer then it pops up a window of Add Printer Wizard click Next then please re...

Page 13: ...test page completed pops up click Yes 6 The printer driver process is installed successfully 2 The installing steps with an USB cable Note 1 As the system of Windows 98 ME doesn t have integrated USB...

Page 14: ...according to prompt choose the printer is default Yes click Next choose Yes recommended click Finish A window of Printer test page completed pops up click Yes 6 The printer driver process is installe...

Page 15: ...BP 002 User s Manual 10 4 Select the BP 002 and then click Next 5 Tick off the option of Let me choose my own passkey and enter 1234 as shown then click Next...

Page 16: ...ery Bluetooth device has its own address Please reinstall it when replacing the Bluetooth device 2 7 Ethernet Settings Please use Birch network setting software NetFinder to set the IP address for Bir...

Page 17: ...follows 2 Search printer Click Search button in the main interface the dialog box appearing will begin searching automatically and show appearance listing a printer in the main interface if found The...

Page 18: ...s and MAC address What s more the assign mode dynamic static is noted behind the IP address 1 Correlative description for IP address settings In order to search and set printer s IP address convenient...

Page 19: ...there is no gateway in the network fill 255 255 255 255 in the Default gateway IP address and Subnet Mask should obey the assigning rules of local LAN Ethernet please enquire the administrator of net...

Page 20: ...d setup mode please don t click Enter setup mode again Load Load the current Wi Fi parameter Baudrate Set the serial baudrate This parameter setting usually does not need to change Flow control Contro...

Page 21: ...gment such as 192 168 0 the PCs in this segment all can communicate with the printer Recover default Recover the default setting After recover the default setting you should set the Wi Fi parameters a...

Page 22: ...d obey the assignment rule of the local LAN Use DHCP Select to use dynamic IP assignment or not When select Use DHCP the IP parameters would be invalid Please ensure there it DHCP server in the networ...

Page 23: ...ishing recovering please restart the printer and set the Wi Fi parameters again 2 9 Installing Printer Network Driver The ways of installing network driver are classified into Newly install way and Up...

Page 24: ...address 192 168 0 240 for example Port Name is created automatically after finishing filling in IP address 6 A window of Additional Port Information Required pops up select Custom in the Device Type...

Page 25: ...river WIN2000 XP Vista Win7 click Open then click OK to return to the window of Install Printer Software select the respective model click Next 12 Follow the direct click next gradually till the insta...

Page 26: ...tandard TCP IP Printer Port Wizard pops up click Next 6 A window of Add a port pops up import the IP address reported by the Setting printer s IP address in the Printer name or IP address column Take...

Page 27: ...ional Port Information Required pops up select Custom in the Device Type then click settings 8 A window of Port Settings pops up Affirm that Port name and Printer name or IP address are correct Protoc...

Page 28: ...Next 10 A window of Completing the Add Standard TCP IP Printer Port Wizard pops up click Finish 11 Return to Printer Ports click Close 12 Return to Properties make sure the network port is selected cl...

Page 29: ...BP 002 User s Manual 24...

Page 30: ...printer printouts the self test content normally it denotes that there is nothing wrong with the printer except for the interface connecting to the computer Otherwise the printer should be repaired Ho...

Page 31: ...rameter Settings BP 002 supports the function of online aptitude parameter settings which can be set in the PC with the driver installed in The concrete setting steps are shown as follows 1 Make sure...

Page 32: ...set the printer online or use the proper printer port 6 When setting parameter please click parameter icon then parameter setting window will pop up there are parameter items decription and control b...

Page 33: ...ch the thermal print head after printing to avoid being burned 2 Don t pull the paper moving directly with your hand 1 Push the cover opening button open the upper cover 2 Insert the roll paper as sho...

Page 34: ...cover NOTE After finishing installing the paper if PAPER OUT indicator light and ERROR indicator light are still on or the printer makes strange noise when feeding paper please open the cover and re...

Page 35: ...e in 1 203 inch increments Interface Cash drawer interface data interface parallel interface USB serial interface USB Ethernet interface USB interface Bluetooth and USB interface Wi Fi Cash drawer int...

Page 36: ...er feed mode Unidirectional with friction feed Average no malfunction period 5 million lines Code page 0 PC437 Std Europe 1 PC437 2 PC850 Multilingual 3 PC860 Portuguese 4 PC863 Canadian 5 PC865 Nordi...

Page 37: ...is a 36 PIN connector whose pins are shown as below Table A 2 Connector Pin Assignments Pin number Signal Direction Description 1 STB IN Trigger in low level read the data in rising edge 2 DATA1 IN 3...

Page 38: ...tor A and B s signal wire assignment is as Table A 3 shown 5 2 4 Serial Interface BP 002 printer s serial interface is compatible with RS 232C protocol supporting RTS CTS and XON XOFF handshaking prot...

Page 39: ...BP 002 printer s serial interface can be connected with the standard RS 232C connector When connecting with a PC the connecting picture is shown as Figure 5 6 While connecting with an IBM PC or a com...

Page 40: ...User s Manual 35 5 2 6 Power Supply Inlet The BP 002 printer connects with a 8 5V 5 and 3A AC adapter The power supply inlet is shown as Figure 5 9 Figure 5 9 Power supply inlet Figure 5 8 Ethernet in...

Page 41: ...se of the printer prevents greater part of dust from invading Clean Printer Case Remove the dirt in the printer case with clean soft cloth and take out the paper pieces with a nipper Clean the printer...

Page 42: ...ntal tab position LF Print and line feed Format ASCII LF Decimal 10 Hex 0A Description Print the data in the print buffer and feed one line based on the current line spacing Feed paper one line when t...

Page 43: ...not selected 7 1 Underline mode selected ESC Set absolute print position Format ASCII ESC nL nH Decimal 27 36 nL nH Hex 1B 24 nL nH Description Set the distance from the beginning of the line to the...

Page 44: ...1 k n1 256 n2 3 m 32 33 The number of dots in horizontal direction is n1 256 n2 If the number dots exceed the max dot number in a line shown as below the excess data is ignored M is used to select dot...

Page 45: ...at ASCII ESC n Decimal 27 63 n Hex 1B 3F n Description Cancel the character specified by n n 32 126 ESC Initialize printer Format ASCII ESC Decimal 27 64 Hex 1B 40 Description Initialize the printer t...

Page 46: ...ect the international character set according the value of n as shown in the follow 0 USA 1 France 2 Germany 3 U K 4 Denmark I 5 Sweden 6 Italy 7 Spain I 8 Japan 9 Norway 10 Denmark II 11 Spain II 12...

Page 47: ...n lines n 0 255 ESC p m t1 t2 Generate pulse Format ASCII ESC p m t1 t2 Decimal 27 112 m t1 t2 Hex 1B 70 m t1 t2 Description Printer output pulse whose width specified by t1 and t2 On time is t1 2ms...

Page 48: ...3 Off 00 0 Double height is not selected On 08 8 Double height is selected 4 Not define 5 Not define 6 Not define 7 Off 00 0 Underline is not selected On 80 128 Underline is selected FS Set Chinese la...

Page 49: ...ght 24 columns FS S Set Chinese character spacing Format ASCII FS S n1 n2 Decimal 28 83 n1 n2 Hex 1C 53 n1 n2 Description 0 n1 255 0 n2 255 Set the character left side spacing to n1 horizontal or vert...

Page 50: ...256 horizontal or vertical motion unit nL nH 0 255 Horizontal or vertical motion unit is specified by GS P command GS P Set horizontal or vertical motion unit Format ASCII GS P x y Decimal 29 80 x y H...

Page 51: ...0 9 48 d 57 2 EAN13 Fixed 12 k 13 0 9 48 d 57 3 EAN8 Fixed 7 k 8 0 9 48 d 57 4 CODE39 Can be changed 1 k 0 9 A Z SP start character 48 d 57 65 d 90 d 32 36 37 43 45 46 47 d 42 start character 5 ITF Ca...

Page 52: ...using the mode specified by m as follows m 0 48 normal m 1 49 double width m 2 50 double height m 3 51 quadruple XL xH yL yH 0 255 XL xH specifies xL xH 256 bytes in horizontal direction for the bit i...

Page 53: ...et line spacing ESC Select peripheral device ESC Cancel user define character ESC Initialize printer ESC D Set horizontal tab position ESC E Turn emphasized mode on off ESC J Print and feed paper ESC...

Page 54: ...Character size GS B Turn white black reverse mode on off GS H Select print position of HRI character GS L Set left margin GS P Set horizontal or vertical motion unit GS W Set print area width GS f Se...

Reviews: