background image

K

HA
C

H

IK C

HE
C

K

ER M

ANU

AL

K

HA

C

H

IK C

HE

C

K

ER M

ANU

AL

Rev.20220224e

STEPS FOR PERFORMING A MEASUREMENT

STEPS FOR PERFORMING A MEASUREMENT

31

32

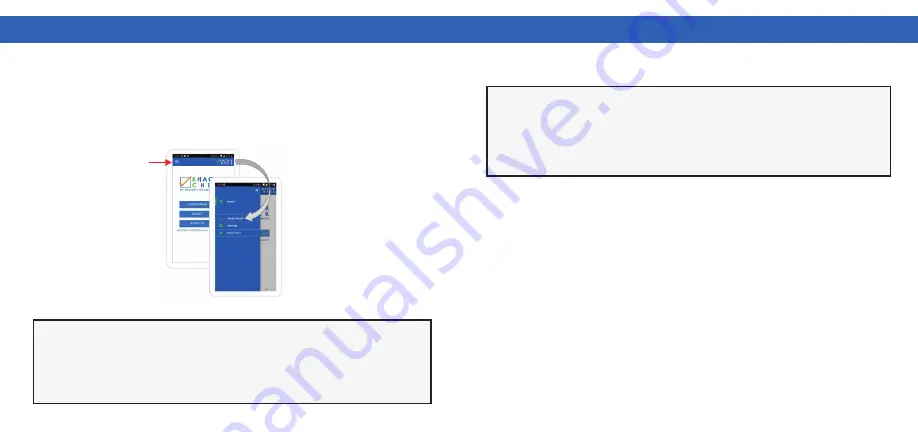
If you wish to connect a different scanner with your phone/tablet after you have 
previously connected a another, please press on the 3-bar symbol in the upper 
left corner of the 

KHACHIK CHECK

 app to select and start the “

Setup wizard” 

manually 

(Figure 4). Follow the instructions to connect the additional scanner 

now with the phone/tablet. The Setup wizard will guide you to an app page for 
selecting and starting a measurement.

ATTENTION

ATTENTION

Please note that the 

KHACHIK CHECK

 app stores only the last connection data. 

Therefore, you must conduct the connection setup again when you have connected 
an additional scanner with your phone/tablet or if you wish to reconnect with the first 
scanner once again.  Every new scanner requires a new connection setup process.

Before you measure the first time please read the general recommendations 
for a correct measurement listed in 

Chapter 10 “Measurement Basics”. 

Following the rules of this chapter is essential towards effectively obtaining 
a correct result.

Figure 4

Sign

To carry out the following steps, the 

KHACHIK CHECK

 app must have been 

started the first time and the connecting process must bave been performed 
successfully and the app displays the image for “Step 15” 

(See Page 30). 

For performing a measurement, one of the modes displayed on the start page 
of the app must be selected (Figure 5). With the mode 

CAROTENOID

, you can 

only measure carotenoids. It is a marker of antioxidants concentration in skin 
and blood. The 

HEART

 mode enables the measurement of 

Heart Rate Variability 

(HRV); Heart Rate (Fitness); the calculation of Biological Age; and Body Mass 
Index (BMI). If you select the mode 

VITALITY

, your results will be a combination 

of both heart and carotenoid mode. Your measurement will test for carotenoids, 
HRV, HR, Biological Age and BMI. The results are plotted in the Vitality Report 
together and displayed in the web browser of your phone/tablet.

9.2: Measurement Modes

Summary of Contents for KHACHIL CHECK

Page 1: ...USER MANUAL Manufacturer Biozoom Services GmbH Ziegelstraße 17 34121 Kassel Germany Copyright 2022 Naturally Plus USA ...

Page 2: ...ment 19 9 1 How to Connect Scanner with Phone Tablet 32 9 2 Measurement Modes 34 9 2 1 Carotenoid 43 9 2 2 Heart 47 9 2 3 Vitality 10 48 Measurement Basics 48 10 1 Preparation Before Starting a Measurement 49 10 2 Performing Measurements 53 10 3 General Aspects Influencing the Level of Measured Results 11 55 Troubleshooting 12 60 Maintenance and Cleaning 13 61 Technical Specification 14 62 Certifi...

Page 3: ...of the device in fire as this might cause an explosion resulting in serious injury death and property loss 3 4 1 HOW TO GET STARTED Please read all chapters of this manual in the ranked order carefully to learn the correct handling of the device Before you use the device please first download the KHACHIK CHECK app onto your phone or tablet ch 5 Second charge the battery of the device ch 8 If the d...

Page 4: ... air Turn off the device before boarding an aircraft Using the device on an aircraft might affect aircraft instrumentation communication and performance might disrupt the network might otherwise be dangerous to the operation of the aircraft its crew and its passengers and might be illegal Do not disassemble the device Most modern electronic equipment is shielded from radio frequency RF signals How...

Page 5: ... 500mA of current iPhone with IOS 12 or newer or Android phone with OS version 8 or newer 2 4 GHz WIFI connection 54 MBps min Internet connectivity Device Internet Environment 3 INTENDED USE ATTENTION Measure on uninjured bare skin only The KHACHIK CHECK is not a medical product and is not intended to diagnose treat cure or prevent any disease The KHACHIK CHECK may only be used for the purposes me...

Page 6: ...Guide 9 10 5 DOWNLOADING THE KHACHIK CHECK APP To use the KHACHIK CHECK app for iOS or Android it must be downloaded onto your smartphone or tablet from the App store or Google Play https apps apple com us app khachik checker id1522002491 https play google com store apps details id net biozoom vitalitycheck khachik hl en_US gl US ...

Page 7: ... To align the palm of the hand while measuring Sensor Area 8 LED flashes one after the other when measuring When measuring the LEDs of the Sensor area 8 light will switch on one after the other 11 12 Names and function of each part The base portion of the KHACHIK CHECK is shown in Figure 2 The base consists of an On Off button 1 a connectivity button 3 the USB C socket 2 the sensor area 8 and seve...

Page 8: ...LIT GREEN FLICKERING 7 PRODUCT DESCRIPTION The progress indicator 5 shows the progress The displayed information has different meanings for every status See Chapter 11 for more information To indicate a present status the status of the light indicators 4 will display the following colors LED COLOR Error or problem In this mode the scanner opens a a WIFI network see Chapter 9 1 Update mode USB conn...

Page 9: ...ts red and the status indicator lights white If the battery is fully charged the device will stop charging automatically ATTENTION Please charge the KHACHIK CHECK scanner entirely before its first use 1 Plug the USB C cable into the charging port 2 Connect the cable into a USB charger or USB port 3 Switch the scanner on The status indicator will appear white If you do not switch the device on the ...

Page 10: ...e a phone tablet can handle only one WIFI connection at the same time the app may need to change the WIFI connection between connecting to the scanner and connecting to the internet several times The connection data are stored in the app so changing from the scanner WIFI to the WIFI used to connect your phone to the internet does not require you to enter passwords or network names But depending on...

Page 11: ...izard again you can find it in the main menu by pressing the 3 bar symbol on the top left side of the app Please follow the instructions step by step until you can select and start a measurement The following screen shots displays the connection procedure of the Setup Wizard Starting a measurement procedure is described in Chapter 9 2 The image of STEP 1 see next page is displayed on the phone tab...

Page 12: ... A MEASUREMENT 9 STEPS FOR PERFORMING A MEASUREMENT 21 22 Step 1 Step 2 Step 3 Step 4 Permission to connect to scanner WIFI Connection permitted Permission to connect to scanner WIFI Drop down menu to select language Press REQUEST PERMISSION Press ALLOW Press NEXT Language Selection ...

Page 13: ...RMING A MEASUREMENT 23 24 Request to connect the scanner Switch scanner on Check the scanner status Remove the lid cover from the scanner Press CONNECT A SCANNER Press NEXT Push this button at your scanner to switch the scanner on If status indicator does not light blue press CHANGE MODE Step 5 Step 6 Step 7 Step 8 ...

Page 14: ...scan QR Code Identification by typing the serial number Identification enables connection with phone Press NEXT if status LED lights blue Press MANUALLY to type the number Press SCAN for scanning the QR Code If you have used QR Code press ALLOW If you have chosen to press MANUALLY use the serial number that is printed on the label of the scanner Step 8 1 Step 9 Step 10 Step 10 1 ...

Page 15: ...ORMING A MEASUREMENT 9 STEPS FOR PERFORMING A MEASUREMENT 27 28 Trying to connect to the scanner Firmware up to date Firmware is not up to date Check the scanners Firmware The scanner number will be displayed here Press NEXT Press START UPDATE Step 11 Step 12 Step 13 Step 13 1 ...

Page 16: ...ENT 9 STEPS FOR PERFORMING A MEASUREMENT 29 30 Firmware will be updated Connection scanner with phone successful Start page for conducting measurements Firmware is now up to date restart scanner Press LET S GET STARTED Press NEXT Select your measurement mode Step 13 2 Step 13 3 Step 14 Step 15 ...

Page 17: ... first time please read the general recommendations for a correct measurement listed in Chapter 10 Measurement Basics Following the rules of this chapter is essential towards effectively obtaining a correct result Figure 4 Sign To carry out the following steps the KHACHIK CHECK app must have been started the first time and the connecting process must bave been performed successfully and the app di...

Page 18: ...esult The data of each of these four results are evaluated directly after each measurement taken As a result you may begin seeing recommendation messages if you have not placed the hand on the sensor properly Therefore user experience can be improved within the measurement process The LIGHT version can be used for a quick check when you do not have enough time to perform a FULL measurement It is n...

Page 19: ...he orange blinking after 60 seconds if the user has not placed their hand on the sensor If the sensor has detected the placement of the hand the measurement starts The smallest symbol of the progress indicator will stop blinking and the lights will be a permanent green At that time the hand should not be moved on the sensor to avoid a miss reading The progress indicator LEDs on the scanner shows t...

Page 20: ...e tablet disconnects from the scanner and the WIFI indicator turns off Only the status indicator still lights up in blue Figure 8 Your phone tablet will connect to an existing WIFI or alternatively use a cellular connection to the internet After successful connection the app informs you that the data has been sent to the server When the result is available the result is sent to the KHACHIK CHECK w...

Page 21: ...efore you get the final result Figure 10 9 STEPS FOR PERFORMING A MEASUREMENT The app offers two modes to do the four measurement steps In the standard mode Figure 11 the data of each individual measurement is evaluated directly after the measurement This mode is recommended for new users because it enables the assessment of the hand placement on the scanner for each measurement directly after the...

Page 22: ...ate this option the app will first complete all four measurements and then send the data to the server for evaluation This will significantly reduce the time needed for a FULL measurement because the smartphone does not need to change the WIFI connection from scanner to internet that often It will also reduce user interaction as Phones tablets with iOS operation system or Android 10 and higher alw...

Page 23: ...data press the NEXT button and LET S GET STARTED The app will then inform you that you should be measuring in a seated position with your arm and elbow on the table because in this position your hand rests on the sensor only with the weight of your arm see Chapter 10 Additionally the app requests that you relax without moving the position of your hand on the sensor while measuring Figure 13 After ...

Page 24: ...when it s finished the app requests you to lift your hand off the sensor The data will only be transferred to the server for calculations after you have lift your hand Figure 15 The status indicator will then light blue For sending data to the server the app will connect to the internet and begin the data transfer After the results have been calculated they will be displayed in a web browser on yo...

Page 25: ...ften see an effect on your antioxidant measurement as well as on heart rate variability that does not reflect your general level If you want the maximum measurement precision allow your body to rest 20 minutes between exercise and measurement Measure at the same time each day to get consistent results The antioxidant level may change during the day During sleep your body relaxes and recovers You c...

Page 26: ...Figure 18 Rest your elbow on the table for controlling the pressure when placing the hand on the sensor Apply no additional force the weight of your hand arm is enough You can get to the ideal contact pressure by letting the hand rest on the sensor with its own weight Do not use the muscles of the arm to lift the hand or to press it onto the sensor 10 MEASUREMENT BASICS The ideal contact pressure ...

Page 27: ...soon as it detects your skin To make sure not to move your hand after the measurement has started avoid correcting the position of the hand on the scanner after the skin touches the scanner Use the groove to align the hand precisely Do not move your hand while measuring Figure 19 Avoid any bright light escaping between your hand and the scanner while measuring sunlight bright artificial light Cove...

Page 28: ...uires these substances to defend itself against free radicals which can be generated in many ways Examples are smoking radiation such as strong sunlight stress and strong physical exercise Even though a complete list of all influences would exceed the scope of this document a few important examples are listed below Note that illness may lower your antioxidant value If you have a cold or some other...

Page 29: ...unexpected behavior of the scanner this table should assist with your understanding of the situation If further actions are necessary this table will supply instructions For unexpected events not listed within the table please carry out the following steps Since the scanner will indicate its status by lighting of a specific color or a combination of colors of different indicators the table below h...

Page 30: ...to 2021 Scanner is switched on status indicator lights orange WIFI indicator lights green or is blinking green 1 2 3 No Blinking or constantly green 11 TROUBLESHOOTING Condition Indicator Situation Connection with phone tablet is possible now If a connection has already been established with this phone tablet before a new connection is automatically established when another measurement is conducte...

Page 31: ... will not be send to the server for calculation Please take off your hand from the scanner now Scanner is measuring Scanner has finished the measurement Firmware update mode Flickering Blinking Each symbol is repeatedly switched on one after the other Scanner has finished the measurement Scanner requests you to take your hand off the sensor 7 8 9 10 No 12 MAINTENANCE AND CLEANING The KHACHIK CHECK...

Page 32: ...CC RF exposure compliance requirements no change to the antenna or the device is permitted Any change to the antenna or the device could result in nthe device exceeding the RG exposure requirements and void user s authority to operate the device Patent Information The Biozoom MSRRS SCN05 is protected by one or more of the following U S Pat Nos 10 416 079 11 085 876 European Patent Nos EP 3013217 E...

Reviews: