Chapter 2: Hardware installation
| 9
Z170GT7
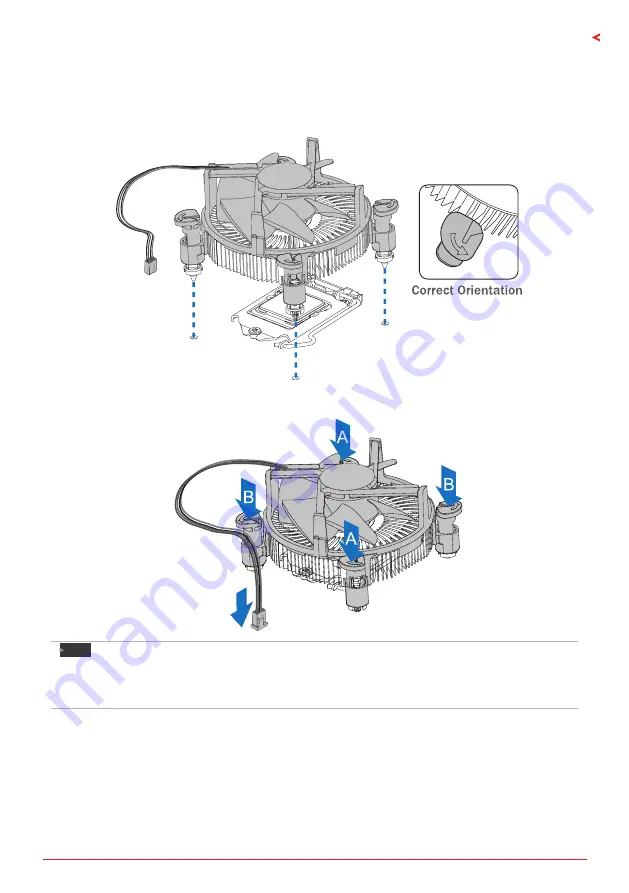
2.2 Install a Heatsink
Step 1: Place the CPU fan assembly on top of the installed CPU and make sure that the four
fasteners match the motherboard holes. Orient the assembly and make the fan cable is closest
to the CPU fan connector.
Step 2: Press down two fasteners at one time in a diagonal sequence to secure the CPU fan
assembly in place. As each fastener locks into position a click should be heard.
Note
»
Apply the thermal interface material on the CPU before heatsink installation, if necessary.
»
Do not forget to connect the CPU fan connector.
»
For proper installation, please kindly refer to the installation manual of your CPU heatsink.
Summary of Contents for Z170GT7
Page 6: ...6 Chapter 1 Introduction 1 5 Motherboard Layout Note represents the 1st pin...
Page 42: ...42 APPENDIX I Specifications in Other Languages this page intentionally left blank...
Page 43: ...FCC FCC 15 Class B BIOSTAR BIOSTAR BIOSTAR CE 2004 108 CE 2006 95 CE 1999 05 CE...
Page 45: ...3 Z170GT7 1 1 0 45 1 2 Serial ATA x4 ATX I O x1 x1 x1 LED x1...
Page 48: ...6 1 5 1...
Page 49: ...7 Z170GT7 2 1 CPU 1 CPU CPU 2 3...
Page 50: ...8 4 CPU CPU 5 CPU LGA1151 CPU CPU CPU CPU...
Page 51: ...9 Z170GT7 2 2 1 CPU CPU CPU 2 2 CPU CPU CPU CPU...
Page 64: ...22 UEFI BIOS 7 DEL BIOS Save Exit Restore Defaults Save Changes and Reset BIOS BIOS BIOS Save...
Page 66: ...24 UEFI BIOS eHot Line eHot Line Send Send Do Not Send Save As...
Page 68: ...26 UEFI BIOS RACING GT Utility RACING GT 1 2 3 4...
Page 71: ...UEFI BIOS 29 Z170GT7 1 CPU 2 3 CPU 4 CPU 5 6 7...
Page 72: ...30 UEFI BIOS 1 2 3 4 5 CPU CPU...
Page 77: ...35 Z170GT7 4 5 RAID RAID Block 2 6 8 Uses RAID 0 RAID 1 2 RAID 1 RAID1 RAID 2 2 RAID 1 100 2...


