background image

1. Auto Power Off

The Meter will power off automatically if you don't operate it for over 2 minutes.

2. Manual Power Off

If you want to turn off the Glucose Meter, please keep pressing the "        " button 

(right button)

 for 

2 seconds.

3. How to turn on the Power


   1) Press the "        " button 

(right button)

 .

   2) Insert one piece of strip.

Turning On/Off the Meter

27

26

Function Screens and Button Operations

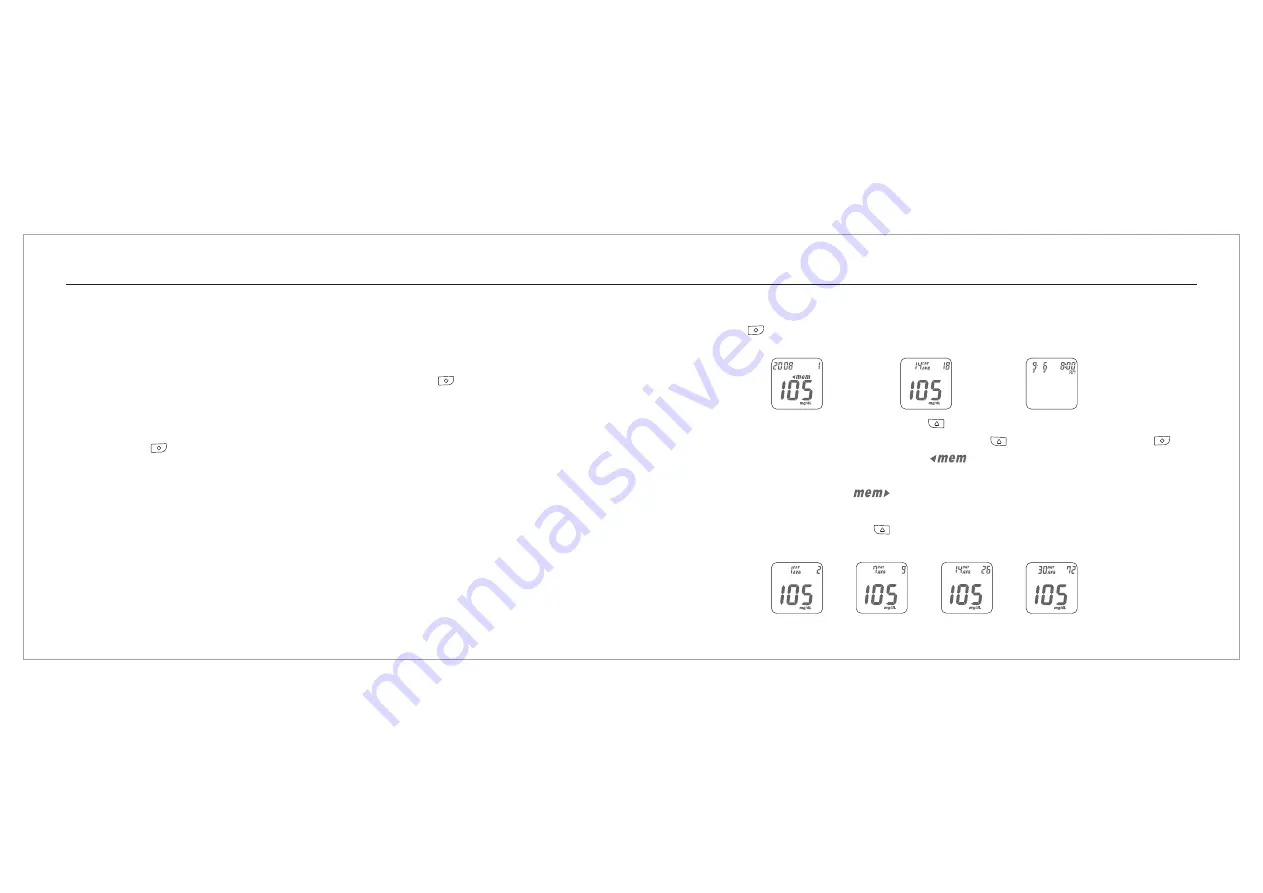
Switching the Function Screens

1. Press the "      " button 

(right button)

 to switch function screens including Memory, Average and 

Time in sequence.

Time

Average

Memory 

2. Under memory function, you can keep press

button 

your memorized test data.

    If you want switch the searching direction, keep pressing

, then press

. When the meter screen shows

, you can do searching forward. You will 

see the numerical order of memorized data on the screen, like 2,3,4,5...etc.
When the meter screen shows

, you can do searching backward. You will see the 

numerical of memorized data on the screen, like 10,9,8,7...etc.

 "        " 

(left button)


 "        " 

(left button)


 "        " 

(right button)

 "              " 

 "              " 


3. Under Average function, press the "        " button 

(left button)

 to search your average data of 1 day, 

7 days, 14 days or 30 days in sequence.

Summary of Contents for Rightest GM210

Page 1: ...enhua Road Dali City Taichung County Taiwan 412 Tel 886 4 24951268 Fax 886 4 24952568 http www bionime com E mail info bionime com 101 3GM210 060 EN BIONIME GmbH Tramstrasse 16 9442 Berneck Switzerlan...

Page 2: ...stic use For self testing professional use only outside the body The testing result is calibrated to be plasma equivalent for test with fresh capillary whole blood samples from the fingertip You may c...

Page 3: ...toring System is intended Blood Glucose Monitoring System is intended Blood Glucose Monitoring System has not been val Precaution 5 4 Precaution Blood Glucose Meter hasn t been used for arterial blood...

Page 4: ...urning On Off the Meter Function Screens and Button Operations Easily Handling the Test Strip 30 31 41 18 20 22 26 27 28 8 10 14 16 17 Review Your Test Memory Recalling Your Test Result Recalling Your...

Page 5: ...5 Dummy Code Key for the package without strip or Smart Code Key pre installed for the package with strip 7 Test strips 0 10 25 50 pcs 8 Control Solution 9 Check Key 10 Lancing Device 11 Disposable St...

Page 6: ...lick Smart Code Key For calibrating your meter New one comes with every boxof test strips Refer to page 17 Contain the test strip port for inserting strip Assemble Smart Code Key into code key base Di...

Page 7: ...Base Assemble Smart Code Key here Battery Cover Slide cover to change batteries Smart Code Key Release Button Press down to release and switch the Smart Code Key Please follow the step and step Meter...

Page 8: ...se refer to the Test Strip Package Insert View Window This window is originally yellow before applying blood sample It will gradually become red after filled with blood drop Hand Bar Where you can eas...

Page 9: ...t Code Key Smart Code Key is designed for calibrating your meter to match the strips Each new box of strips contains its new Smart Code Key The Smart Code Key stores information that your meter needs...

Page 10: ...mart Code Key release button if one is installed 2 With the Meter off follow and direction to put the new Smart Code Key into the track on code key base Smart Code Key Installation 19 18 Smart Code Ke...

Page 11: ...will do electronic running test and the whole screen will keep blinking as soon as the batteries are installed 5 Press any button to close the running test of the meter and enter setting mode 6 Please...

Page 12: ...p Your Meter 23 22 Setting Up Your Meter Setting the Time Date and Unit 2 Month setting With the month blinking press the button left button until the current month appears Then press the button right...

Page 13: ...me screen The settings you have entered are saved 9 When you do not do any settings of meter for over 2 minutes the meter will leave setting mode and power down automatically illimol Setting Up Your M...

Page 14: ...screens including Memory Average and Time in sequence Time Average Memory 2 Under memory function you can keep press button your memorized test data If you want switch the searching direction keep pr...

Page 15: ...t strip 3 Insert the test strip into test strip port until it snaps and firmly stops Removing the test strip 1 Hold the test strip same as insert it 2 Rotate the test strip counterclockwise and pull u...

Page 16: ...Key from the new strip package Cleaning your hands Before starting your test use warm soapy water to wash your hands and dry thoroughly Warm water helps to increase the blood flow to your fingertips...

Page 17: ...the strip port you will hear a sound of beep Performing a Test in Order 2 Insert the test strip into test strip port with indication symbol facing up and aligning the metal point of the smart code key...

Page 18: ...w the local regulation and discard the used strips properly 5 While the symbol flashing you are ready to apply the blood sample The code number will appear on the right up corner of the screen Perform...

Page 19: ...ntion not to squeeze too much blood to pollute Smart Code Key 37 Performing a Test in Order Performing a Test in Order We suggest you to take 1 4 2 5 l to do the test on glucose monitoring system Bloo...

Page 20: ...result appears after the measurement is completed The result is displayed in mmol L or mg dL At the same time the result will be memorized with time and date PRECAUTION Check the expiration date print...

Page 21: ...onal immediately 3 The testing result with time and date is automatically stored in your meter s memory You may also record the glucose value in your Log Book 4 Rotate to remove the test strip Please...

Page 22: ...care professional Recalling Your Test Result 2 Under the memory screen press the button left button to review all previous results with date and time You will see results from the most recent Sequence...

Page 23: ...esult will not be used for average calculation 5 If the ambient temperature is 0 9 or 41 50 32 48 or 106 122 the test result will show with symbol blinking The test result under these range of tempera...

Page 24: ...s To perform a quality control test you have to prepare the items below Meter with Smart Code Key installed Blood Glucose Test Strips Control Solution Check Key PRECAUTION The complete quality check s...

Page 25: ...r If you want to make sure strip and meter work properly please use control solution for the test see page 50 for detail Performing a Quality Control Test Example Starting with Check Key 1 Insert the...

Page 26: ...forming a Quality Control Test 51 50 Performing a Quality Control Test PRECAUTION Before you do control solution test you have to do check key test first Before appears please don t touch the control...

Page 27: ...orized and calculated for average same as real blood test Your quality control test result by control solution test will not be calculated for average reading but still can be recalled The control sol...

Page 28: ...correctly Malfunction of the meter Understanding Control Test Results Caring for Your Meter Maintenance Keep your meter and test strip free of dust water or any other liquid Store the meter in the car...

Page 29: ...the symbol will blink in this condition Please move the meter to environment with temperature between 10 40 50 104 and redo the test after 30 minutes About Battery Error 1 The symbol is blinking when...

Page 30: ...test again Limitations Store the strips in the original capped vial at temperatures between 4 to 30 39 to 86 and relative humidity below 90 Do not freeze Blood Glucose Test strips are designed for usi...

Page 31: ...ter Dimension 30 55 Two 1 5V AAA batteries About 1000 tests 82 0 mm x 60 0 mm x 20 0 mm Specification 10 40 50 104 10 90 300 blood glucose test results with date and time Turn off automatically after...

Page 32: ...e authorized representative Different models have different specifications Some of the models are not included with the warranty card Customer Service We sincerely like to provide complete considerate...

Page 33: ...ct complied with In Vitro Diagnostic Medical Device Directive 98 79 EC CE0197 EU Rep BIONIME GmbH Disposable Sterile Lancets Product complied with Medical Device Directive 93 42 EEC CE0197 EU Rep Tram...

Page 34: ...n Medication Blood Glucose Insulin Medication Blood Glucose Insulin Medication Blood Glucose Insulin Medication DATE Breakfast Lunch Dinner Bedtime Other COMMENTS M T W T F S S Blood Glucose Insulin M...

Page 35: ...n Medication Blood Glucose Insulin Medication Blood Glucose Insulin Medication Blood Glucose Insulin Medication DATE Breakfast Lunch Dinner Bedtime Other COMMENTS M T W T F S S Blood Glucose Insulin M...

Page 36: ...n Medication Blood Glucose Insulin Medication Blood Glucose Insulin Medication Blood Glucose Insulin Medication DATE Breakfast Lunch Dinner Bedtime Other COMMENTS M T W T F S S Blood Glucose Insulin M...

Page 37: ...n Medication Blood Glucose Insulin Medication Blood Glucose Insulin Medication Blood Glucose Insulin Medication DATE Breakfast Lunch Dinner Bedtime Other COMMENTS M T W T F S S Blood Glucose Insulin M...

Page 38: ...n Medication Blood Glucose Insulin Medication Blood Glucose Insulin Medication Blood Glucose Insulin Medication DATE Breakfast Lunch Dinner Bedtime Other COMMENTS M T W T F S S Blood Glucose Insulin M...

Page 39: ...he Monitor has not been caused in whole or in part by the use of test strips that are not Test Strips manufactured by Bionime Use only Test Strips in your Monitor 3 The sole obligation of Bionime unde...

Page 40: ...per week Do you use insulin Yes No Oral medication Yes No How did you hear about the Blood Glucose meter Name Male Female Date of Birth Address City Country Postal Code Phone Number Emergency Card Ple...

Reviews: