Bioness VEC-1000 Clinicians Manual Download Page 55

46

Clinician's Guide

Walking Tests

1.  Position the patient at the start of the course. 

2.  From the Training Session screen, activate Trolley Tracking and Dynamic Body Weight Support by 

pressing the Trolley Tracking and DBWS buttons.

3.  From the Training Session screen, press the Walking Test button.

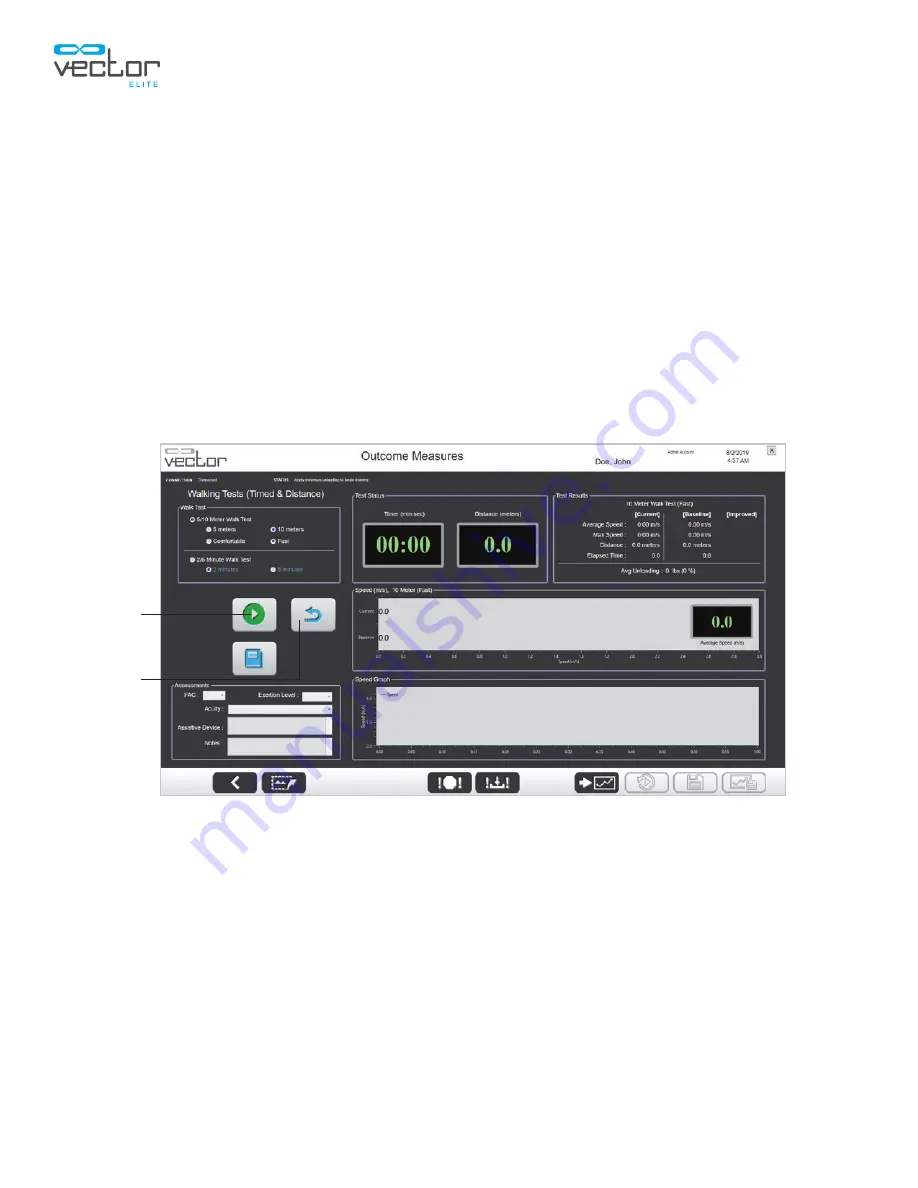
4.  The Outcome Measures Walking Tests (timed & distance) screen will open.

5.  From the Walk Test section select the type of walk test, a 5/10 meter test or a 2/6 minute test. See 

Figure 7-6. 

6.  For the 5/10 meter test type, make a secondary selection of 5 meters or 10 meters and select a  

walking speed of comfortable or fast. 

7.  For the 2/6 minute test type, make a secondary selection of 2 minutes or 6 minutes.

Figure 7-6: Outcome Measures Walking Tests (Timed & Distance) Screen 

8.  When you and the patient are ready, say “Ready and Go.”

9.  For the 5 or 10 meter walk test: Press the Start button, see Figure 7-6, when the patient has  

accelerated to their comfortable/fast walking pace. If you have placed markers, press the Start  
button when the patient's front foot crosses the 2 meter mark. 

•  The test collection will continue and automatically stop when a distance of 5 or 10 meters has 

been walked. 

10. For the 2 or 6 minute walk test: Press the Start button, see Figure 7-6, when the patient begins 

to walk. The patient will need to continuously walk as far as possible during a 2 or 6 minute period.

•  The test collection will continue and automatically stop when a time of 2 or 6 minutes has been 

reached.

Start 

Reset

Summary of Contents for VEC-1000

Page 1: ...tionsweg 41 3331 LR Zwijndrecht The Netherlands Telephone 31 78 625 6088 Email international nl bioness com Website www bioness com 612 00624 001 Rev L 08 2019 Rx Only 2019 Bioness Inc MEDICAL EQUIPME...

Page 2: ...Clinician s Guide...

Page 3: ......

Page 4: ...c products Bioness does not accept any responsibility for any damage caused to its products either directly or indirectly as a result of use and or repair by unauthorized personnel Environmental Polic...

Page 5: ...mber Manufacturer SN Serial Number European Authorized Representative Temperature Limitation Humidity Limitation Atmospheric Pressure Limitation This product must not be disposed of with other househo...

Page 6: ...omagnetic Emissions 5 Warnings 5 Incident Reporting 6 Chapter 3 Patient Harness Fitting Instructions 7 Selecting a Harness Size 7 Donning a Patient Harness 7 Chapter 4 Starting the Vector Elite System...

Page 7: ...ng Features 31 Advanced Trolley Tracking 31 Trolley Cue 31 Enabling Posterior Anterior Cue 32 Enabling Anterior Chase 32 Trolley Range 33 Advanced Body Weight Support 33 Gait Smoothing 33 Ascent Assis...

Page 8: ...t Value During a Training Session 66 Changing the Assistance Level During an Active Body Control Session 66 Disabling the Fall Limit 67 Fall Prevention 67 Auto Recovery 67 Using the Remote Control wit...

Page 9: ...bleshooting WiFi Connection Issues 91 Troubleshooting PC WiFi Connection Issues 91 Troubleshooting Remote Control WiFi Connection Issues 91 Elite Trolley Light Indicators 92 Troubleshooting Error Scre...

Page 10: ...m receives control signals through an encrypted WiFi signal from a PC or remote control The Vector Elite System is designed to be used in a hospital professional healthcare facility Figure 1 1 Vector...

Page 11: ...e three holes built to accommodate patients of different sizes Patient Harness The patient harness secures a patient during a therapy session The patient harness comes in a variety of different sizes...

Page 12: ...o the spreader bar is not too narrow or too wide Use care when assisting patients into out of a harness so they do not get tangled and fall Follow instructions carefully to prevent pulling or jerking...

Page 13: ...he harness and step away from the equipment Do not use equipment if the Vector Elite trolley has become wet e g from sprinklers as there is a risk of electrocution Servicing is required before the equ...

Page 14: ...ence by one or more of the following measures Reorient or relocate the receiving antenna Increase the separation between the equipment and receiver Consult the dealer or an experienced radio TV techni...

Page 15: ...lectrotechnical Commission emission requirements The emissions characteristics of this equipment make it suitable for use in industrial areas and hospitals CISPR 11 class A If it is used in a resident...

Page 16: ...132 cm 142 cm Brown 5X Large 56 60 142 cm 152 cm Pink 1 Waist size is determined by measuring 2 in 5 cm below the umbilicus belly button tightly around the torso Table 3 1 Maine Anti Gravity Systems...

Page 17: ...re the Velcro 10 Adjust side vertical straps attached to the leg supports if necessary 11 Adjust shoulder straps to the desired length Figure 3 1 Patient Harness Features Shoulder Straps Lower Abdomin...

Page 18: ...itialize After approximately 90 seconds a green light on the posterior of the trolley body will appear indicating that the power is on and the system started properly 3 After the power has been turned...

Page 19: ...a single trolley configured system and five menu options for a multi trolley configured system The menu options appear as buttons with descriptive icons on the Main Menu Screen See Figures 4 4 and 4...

Page 20: ...tions found on the single trolley system Patient Training Manual Control Summaries and Reference Library menus plus the additional option listed below Sync Menu This option allows the user to manually...

Page 21: ...ion login screen It is recommended to press the logout button after each therapy session Note Exit out of the Vector Elite software application when not in use Exit Button To exit the Vector Elite sof...

Page 22: ...ta fields Some data fields will have a drop down menu See Figure 5 1 Required fields are marked with an asterisk Verify that all information is correct Note The patient ID is permanent and cannot be e...

Page 23: ...ining the name Scroll up down or start typing in the patient s name in the blank fields to filter the database results 4 Once the patient has been selected the data fields will auto fill with the pati...

Page 24: ...sures and Session Status See Figure 5 3 Vector Elite systems may interface with a treadmill The Treadmill Controls will be displayed by selecting the Treadmill Controls tab See Figure 5 4 Figure 5 3 T...

Page 25: ...tion indicated until the button is released Reference the trolley icon to determine the direction of the movement Moves the trolley 18 inches 45 7 cm along the track in the direction indicated and sto...

Page 26: ...or anterior to the patient may be desired for exercises such as sit to stand In these cases first reduce unloading to 10 lbs position trolley and then increase unloading to desired value See pages 18...

Page 27: ...4 5 kgs must be detected in order to initiate DBWS If the static unloading value and the Dynamic Unloading differs by more than 75 lbs 34 kgs the system will not allow DBWS to be activated Manually ad...

Page 28: ...o red Press the Save button to save the Fall Limit setting value and zero point Make sure the Fall Limit setting value appears in green text If not press the Save button to ensure that the Fall Limit...

Page 29: ...from descending farther When the patient reaches the original standing position Trolley Tracking and DBWS will resume their normal operation Auto Recovery is enabled when the check box is selected See...

Page 30: ...Timed Up and Go TUG Test screen From this screen a TUG test may be initiated and recorded with the patient secured in the Vector Elite system Walking Test Button The Walking Test button is used to nav...

Page 31: ...t value Preparing for a Training Session If the clinician is using an open track place markings on the floor to designate the end of the track if the track does not terminate at a wall or other obstru...

Page 32: ...nt Connect the patient harness to the outermost attachment points for broader patients and to the innermost points for thinner patients See Figure 5 14 4 Connect the spreader bar carabiners to the D r...

Page 33: ...10 lbs 4 5 kgs To adjust the setting use the plus or minus buttons The revised value will display in the text between the buttons This value must be within 75 lbs 34 kgs of the current unloading value...

Page 34: ...minus buttons The adjustment is instantaneous and will be applied while the patient is actively training Adjusting the Fall Limit Value During a Training Session The Fall Limit can be adjusted while...

Page 35: ...ce level is exceeded When the system detects and prevents a fall the trolley locks and goes into Static Unload mode 1 When the Vector Elite system software detects a fall the Fall Prevented window wil...

Page 36: ...winch up or down button on the Fall Prevented window Stopping a Training Session Both DBWS and Trolley Tracking should be turned off inactive before stopping a training session Depending on the unloa...

Page 37: ...des the average speed and total time is empty The contents of the Session Summary section will be completed after the training session 1 From the Training Session screen press the Session Summary butt...

Page 38: ...ctor Elite Time Out Feature If Vector Elite software detects no activity for 15 minutes the system logs out automatically See Figure 5 22 The Time Out feature will not activate during a training sessi...

Page 39: ...30 Clinician s Guide...

Page 40: ...Note The option to disable Homing is only available from the Training Screen on the Vector PC Homing cannot be disabled from the Vector Remote software Anterior Chase This feature encourages the patie...

Page 41: ...e the rope angle from the vertical orientation by selecting the Minimum Moderate or Maximum radio buttons See Figure 6 3 Note The trolley will remain in its overhead position before the patient begins...

Page 42: ...kward motion of the trolley e g setting the range to 5 ft allows the trolley to move forward 5 ft and backward 5 ft for a total of 10 ft of movement Advanced Body Weight Support Advanced Body Weight S...

Page 43: ...nitors the difference between the set unloading and the actual force applied to the rope and determines if the patient is descending in a controlled manner If the difference is sufficiently large the...

Page 44: ...Ascent Assist button to disable it When disabled the button will turn green again Figure 6 10 Ascent Assist Active Figure 6 9 Patient Weight Confirmation Treadmill Integration with the Vector Elite So...

Page 45: ...dmill button See Figure 6 12 Note Manual controls are hidden when accessing the Treadmill Controls tab To access manual controls for the trolley and spreader bar select the Manual Controls tab Note If...

Page 46: ...l times regardless of which device is being used to control the trolley Figure 6 14 Training Session Screen with Treadmill Controls Enabled Note With an established treadmill connection the treadmill...

Page 47: ...ine See Figure 6 16 4 The treadmill belt direction can be reversed by pausing the treadmill session then selecting the Reverse check box See Figure 6 16 Note The belt direction cannot be changed while...

Page 48: ...readmill session press the Stop button and confirm on the dialog box See Figure 6 18 Note After the Stop button is selected the previously used treadmill settings will be cleared even if the Cancel bu...

Page 49: ......

Page 50: ...ng for either a specified distance or a specified length of time Tests are timed and speed and distance are recorded The Outcome Measures software module has four different Walking Tests 5 10 meter Wa...

Page 51: ...for acceleration and deceleration If possible use a straight section of track Place markers optional at 0 2 12 and 14 meters 2 6 Minute Walk Set up a course of the longest length possible marked on ei...

Page 52: ...Tracking and Dynamic Body Weight Support by pressing the Trolley Tracking and DBWS buttons 2 Press the Timed Up and Go TUG Test button See Figure 7 1 Figure 7 1 Training Session Screen 3 The Outcome M...

Page 53: ...l then stand walk out 3 meters to the cone turn around by walking around the cone walk back and return to a seated position in the chair Once the patient sits back in the chair press the Stop button t...

Page 54: ...As Baseline button See Figure 7 5 11 To export the current test screen as a screen capture image press the Export Screen button See Figure 7 5 When the Export Screen button is pressed the software sa...

Page 55: ...ake a secondary selection of 2 minutes or 6 minutes Figure 7 6 Outcome Measures Walking Tests Timed Distance Screen 8 When you and the patient are ready say Ready and Go 9 For the 5 or 10 meter walk t...

Page 56: ...results If the button is not pressed before starting another test run or before leaving the screen the current test run results will not be saved to the patient summaries 14 To save the current test a...

Page 57: ...active Outcome Measures test screen press the Back button See Figure 7 7 2 The software will navigate back to the Training Session screen The current test type Outcome Measures button will appear in r...

Page 58: ...Main Menu Screen Manual Control Menu From the Main Menu screen press the Manual Control menu button to open the Manual Control menu This menu allows the operator to control the trolley manually witho...

Page 59: ...rum finger guard and rope If at any time a manual winch down is initiated or in process and the minimum tension cannot be detected by the system a warning message window will be displayed See Figure 8...

Page 60: ...from any patient press the Summaries Menu button on the Main Menu 2 Once a patient has been selected a list of their training sessions will appear in the Sessions List See Figure 8 4 Figure 8 4 Sessio...

Page 61: ...istive device used level of exertion and any comments related to the training session 5 Press the Save button to save any session notes that were entered 6 Press the Save PDF Report button to save the...

Page 62: ...n Summary screen press the Training Session Summary button 9 To go to the Training History screen press the Training History button See Figure 8 8 10 You can access the Training History screen from th...

Page 63: ...le 11 If your system features the Outcome Measures software module you will see an Outcome Measures Summary button on the Patient Training Summaries screen See Figure 8 9 Figure 8 9 Outcome Measures S...

Page 64: ...he Save button Main Menu Button Takes the user to the Main Menu screen Save As Baseline Button Saves the currently selected test run as the Baseline Test for that test type organized by tab Button is...

Page 65: ...ected The graph will display key results of multiple test runs over a selected number of tests The graph will also display the Baseline score and daily average summary See Figure 8 11 15 You can selec...

Page 66: ...ce Library Menu button to open the Reference Library Menu screen See Figure 8 12 Press the Training Videos button to access a folder where training videos are stored Press the Instruction Guide button...

Page 67: ......

Page 68: ...or Elite system Starting the Vector Elite Remote Control 1 Turn on the Vector Elite remote control 2 To launch the Vector Elite software press the Vector Elite software application icon on the remote...

Page 69: ...is not detected you will see a warning message See Figure 9 2 Figure 9 2 Remote Control Warning Message Window Once the minimum tension of 0 5 lbs 0 23 kgs or more has been applied by allowing the spr...

Page 70: ...he Take Control button to transfer control from the PC to the remote control See Figure 9 3 Once control has been transferred the Take Control button on the remote control will be disabled and the Tra...

Page 71: ...as well as the four screens discussed in the previous section of this chapter The remote control can be used to start and stop an Outcome Measures test and will display a subset of the data collected...

Page 72: ...Figure 9 7 The exceptions to this rule are the Emergency Stop and Emergency Lower buttons If a compatible treadmill is connected to the Vector software the treadmill controls is also an exception The...

Page 73: ...s communication with the Vector Elite trolley the trolley will automatically transfer control to the other device For example if the remote control battery dies while in use the trolley will automatic...

Page 74: ...press the Take Control button 5 Once the remote control establishes connection with the Vector Elite trolley the status display will state Ready and the Take Control button will be disabled 6 Press th...

Page 75: ...the down arrow button to decrease the amount The new setting will appear in red text between the buttons and the Save button will turn red 2 Press the Save button The text between the buttons and the...

Page 76: ...patient to standing position You can also use the Emergency Lower button to lower the patient to the ground 3 Press the Close button to close the Fall Prevented window If the patient is in standing p...

Page 77: ...m the Remote Control after it is connected to the Vector software 1 Ensure that the treadmill is powered on and plugged into the PC using the cables provided For more information on cable connection s...

Page 78: ...be activated and a training session can be initiated using the Start button See Figure 9 15 Note If the system does not detect a minimum of 10 pounds on the spreader bar an error will be displayed and...

Page 79: ...Reverse check box See Figure 9 17 Note The belt direction cannot be changed while the treadmill belt is in operation and the Reverse checkbox will not be enabled for selection until the treadmill ses...

Page 80: ...mill session press the Stop button and select Disconnect on the dialog box See Figure 9 19 Note After the Stop button is selected the previously used treadmill settings will be cleared even if the Can...

Page 81: ...Swipe back to the Training Controls tab 5 Make the desired adjustments to the training controls Swipe to the right on the tabs and select the TUG Test tab to return to the TUG screen Note The trainin...

Page 82: ...Press the Start button when the patient begins to walk The patient must continuously walk as far as possible during a 2 or 6 minute period The test collection will continue and automatically stop when...

Page 83: ...nt must be selected from the PC for training data to be saved To control the Vector Elite system without capturing training data 1 Turn on the Vector Elite trolley and then turn on the remote control...

Page 84: ...e button will turn red See Figure 9 24 3 When finished with the Gait Smoothing feature press the red Gait Smoothing button to disable it When disabled the button will turn green again Note Gait smooth...

Page 85: ...anced Training tab to display the Trolley Cue controls The Cuing drop down will be displayed 2 Open the drop down menu and select the Posterior Cue or Anterior Cue mode See Figure 9 27 3 Select Normal...

Page 86: ...rior Chase 3 Set the target speed by pressing the arrow buttons See Figure 9 28 Note The target speed can be adjusted at any time including before and after the patient begins walking Figure 9 29 Warn...

Page 87: ...78 Clinician s Guide...

Page 88: ...ored to their patient files using any of the available Vector Elite trolleys The databases will automatically sync multiple times throughout the day It is recommended that at the end of the day on eac...

Page 89: ...hronization window appears press the Sync Now button 6 Go back to the first computer and press the Sync Now button Confirm that the window states Syncing with primary database See Figure 10 3 7 Go bac...

Page 90: ...istrator privileges include Managing the patient database including patient import and export Managing user accounts create and close accounts Data backup and restore Troubleshooting System settings A...

Page 91: ...dmin Menu Options Patient Database menu Add Users menu Backup Restore Database menu System Settings menu Patient Database Menu The Patient Database Menu is used to manage patient records 1 From the Ad...

Page 92: ...cannot be edited Create a New Patient Account To create a new patient account 1 Press the Add button See Figure 11 3 2 Fill in the required patient data fields Required fields are marked with an aste...

Page 93: ...omatically imports the data if imported data is newer than existing data Different Patient 1 If the importing patient has a Patient ID matching that of an existing patient but is not the same patient...

Page 94: ...Figure 11 4 Add Users Screen Create a New User Account To create a new user account 1 Enter data in all fields with an asterisk The user name and passwords are set for each user account 2 To give the...

Page 95: ...box next to Disabled 4 Press the Save button 5 To return the Admin Menu screen press the Back button See Figure 11 6 Backup and Restore Database Menu The Backup and Restore Database Menu allows the ad...

Page 96: ...11 6 3 Press the Backup Database button to backup the system database onto a disc or external hard drive 4 A Save As window will appear The content will be save as a dat file Select the location to s...

Page 97: ...that is installed See Figure 11 9 Tracking Responsiveness This feature allows the clinician to adjust how responsive the trolley is to patient movements Depending on patient capability and mobility le...

Page 98: ...e Save button To change the formatting settings 1 Pick the appropriate region from the drop down menu 2 A preview of the date time and numerical formatting will be displayed 3 Press the Save button To...

Page 99: ...Measures PDF reports 4 To upload a logo press the Upload button The Select a Picture window will appear Select the file and press the Check Mark button to save The logo and clinic information will app...

Page 100: ...oes not appear on the wireless network list then check to make sure the wireless adapter is properly connected to the PC The back of the wireless adapter in the USB slot should be flashing slowly If i...

Page 101: ...em requires power cycling to reboot Turn the power off Turn the power back on Restart the Vector Elite software application Table 12 1 Vector Elite Trolley Indicator Lights Troubleshooting Error Codes...

Page 102: ...l distributor outside of the United States for troubleshotting assistance 55 A non specific trolley error has occurred 81 Trolley firmware error 87 Watchdog error 92 WiFi interlock error 90 Internal n...

Page 103: ......

Page 104: ...6 Option 3 in the United States or your local distributor outside of the United States for a service appointment Inspect the patient harness for tears material separation and Velcro degradation Inspec...

Page 105: ...e To check the PC for Disk Storage Space 1 Bring up Windows OS File Explorer by simultaneously pressing the Windows key and E key 2 Click on the computer icon on the left panel The right panel will sh...

Page 106: ...ric pressure range up to 80kPa Relative humidity range 20 to 60 Environmental conditions for transport and storage Temperature range 25C to 70C Atmospheric pressure range up to 67kPa Relative humidity...

Page 107: ...98 Clinician s Guide...

Page 108: ...ions IEC 61000 3 2 Class A The Vector Elite System is intended to be used in a hospital Professional Healthcare facility environment Voltage fluctuations flicker emissions IEC 61000 3 3 Complies Guida...

Page 109: ...e System requires continued operation during power mains interruptions it is recommended that the equipment be powered from an uninterruptible power supply or a battery Power frequency 50 60 Hz magnet...

Page 110: ...om structures objects and people NOTE 3 P is the maximum output power rating of the transmitter in watts W according to the transmitter manufacturer and d is the recommended separation distance in met...

Page 111: ...80 MHz to 800 MHz d 0 4 P 800 MHz to 2700 MHz d 0 7 P 0 01 0 12 m 0 04 m 0 07 m 0 1 0 38 m 0 13 m 0 22 m 1 1 2 m 0 4 m 0 7 m 10 3 8 m 1 3 m 2 2 m 100 12 m 4 m 7 m NOTE 1 At 80 MHz and 800 MHz the high...

Reviews: