background image

Page 40 of 42 


d. 

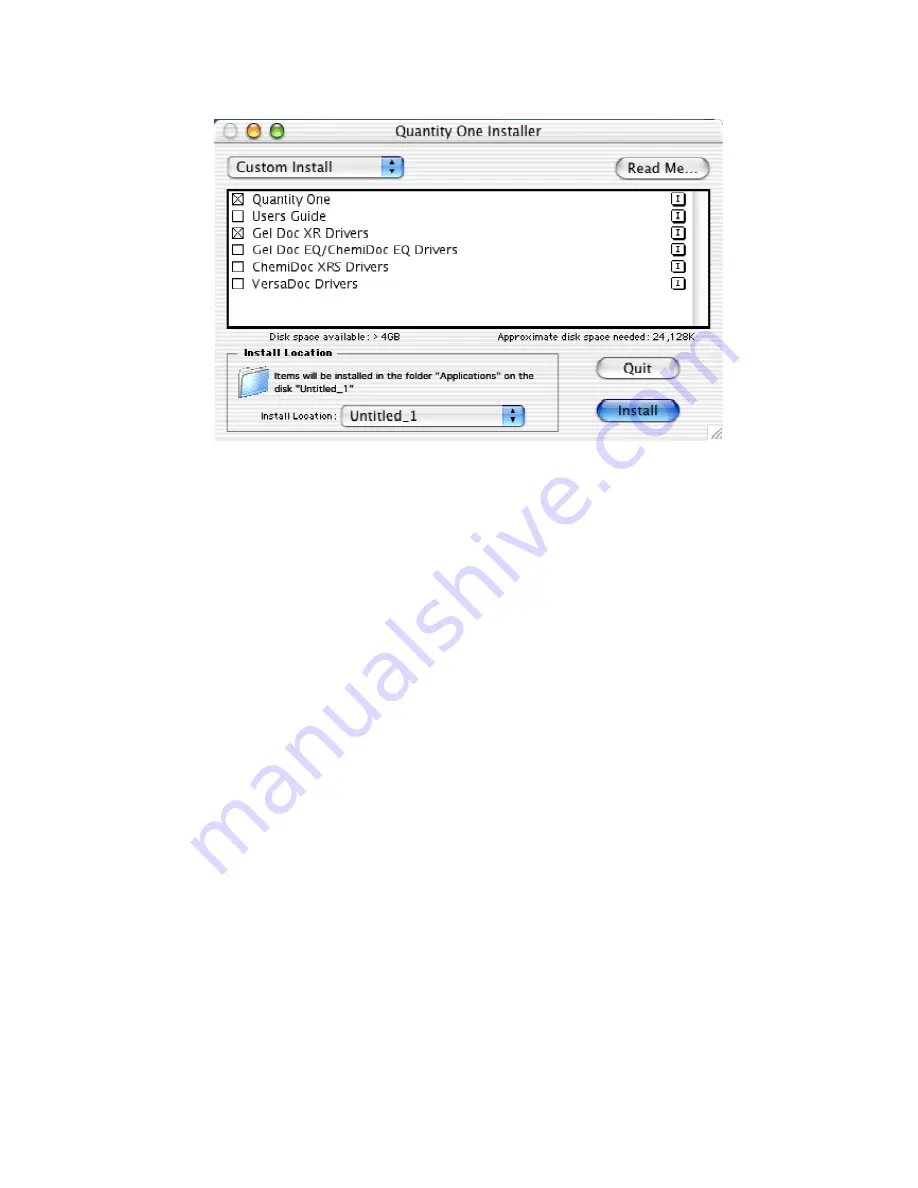
From the pull down menu, select “Custom Install”.


c.  Select the Driver you want to install. If you have not yet installed the application, be 

sure to select that as well. 

d.  When you have made your selections, click Install to complete the installation. 

 
Also read the Release Notes file for last minute updates for the Software

Summary of Contents for ChemiDoc XRS 170-8070

Page 1: ...MI170 8062BB Rev G Gel Doc XR ChemiDoc XRS 170 8170 170 8070 170 8171 170 8071 Hardware Instruction Manual ...

Page 2: ...The Gel Doc XR and Chemi XRS are warranted against defects in materials and workmanship for 1 year If any defect occurs in the instrument during this warranty period Bio Rad Laboratories will repair or replace the defective parts at its discretion without charge The following defects however are specifically excluded Defects caused by improper operation Repair or modification done by anyone other ...

Page 3: ...fications of the instrument not performed by Bio Rad Laboratories or an authorized agent Richtlinien WICHTIG Dieses Geraet von Bio Rad Laboratories konstruiert besitzt das Zertifikat ENC1010 anerkannt von dem internationalen elektrischen Sicherheitsstandard EMC und unterliegt dessen Richtlinien und TUV Die Geraete sind sicher im Gebrauch wenn die vorliegende Bedienungs anleitung beachtet wird Dies...

Page 4: ...he instrument Switch off all the lights immediately after use Clean the transilluminator platen after use Generelle Vorsichtsmassnahmen Bitte die Bedienungsanleitung aufmerksam lesen Das Geraet darf nur fuer die vorgesehenen Applikationen eingesetzt werden d h Geldokumentation in Forschungslaboratorien Fuer die Stromversorgung des Hood muss eine geerdtete Steckdose benutzt werden Keine Fluessigkei...

Page 5: ... Wide Angle Lenses ChemiDoc XRS only 16 4 3 Description of System Function and System Initialization 18 4 3 1 Control panel 18 4 3 2 System Initialization 21 4 3 3 Aligning the Camera assembly 24 SECTION 5 OPERATION OF THE UNIVERSAL HOOD II 25 5 1 OPERATING THE UNIT 25 5 1 1 Switch on the Universal Hood II 25 5 1 2 Position your gel 25 5 1 3 Acquire an image 25 5 1 4 Acquiring an image with Flat F...

Page 6: ...RELEASE NOTES FILE FOR LAST MINUTE UPDATES FOR THE SOFTWARE 40 APPENDIX D PCI CARD INSTALLATION 41 Gel Doc XR PC 41 Gel Doc XR Mac 41 ChemiDoc XRS PC 41 Installing the PCI Digitizing Card 41 APPENDIX E TECHNICAL SPECIFICATIONS 42 ...

Page 7: ... the program is mainly determined by the size of the images you will scan and analyze Images scanned at high resolution can be quite large For this reason we recommend that you archive images on a network file server or removable storage media 1 2 PC The following is the recommended system configuration for installing and running on a PC Operating system Windows 2000 Windows XP Processor Intel Pen...

Page 8: ...ist nur fuer Forschungszwecke geeignet Ausserdem ist die Benutzung nur fuer spezialisiertes Personal gedacht das mit den Gesundheitsrisiken vertraut ist die an die UV Strahlung gebunden sind und den Reagentien die normalerweise mit diesem Geraet benutzt werden Die Benutzung eines Plexiglasschutzschildes garantiert dem Benutzer keinen Schutz vor UV Strahlung Die Benutzung von Schutzbrille oder Schu...

Page 9: ...awer of the Universal Hood II and can accessed from the front of the enclosure For your convenience the lights in the darkroom enclosure turn off automatically after about 15 minutes This time period can be extended indefinitely by pressing the HOLD button The Universal Hood II has a three position Filter Slider that offers the flexibility of using two different emission filters for fluorescence a...

Page 10: ...One Software Each system ships with 1 full version of Quantity One and unlimited copies of Quantity One Basic Mode The software can be used to annotate and document images analyze molecular weights print and perform a host of other applications See the software manual for detailed instructions on how to install and operate the software Note Read and follow the instructions in Appendix C and D prio...

Page 11: ...L PC Mac 170 9600 Quantity One Software PC Mac 170 8009 Adapter USB to Serial Mac System only Part Descriptions 170 8070 170 8071 ChemiDoc XRS System PC Mac 170 8062 Universal Hood II W TLUM 100 240 Vac 170 8088 ChemiDoc XRS Camera W MZL including PCI card and Camera Controller Cable 170 8080 Kit Accessory Universal Hood II 170 8008 Fluorescent Reference Plate 170 7964 7963 Cable Serial MZL PC Mac...

Page 12: ...en halten a Open the box and review the unpacking instructions b Carefully remove all of the components of your system c Remove the top foam and the plastic wrapping from the Universal Hood II d Carefully pull the enclosure out of the bottom foam and place it in a suitable location Note Please do not connect the power cable to a power source until all connections are made The power source has to b...

Page 13: ...od II by inserting the lens into the adapter ring f Make sure that the front of the lens is in direct contact with the black adapter ring g Verify that the lens is centered in the opening on top of the enclosure To do this you may need to move the entire body of the Camera and the ring so that the lens is also in the center of the adapter ring WARNING Failing to center the lens in the adapter ring...

Page 14: ...ce the black adapter ring 6 millimeters thickness on the top of the hood with its soft side facing up ChemiDoc XRS Camera with bracket Black adapter ring for ChemiDoc XRS Camera and its positioning on the top of the Hood d Position the ChemiDoc XRS Camera over the opening on the top of the enclosure by inserting the lens through the adapter ring Make sure that the lens is in close contact with the...

Page 15: ... installing a Gel Doc XR or a ChemiDoc XRS Camera Please refer to the instructions included in Appendix A B respectively for Gel Doc XR ChemiDoc XRS cable wiring The controls for the Motorized Zoom Lens can be operated from the membrane touch pad of the Universal Hood II or from the PC using the buttons that appear in the window when the option Gel Doc XR or ChemiDoc XRS is selected in the File Me...

Page 16: ...ouch pad To use the White Light Transilluminator place it horizontally on the UV Transilluminator and press the TransWhite button on the membrane touch pad When the White Light Transilluminator is not in use store it in the two plastic holders located at the rear of the enclosure Storage of the White Light Transilluminator 4 2 5 Installing the Optional 17 mm or 25 mm Wide Angle Lenses ChemiDoc XRS...

Page 17: ...Make sure that the hard side is against the top of the enclosure Secure the Camera with wide angle lens attached to the Camera bracket with the black washer and the thumbscrew Before tightening the screw make sure that the wide angle lens is positioned in the round slot in the Light Seal soft side up Carefully push the Camera down so that the lens goes into the slot all the way and comes to a stop...

Page 18: ...ransillumination White Epi illumination and White Light transillumination Please read the following section to become familiar with each function Membrane Touch Pad The Power light tells you whether the system is turned on or not The power on off switch is located at the rear bottom left side of the enclosure Epi White LED and button Trans White LED and button Hold LED and button Trans UV LED and ...

Page 19: ...gain to turn it ON Important For the purposes of band cut applications it is possible to turn ON the UV light with the drawer fully open You must wear all possible UV protections especially for your eyes when the transilluminator switch is turned ON with the drawer fully open The UV shield has to be used but glass or mask and gloves are recommended to block the UV radiations This option is not app...

Page 20: ... ship with a converter Lens Control The membrane pad has a Fast and a Slow button to obtain rapid or fine adjustments of the lens An image can be optimized with the following lens adjustments Aperture is adjusted using the Iris buttons on the membrane touch pad The size of the aperture opening allows the CCD sensor to take in more or less light The Iris has two buttons One button Close reduces the...

Page 21: ...e computer is switched on Turn on the system Power LED turns on after short blinking Wait for 30 minutes for Camera to warm up Nothing will change except the Camera will warm up Press the Epi White key Epi White LED turns on Open the door Epi lights are on Trans UV LED blinks Press the Epi White key again Close the door Epi lights and LED are turned off Trans UV LED turns off Press the Trans UV ke...

Page 22: ...refer to next step for details about Reference Dark image acquisition 5 Select Live Focus 6 An image of the target will appear on the computer screen Using the lens control buttons on the membrane touch pad or the control panel that appears in the software find the best Iris Focus and Zoom conditions Note Working with a widely open Iris and changing the Zoom may require you to adjust the Focus STE...

Page 23: ...niversal Hood II 4 Wait for 30 minutes for the system to warm up and stabilize 5 Double click on Quantity One software icon on the desktop From File Menu select Gel Doc XR OR ChemiDoc XRS TDS Quantity One Window Select Gel Doc XR OR ChemiDoc XRS from File Menu 5 The following window will open with a notification that the system will be acquiring Dark Reference images ...

Page 24: ...ent of the Camera with the center of the UV transilluminator To verify please follow the instructions below 1 Place the focusing target in the center of the transilluminator 2 Switch on the Epi White light 3 Open the acquisition window in Quantity One Select Live Focus mode so that a live image of the target is seen on the monitor 4 Focus on the target 5 Click on Show Alignment Grid button located...

Page 25: ... the White Light Conversion screen or the White Light Transilluminator focusing is easily achieved if the Iris is slightly closed 5 1 3 Acquire an image 1 Press the appropriate light source for your sample 2 Select an integration time see software manual for details 3 When a satisfactory image is seen click Freeze 5 1 4 Acquiring an image with Flat Fielding Note This applies to ChemiDoc XRS system...

Page 26: ...ator and place the Fluorescent Reference Plate on the platen for UV illuminated images For White Light Illumination the White Light Transilluminator or the UV conversion screen is used to collect the reference Flat Fielding image In either case you must remove the sample from the platen ...

Page 27: ...nt Reference Plate on the platen Make sure that the plate covers the entire glass surface Close the door and then click on Continue in the window shown above 11 The next prompt will direct you to turn ON the UV transilluminator Press the UV transilluminator or White transilluminator button on the hood as the case may be and click on Continue ...

Page 28: ... drawer until it is fully extended and the UV Trans LED stops blinking 2 Place the clear acrylic UV protection screen in the horizontal slot in the inside of the drawer facing the transilluminator CAUTION VORSICHT WARNING EXPOSURE TO UV RADIATION IS HAZARDOUS TO HEALTH PLEASE WEAR PROPER UV PROTECTIVE CLOTHING AND FACE AND EYE SHIELDS WHEN CUTTING GELS THE UV SHIELD PROVIDED WITH THE SYSTEM IS NOT...

Page 29: ...he hole with the black plastic screw Hot very bright pixels are seen in the image ChemiDoc XRS only Reference is not selected for Dark Subtraction in the OPTIONS window Select Reference by clicking on the appropriate box in the OPTIONS window Hot very bright pixels are seen in the image Gel Doc XR only Corrupted Reference Dark image Click on OPTIONS button and then click on RESET REFERENCE DARK Ch...

Page 30: ...USB to Serial Includes USB Cable 931 0071 Cable USB Type A to B 10 long 100 1381 Lamp Epi illumination 11 Watt 100 2827 Lamp Epi illumination 5 Watt 100 1361 Lamp UV B 302 nm 1 each 170 8097 Kit 6 lamp 302 nm 170 8098 Kit 6 lamp 254 nm 170 6887 Kit 6 lamp 365 nm 170 8080 Kit Accessory ChemiDoc XRS 100 2651 Card PCI Digitizing ChemiDoc XRS 170 8173 Card Fire Wire PCI Gel Doc XR 100 2649 Cable Contr...

Page 31: ...id complete 100 1948 Universal Hood II Opal Filter Epi illumination w o metal frame 100 2786 Universal Hood II Left Shield Epi illumination Lid complete 100 2787 Universal Hood II Screw Feet 4 100 1951 Fuse T 2 A 250 V 10 each 100 1952 Fuse T 4 A 250 V 10 each 100 1370 UV TR Starter 3 each 170 9600 Quantity One Software PC Mac ...

Page 32: ...t hold each lamp housing to the internal side of the hood Remove this screw The cover screen with a plastic piece will come loose Pull on the cover to remove it from the box and the lamp will become visible To remove the lamp hold it from the receptacle and then pull it from the plastic Holder Insert the new lamp 5 or 11 W into the lamp holder and then push it into the receptacle Reassemble the co...

Page 33: ... the chemical agents used as gel dyes Please use protective gloves when touching the UV transilluminator cover The lamps must be replaced after every 500 hours of use Turn off the power Disconnect the power cord from the Universal Hood II Remove the four screws located on the left right sides of the drawer Remove the cover with the UV filter by sliding it forward Place it down on its backside on a...

Page 34: ... the left right sides of the drawer Remove the cover with the UV filter by sliding it forward Place it down on its backside on a non abrasive surface Caution Do not put the UV filter directly on the bench To remove the starter rotate it counter clockwise and pull out To replace the starter insert it into the holder and rotate clockwise Reassemble the cover and retighten the screws on both sides ...

Page 35: ...e to the appropriate port on the PC or Mac USB to Serial Adapter d Connect the MZL cable connector to the connector labeled LENS on the rear panel of the universal hood The following table describes the connectors and their designations Label Color Instrument Connection 6 pin Fire Wire connector Fire Wire Connector of the PC or PCI Card 6 pin Fire Wire connector CCD Camera Fire Wire Connector Came...

Page 36: ...d the other end of this cable should be connected to the PCI Digitizing Card after the card is installed in the PC per procedure in Step 4 2 3 Camera Controller Cable and Connector Controller Cable Connector labeled Data d Connect the provided Serial Cable to the 9 pin D SUb 8 pin round serial connector on the PC Mac and the other end of the 25 pin serial connector on the Hood e In case of a Mac w...

Page 37: ...D ROM drive of the PC It will go into AUTO RUN mode and the following window will open a Depending on which application you are using Quantity One or PDQuest click Install to run the installer b If this is a new installation follow the installation steps until you get to the Select Features dialog box If you have already installed the application click Modify to open the Select Features dialog box...

Page 38: ...c XR and select Will be installed on local hard drive from the list d Click Next to complete the installation Note If the Windows Device Manager detects a conflict it may be necessary to move the PCI card to a different slot to avoid conflict with an existing card in the PC ...

Page 39: ...ies software CD into the CD ROM drive of the PC The CD will show up on the Apple Desktop as an Icon b Double click on the CD icon the following window will open c Click on the installer for your application and the follow the prompts to to the following Installation Wizard ...

Page 40: ...elect the Driver you want to install If you have not yet installed the application be sure to select that as well d When you have made your selections click Install to complete the installation Also read the Release Notes file for last minute updates for the Software ...

Page 41: ...Installing the PCI Digitizing Card NOTE When installing the PCI Digitizing Card for the ChemiDoc XRS please install the DRIVERS for the Card and the Quantity One Software from the software CD first Please refer to Appendix C for step by step instructions for driver installation a Make sure that your computer is turned off Remove the cover from the computer Install the PCI card into one of the PCI ...

Page 42: ...5 H X 4 65 V 6 7 H X 6 7 V Cooling System No Peltier cooled Camera Cooling Temp NA 45 C Filter Holder 3 positions 2 Emission Filter 1 Chemi 3 positions 2 Emission Filter 1 Chemi Emission Filters 1 Included amber 4 optional 1 Included amber 4 optional Dynamic Range 3 0 Orders 3 0 Orders Pixel Density gray levels 12 bit 4096 gray levels 12 bit 4096 gray levels Dynamic Flat Fielding No Yes Instrument...

Reviews: