background image

2016 

 www.B-TEK.com 

Pit Type Truck Scale Installation Manual

21

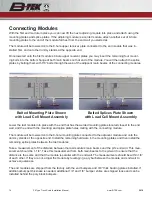
Connect the Grounding Cables

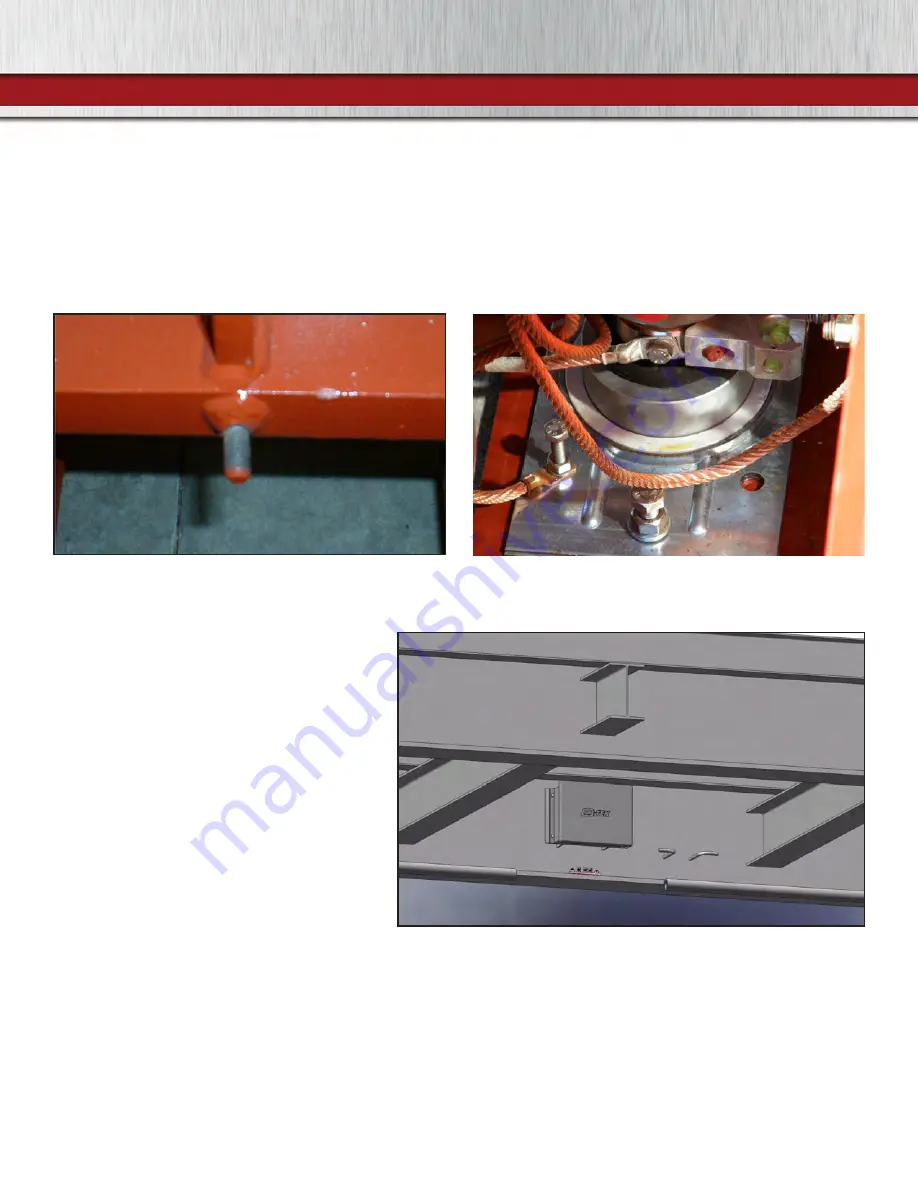
Connect the grounding cables from each load cell to the threaded cable stand-off on the weighbridge. Addition

-

ally, connect a grounding cable from the M8 bolt/nut on the locating plate to the same stand-off on the weigh

-

bridge.

Adjacent weighbridges require an additional grounding wire from the threaded stand-off on the weighbridge 

which is run to a stand-off on the next weighbridge in line.

Load Cell and Locating Plate Grounding 

Wires to Weighbridge Stand-Offs

Grounding Cable Stand-Offs

Load Cell Cable Wiring

At this point all of the load cell cables can be 

pulled through the installed conduit.

Depending on the length of your scale, find 

the correct wiring diagram on the following 

pages. Additionally, a wiring diagram was 

included with your “scale package” along with 

the foundation drawing.

It is important that all cables be installed so 

that they do not touch the ground and are 

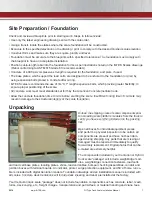
internal to the scale. Zip tie all excess cable 

and attach to hangers near the junction box.

Your digital Pit Style “scale package” will 

include all load cell cables, junction box(es), 

grounding cables, ground rod, indicator, and surge protection device.

Your analog Pit Style “scale package” will include all load cell cables, junction box(es), grounding cables, 

ground rod, and surge protection device. It does not include an indicator. 

Be sure that the cables are not run or bundled so tight that they cause the scale modules to bind resulting in 

weight variations. After being run, connect all load cell cables to the load cells. 

Note: Do not cut the load cell cables—this will void the warranty.

Junction box, buss bar & cable wraps on interior of scale

Summary of Contents for BTEK BS-FECD-P-CPD-M

Page 1: ...BS FESD P CPR M BS FESD P CPD M BS FECD P CPR M BS FECD P CPD M Models Include ...

Page 2: ...www B TEK com 2016 Pit Type Truck Scale Installation Manual 2 ...

Page 3: ... 8 Locating Plate Page 11 Lifting Modules into Place Page 11 Connecting Modules Page 14 Order of Module Installation Page 15 Conduit Installation Page 16 Concrete Deck Scale Preparation Page 17 Adjusting the Checking Page 18 Replacing the Dummy Load Cell Stands Page 18 Aligning the Load Cells Page 20 Connecting the Grounding Cables Page 21 Load Cell Cable Wiring Page 21 Maintenance Page 24 Spare P...

Page 4: ...ts and Measurements authority prior to installation to verify that the foundation meets all requirements including those of the National Institute of Standards and Technology NIST and spe cifically Handbook 44 Prior to installation it is the customer s responsibility to verify that the equipment meets the requirements of the application Do not begin installation if this is unknown It is the custom...

Page 5: ... do not locate indicators in direct sunlight or in areas subject to extreme temperature changes as this may affect the accuracy of the weighing You have a copy of the scale and foundation drawings specific to this installation on site at the time of installation You have a copy of this manual on site at the time of installation The foundation concrete has had a full twenty eight day period for pro...

Page 6: ...ortion of the approach shall insure 1 ease of vehicle access 2 ease for testing purposes and 3 drainage away from the scale The scale drawings provided meet part a of this requirement The site must be located to meet parts b and c The site should have adequate room for trucks to properly align with the platform before pulling on This is especially important if trucks must turn before driving onto ...

Page 7: ... Institute Code Allow the concrete foundation time to cure before erecting the scale Insufficient curing time of concrete may result in damage to the structural integrity of the scale foundation Unload the shipping crate of scale components prior to unloading scale platform modules from the truck to verify you have everything included on the packing list Open all boxes for individual equipment pie...

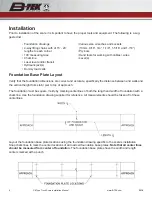
Page 8: ...d with a punch Foundation drawings 4 way lifting chains with of 15 20 lengths to each corner 100 measuring tape Chalk line Laser level and or transit Hydraulic jack s Dummy load cells Various size wrenches and sockets 13mm 9 16 3 4 1 1 8 1 5 16 and 1 7 8 Pry bars Hand tools for working with cables wires Level s Foundation Base Plate Layout Verify that the foundation dimensions are correct and accu...

Page 9: ...cluded with scale 5 2016 Center Line Center Line Foundation Base Plate Center Marks Note that the foundation base plates will be a combination of basic plates and combination plates that have the checking assemblies included as shown below BASIC BASE PLATE COMBINATION BASE PLATE with SIDE CHECKING four per scale ...

Page 10: ...Ring Lower Receiver Isolation Ring Upper Receiver Grounding Straps Shim Plates It is recommended to layout all foundation base plates prior to permanently anchoring to the foundation Set the foundation plates in place Do not secure the plates to the foundation at this time Ensure that the foundation base plates are all level with each other Shim plates for use on the top of the foun dation base pl...

Page 11: ...s prior to lifting the modules into place The first module to be placed onto the foundation is an end module which should be placed directly after the end wall The four dummy mount assemblies should already be in place on the base plates located on the chalk line centers on the foundation Prior to lifting the end module attach two 8 hole mounting plates to the end of the module closest to the cent...

Page 12: ...alling the weighbridge mod ule onto the dummy load cell stands ensure that safety supports such as wood blocking is placed under the weighbridge module being lifted Lift the end module with the 8 hole upper receiver plate already bolted in place over the four dummy cell stand assemblies and slowly lower the module so that the button on top of each dummy stand is inserted into the thru hole located...

Page 13: ... from both main beams to the pit wall to ensure that the distance is the same and that the module is parallel with the end wall The measurements should be within 1 8 of each other If they are not adjust the module by leveraging a pry bar between the module and end wall to achieve squareness The end modules are shipped from the factory with the end bumpers and 3 8 thick backing plates installed If ...

Page 14: ...end that has the welded mounting plates located closest to the end wall and the end with the mounting and splice plate holes mating with the connecting module The module will be lowered onto the 8 hole mounting plate connected to the adjacent module and onto the dummy stands at the opposite end Install the remaining hardware in the mounting plates and then install the remaining splice plates betwe...

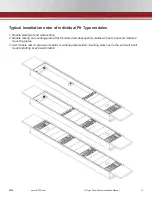
Page 15: ...ype modules 1 Module starting at end wall location 2 Module resting on mounting plate of first module and subsequent modules will rest on second module s mounting plates 3 Last module rest on previous module s mounting plate welded mounting plate next to the end wall 4 cell module starting at end wall location ...

Page 16: ...scale for a concrete deck pour The conduit is shipped loose in 10 lengths Conduit must be cut to length in the field as needed for the scale s length and width Enough conduit is supplied for the scale length and width at each load cell location Conduit clamps are included as well with larger beam clamps for connecting to main beams and slightly smaller clamps for connecting to crossmembers Three c...

Page 17: ...s a temporary crossmember under the sheeting You will need to notch the two top corners to avoid interference with the radii between the top flange and web Cut two additional pieces of lumber to support both ends of the crossmember These pieces will fit between the bottom of the wooden crossmember support and the top side of the bottom flange of the main beams This distance may vary Take a measure...

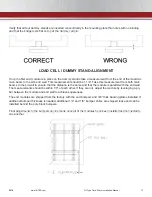
Page 18: ... adjusted to minimize the lateral movement of the weighbridges when replacing the stands Prior to lifting a module weighbridge place safety blocking under one of the main weighbridge structural beams with approximately 1 2 gap between the block and bottom of the beam This will stop the module from falling to the foundation in the case of a stand or load cell falling over Starting with a load cell ...

Page 19: ...te amount of grease on the top button of the load cell bottom cup Slide the foam ring over the top of the load cell bottom cup aligning with the antirotation pin that is protruding Place the load cell onto the assembly taking care that thenotch in the bottom of the load cell aligns with the anti rota tion pin The cable connector on the load cell should face the center of the scale towards the cond...

Page 20: ...is aligned both horizontally and vertically by ensuring that the air bubble is visible between marked lines If the load cell is out of level adjustments can be made by realigning the foundation base plate Repeat the check with the level to verify that the load cell is aligned correctly Continue to readjust the locating plate as needed B TEK Load Cell Surface Level Once the entire scale has had the...

Page 21: ... diagram on the following pages Additionally a wiring diagram was included with your scale package along with the foundation drawing It is important that all cables be installed so that they do not touch the ground and are internal to the scale Zip tie all excess cable and attach to hangers near the junction box Your digital Pit Style scale package will include all load cell cables junction box es...

Page 22: ...www B TEK com 2016 Pit Type Truck Scale Installation Manual 22 See larger drawing in packet ...

Page 23: ...2016 www B TEK com Pit Type Truck Scale Installation Manual 23 See larger drawing in packet ...

Page 24: ... lock washer HW B 1 4 20X1 1 4 20 X 1 L hex bolt J box mounting bolt HW N 1 4 20H 1 4 20 hex nut J Box mounting nut HW W 1 4L 1 4 lock washer J box mounting washer HW W 1 4F 1 4 flat washer J box mounting washer HW B 5 16 18X 75 5 16 18 X 3 4 L hex bolt Buss bar bolt HW N 5 16 18H 5 16 18 hex nut Buss bar nut HW B 5 8 11X2CSCS 5 8 11 X 2 L socket counter head cap screw Deck plate mounting bolt HW ...

Page 25: ...up Load cell mount assembly 899 100021 75K 100K foam debris ring Load cell mount assembly 899 100025 M6 X 30 anti rotation pin Load cell mount assembly 899 100022 75K Lower receiver mount Load cell mount assembly 899 100043 100K Lower receiver mount Load cell mount assembly 899 100023 75K Isolation disc Load cell mount assembly 899 100039 100K Isolation disc Load cell mount assembly 100 61071 Shim...

Page 26: ...B TEK Scales LLC 1510 Metric Ave SW Canton Ohio 44706 800 266 8900 Direct 330 417 8900 Fax 330 471 8909 Monday Friday 7 00 AM 5 00 PM www B TEK com sales b tek com ...

Reviews: