background image

10.2  Maintenance Settings

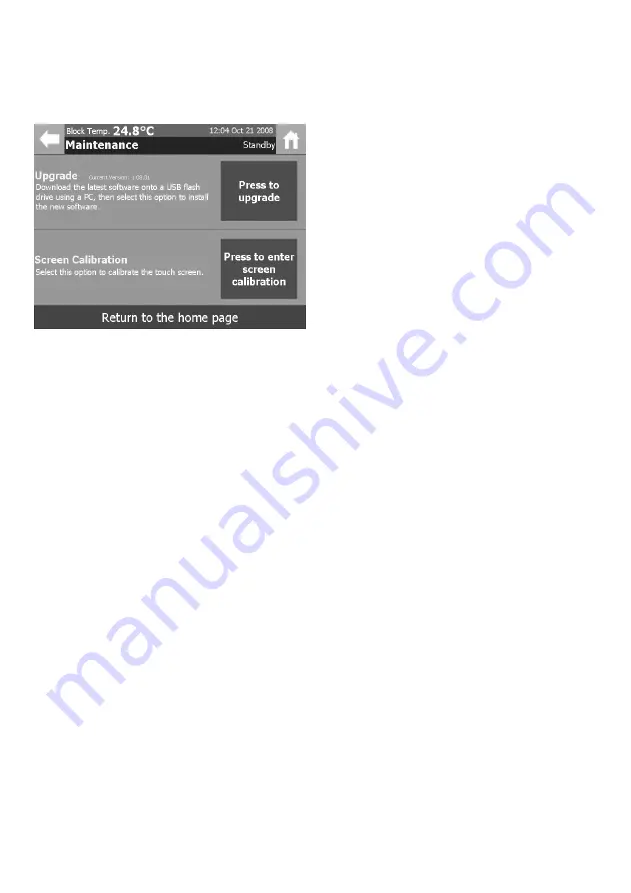
In the Settings and Calibration menu screen touch the Change maintenance settings section of the 
screen. The Maintenance screen allows the user to upgrade the version of software on the instrument 
and to recalibrate the touch screen.

1  To upgrade the instruments software, firstly 

download the new software version onto a 
USB flash drive. Insert the USB flash drive into 
one of the SMP40’s USB ports and touch the 
“Press to upgrade” button. The new software 
version will be automatically installed onto 
the instrument.

Do not switch off the device or attempt to 
remove the USB flash drive during this 
process.

2  To recalibrate the touch screen touch the 

“Press to enter screen calibration” button and 
follow the on-screen instructions.

10.3 Instrument Calibration

To ensure that the instrument is operating correctly, periodic checks on the accuracy of the instruments 
temperature readings are commonly performed. If the accuracy of the instrument is found to deviate 
from the specification or if it is a requirement of your local quality policy, the following procedure can 
be used to recalibrate the displayed temperature on the instrument.

It is recommended that the recalibration procedure is performed using suitable certified melting point 
standards, as this will ensure the highest levels of confidence is maintained in the results generated 
with the instrument. A list of commonly used melting point standards is given below:

Material Nominal Melting Point

Azobenzene 

69 °C

Vanillin 

83 °C

Benzil 

96 °C

Acetanilide 

116 °C

Phenacetin 

136 °C

Benzanilide 

165 °C 

Sulfanilamide  

166 °C

Sulfapyridine 

193 °C

Dicyanodiamide 

210 °C

Saccharin  

229 °C

Caffeine 

237 °C

Phenolphthalein 

263 °C

31

Summary of Contents for Stuart SMP40

Page 1: ...Version 1 1 Melting Point Apparatus SMP40 Instructions for use automatic melting point SMP40 ...

Page 2: ... up New Methods 10 6 1 Creating a New Method 11 6 2 Preset Methods 12 6 3 Carry out a Rapid Melt 13 7 Performing Melt Determinations 14 8 Results 17 8 1 View Previous Results 17 8 2 Re use Result Parameters 25 9 File Management 26 9 1 Manage Files 26 9 2 View Storage Information 28 10 Settings and Calibration 29 10 1 User Settings 29 10 2 Maintenance Settings 31 10 3 Instrument Calibration 31 11 M...

Page 3: ... the colour touch screen allowing all operational and data management functions to be performed without the need to attach an external computer or keyboard The unit can be split into two modules to allow the heating module to be located in an environment suitable for the types of samples being tested while the control module can be kept in a more convenient location The temperature range of the de...

Page 4: ...ontrol and Melt modules apart taking care not to strain the connecting USB cable 3 Disconnect the USB cable on the control module that connects the two modules 4 Using the accessory cables supplied with your SMP40 reconnect the power and USB connections between the modules 5 Once the devices power supply is re established the unit can then be used as described in this manual 6 Reconnecting the mod...

Page 5: ...orded manually Where a single melting point is difficult to define for a substance it is often useful to report a substances melting range The melting range of a substance is defined as the interval between the start of a melt and the clear point 3 3 Temperature Settings The temperature settings used to determine a substances melting point are critical to the accuracy of the determination The star...

Page 6: ... UK plug and replace the plug with a suitable alternative This involves cutting off the moulded plug preparing the cable and connecting to the rewireable plug in accordance with its instructions IT IS IMPORTANT THAT THIS OPERATION SHOULD ONLY BE UNDERTAKEN BY A QUALIFIED ELECTRICIAN Refer to the equipment s rating plate to ensure that the plug and fusing are suitable for the voltage and wattage st...

Page 7: ...n Interface The touch screen interface is used to perform all control and Display functions on the SMP40 Live images of the sample compartment real time data on the instrument s status and the sample block s temperature can also be viewed on this display USB and Ethernet A USB flash drive can be inserted into the one of the USB ports Connections allowing result files to be copied or moved from the...

Page 8: ... and Calibration This menu gives access to the devices user adjustable settings and also allows the device to be recalibrated if required The Stuart SMP40 is controlled solely through the touch screen interface of the instrument The header bar is located at the top of the screen in most menus within the software interface Back Button Used to return to the previous screen at anytime Block Temperatu...

Page 9: ...e character directly in front of the cursor or the highlighted characters SHIFT Toggles the keypad between higher and lower case letters for one character entry CAPS Toggles the keypad between higher and lower case letters for all characters entered CLR Clears the characters in the current entry Alphanumeric Alphanumeric data can be entered Numerical Numerical data can be entered Date Calender dat...

Page 10: ...23 and SYM keys on each of the respective keypads 3 Entries are confirmed by pressing the Accept this text button on the command toolbar 5 2 1 Alphanumeric Entry Field 1 Selecting a Numerical Entry Field opens the numeric keypad interface 2 The numeric entry field can only be populated with numbers 3 Entries are confirmed by pressing the Accept this number button on the command toolbar 5 2 2 Numer...

Page 11: ...s displayed in the 24 hour format 3 Press the arrows above and below each number to increase or decrease the value displayed 4 Entries are confirmed by pressing the Accept this time button on the command toolbar 5 2 5 Listed Options Field 1 Selecting a Listed Options Field opens the listed options keypad interface 2 The options available in the Listed Options entry field is specific to each indivi...

Page 12: ...le Selection Field 6 Setting up New Methods Create a new measurement This option allows a new melt determination to be started Measurement parameters such as the Sample Name Start Temperature and Ramp Rate need to be entered when using this option Use a preset from the library This option allows a new melt determination to be started using measurement parameters stored previously on the device Car...

Page 13: ...enter additional information button If this is not required press Continue and go to step 8 5 The SMP40 will automatically detect the end of the melt when the toggle selection field has an X in the Automatically detect the melt end field Removing this check mark allows a value to be entered into the End Temperature field 6 Enter any batch or reference details in the Batch Reference alphanumeric en...

Page 14: ... the relevant field 4 Optional sample and method information is accessed by pressing the Touch here to enter additional information button 5 Method parameters can be adjusted if required The SMP40 will automatically detect the end of the melt when the toggle selection field has an X in the Automatically detect the melt end field Removing this check mark allows a value to be entered into the End Te...

Page 15: ... new settings 13 6 3 Carry out a Rapid Melt If the user is unsure of the start temperature that should be specified in a melt determination method they can use the rapid melt function to quickly determine an approximate melting temperature In the Measurement menu screen touch the Carry out a rapid melt section of the screen 1 The rapid melt function will heat the sample from 50 0 C at 20 0 C min u...

Page 16: ...has been completed 1 Place 1 3 prepared melting point capillaries into the SMP40 sample compartments sample block The external surface of the sample capillaries must be wiped clean before being placed into the sample block as chemical residues may build up and affect the performance of the device 2 Press Start the melt to initiate the melting protocol 14 Current block temperature Sample name Metho...

Page 17: ...change to Stabilising and the temperature of the sample block will remain constant for 60 seconds 6 After the instrument has stabilised at the start temperature the status will change automatically to Analysing and the instrument will begin to heat the sample capillaries at the specified ramp rate 7 The Capillary tubes melt status is shown to indicate the melt determinations progress The Capillary...

Page 18: ...e instrument will complete the measurement and display the samples analysis report At any time in the melt determination pressing the Stop and go back button will end the melt determination and save any data collected up until that point Once the melt determination is complete the analysis report will be displayed The analysis report displays the following information Statistical Analysis The mean...

Page 19: ... Results screen allows the user to perform a number of actions with the result files stored on the instrument The actions available are displayed in the Results Toolbar Results toolbar Individual sample results Figure 7 View Results Screen The View Results screen allows the user to perform a number of actions with the result files stored on the instrument The actions available are displayed in the...

Page 20: ... or parameter to be selected to organise the displayed data 4 Select the parameter to be used to organise the displayed data by pressing the appropriate button 5 Pressing the button twice will reverse the order or the displayed data 6 Highlight the required result file and press the Select result or preset and continue button 7 The Other button on the toolbar can be used to access additional param...

Page 21: ...een finalised press Apply this search 6 Only the results that match the search criteria specified will now be displayed 7 Pressing the Sort Search and Search buttons again will display the search results summary and allow a new search to be started 8 Press the Search again button to apply new search criteria 9 Press the Clear search button to remove the specified search criteria ...

Page 22: ...Date created and Calibration equation are all displayed in the analysis report Intensity graphs for each capillary tube The device continuously measures each capillary tubes image intensity value during the melt determination These graphs show how the intensity value changes throughout the melt determination Coloured lines indicate the start green and end red of the melting range Recorded events f...

Page 23: ...erature and clear point displayed In addition the mean value of the start and end temperatures is calculated and displayed Press the Hide button to return to the Video Replay screen Tagged event selection During the melt determination additional events may occur that are required to be recorded in the report Pressing this button accesses the list of available events that can be added to the analys...

Page 24: ...or each individual capillary tube Both the automatically determined events and any manually added events are shown in the analysis report The Tagged Events field can be used to add the following events Clear point The sample is a clear liquid Solid particles are no longer visible Collapse point The substance collapses and begins to liquefy Decomposition point The separation of a substance into its...

Page 25: ...s field and selecting the required event from the drop down list Manual events can only be used once in each capillaries report e g A capillary cannot have more than one Meniscus Point 4 Additional manual events can be added by repeating the process described in steps 2 and 3 5 If a manual event needs to be deleted pressing the X next to the manual event will delete that event 6 After the manual e...

Page 26: ...HE MANUAL EVENT WILL BE USED TO CALCULATE THE SAMPLES REPORTED MELTING POINT 1 When the Rename button is pressed for a result a rename dialogue box is opened 2 Press the alphanumeric entry field Abc in the dialogue box to enter a new Sample Name for the selected result 3 The new Sample Name is then displayed in the alphanumeric entry field Select OK to confirm the change to the results Sample Name...

Page 27: ... user to confirm the action Select Yes to confirm or No to cancel In the Results menu screen touch the Re use result parameters section of the screen 1 In the Repeat Measurement screen highlight the result file to be repeated 2 Press Select result and continue 3 The method parameters used previously will be loaded into the Create New Method screen 4 Method parameters and information can be 4 adjus...

Page 28: ...dual sample results The View Results screen allows the user to perform a number of actions with the result files stored on the instrument The actions available are displayed in the Result Toolbar Sort Search See page 18 Select All Clear Selection The Select All Clear Selection action is used to select all of the result files on the instrument or it can be used to deselect the result files currentl...

Page 29: ...USB flash drive by highlighting the files to be copied and pressing the Copy button in the Manage Files toolbar 2 A window is displayed to show the progress of the copy action Copying a typical 5MB result and video file will take approximately 10 seconds 1 Result files can be moved to an inserted USB flash drive by highlighting the files to be moved and pressing the Move button in the Manage Files...

Page 30: ...nfirm delete dialogue box will appear asking the user to confirm the action Select Yes to confirm or No to cancel 9 1 4 Deleting Files 9 2 View Storage Information In the File Management menu screen touch the View storage information section of the screen 1 The Storage Details screen displays information on the status of the internal memory Information displayed includes Total storage capacity Ava...

Page 31: ...ces displayed temperature unit can be set to centigrade C fahrenheit F or Kelvin K Camera gain The devices camera gain can be adjusted to make the image of the sample capillaries darker or brighter Three settings of Low Normal and High are available The Low settings will reduce the brightness of the image compared to the Normal setting and the High setting will increase the brightness of the image...

Page 32: ...sounds for screen touches If a sound is not required to confirm each time the touch screen is pressed remove the check mark in this Toggle Selection field In the Settings and Calibration menu screen touch the Change user settings section of the screen 1 The Change User Settings screen displays the current status of all the user adjustable instrument settings 2 To adjust any of the displayed settin...

Page 33: ...ructions 10 3 Instrument Calibration To ensure that the instrument is operating correctly periodic checks on the accuracy of the instruments temperature readings are commonly performed If the accuracy of the instrument is found to deviate from the specification or if it is a requirement of your local quality policy the following procedure can be used to recalibrate the displayed temperature on the...

Page 34: ...libration Three types of calibration are possible Single Dual and Factory Time and date of current calibration Displays the time and date of the current calibration Date when next calibration is due Displays the date when the next calibration is due to be performed as specified in the user settings Previous calibration history Displays a summary of the devices historical calibrations including the...

Page 35: ...df 10 3 2 Calibration Procedure The SMP40 allows the user to perform either a single or dual point calibration by using the following procedure 1 Using a suitable certified reference material perform a melt determination as described in section 7 2 If a dual point calibration is required perform a second melt determination on a certified reference material with a different melting point to that us...

Page 36: ...press this field again and go to step 8 11 If a dual point calibration is required press the Choose Result field next to Value 2 and repeat the selection process described in steps 8 to 10 12 Enter the certified melting point clear point of the reference material s in the respective Expected numerical entry field s 13 The new calibration factor is calculated and displayed on the screen 14 To accep...

Page 37: ...ils The Calibration history window will now update to display details of the previous calibration 16 If a calibration record needs to be deleted pressing the X next to the calibration record will display a confirm deletion dialogue box Press YES to confirm or NO to cancel 35 ...

Page 38: ...ed Please ensure that the sample block is cooled to room temperature and the instruments electrical power supply is switched off or disconnected before commencing the following procedure 1 Lift the cover of the capillary storage compartment and remove the two screws on either side of the recess 2 Remove the plastic cover from the instruments melt module 3 Remove the ceramic sample block cover and ...

Page 39: ...age caused by incorrect installation adaptation modification fitting of non approved parts or repair by unauthorised personnel Bibby Scientific Ltd Stone Staffordshire ST15 0SA United Kingdom Tel 44 0 1785 812121 Fax 44 0 1785 813748 E mail equipment bibby scientific com Website www bibby scientific com Technical Specifications Temperature range Ambient to 400 C Temperature resolution 0 1 C Ramp r...

Page 40: ...Notes 38 ...

Page 41: ...39 Notes ...

Page 42: ......

Page 43: ...s We cannot be sure that other equipment used in its vicinity will meet these standards and so we cannot guarantee that interference will not occur in practice Where there is a possibility that injury damage or loss might occur if equipment malfunctions due to radio frequency interference or for general advice before use contact the Technical Department of Bibby Scientific Ltd NEW DEC TO COME ...

Page 44: ...Cerro al Lambro Milano Italia Tel 39 0 2 98230679 Fax 39 0 2 98230211 e mail marketing bibby scientific it www bibby scientific it Bibby Scientific US Ltd 3 Terri Lane Suite 10 Burlington NJ 08016 USA Tel 800 225 9243 Fax 609 589 2571 www bibby scientific com Bibby Scientific Asia Ltd Prudential Tower Level 26 30 Cecil Street Singapore 049712 Tel 65 6631 2976 Fax 44 0 1785 810405 e mail info bibby...

Reviews: