


Riva Plus Manual
27
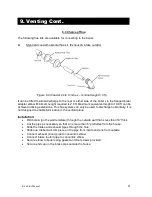
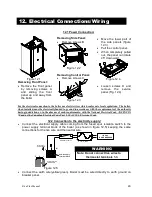
The Riva boiler is supplied with a 3/4” stainless steel gas pipe (A in figure 10.1), 2 - 3/4”
copper pipe (C,D in figure 10.1), located in a plastic bag in the boiler package.
Figure 10.1
A. Stainless steel gas pipe
B. Main circuit drain cock
C. C.h. supply copper pipe
D. C.h. return copper pipe
E. C.h. PRV discharge copper pipe
F. Condensate trap
Installation:
•
Remove the protective caps off boiler connections (Figure 10.1).
•
Thoroughly clean the connections.
•
Attach the supplied components to the boiler connections (see Figures 10.1). Be sure
to use the proper gaskets for the pipe connections.
•
Attach the condensate trap to an appropriate drain pipe.
•
Before connecting the boiler to the heating system piping, review the suggested piping
diagrams in Section 4 (page 12).
•
If the c.h. system is above the boiler level, it is advisable to install c.h. cocks close to
the boiler for servicing operation
Condensate trap:
The condensate trap allows the discharge of the condensate via the condensate drain pipe
avoiding in the mean timethe escape of combustion products. A plastic ball closes the trap
outlet in case that the trap is empty. The condenste trap is provided with two electrodes: if the
drain pipe is plugged or in any case in which the condensate isn’t correctly evacuated, the
condensate level in the trap rises putting in contact the electrodes thus causing the boiler
lock-out.
10. Pipe Connections
A
C
E
F
D
B
Summary of Contents for Riva Plus
Page 2: ...Riva Plus Manual 2...
Page 14: ...Riva Plus Manual 14 5 1 Sequence of Operation...
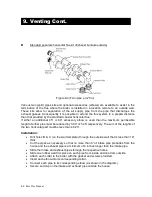
Page 20: ...Riva Plus Manual 20 9 Venting Cont...
Page 50: ...Riva Plus Manual 50...


