background image

   NPX 

Installation and Operation Guide 

page 9

OPERATION (CONTINUED)

Function

Navigation

LCD

Description

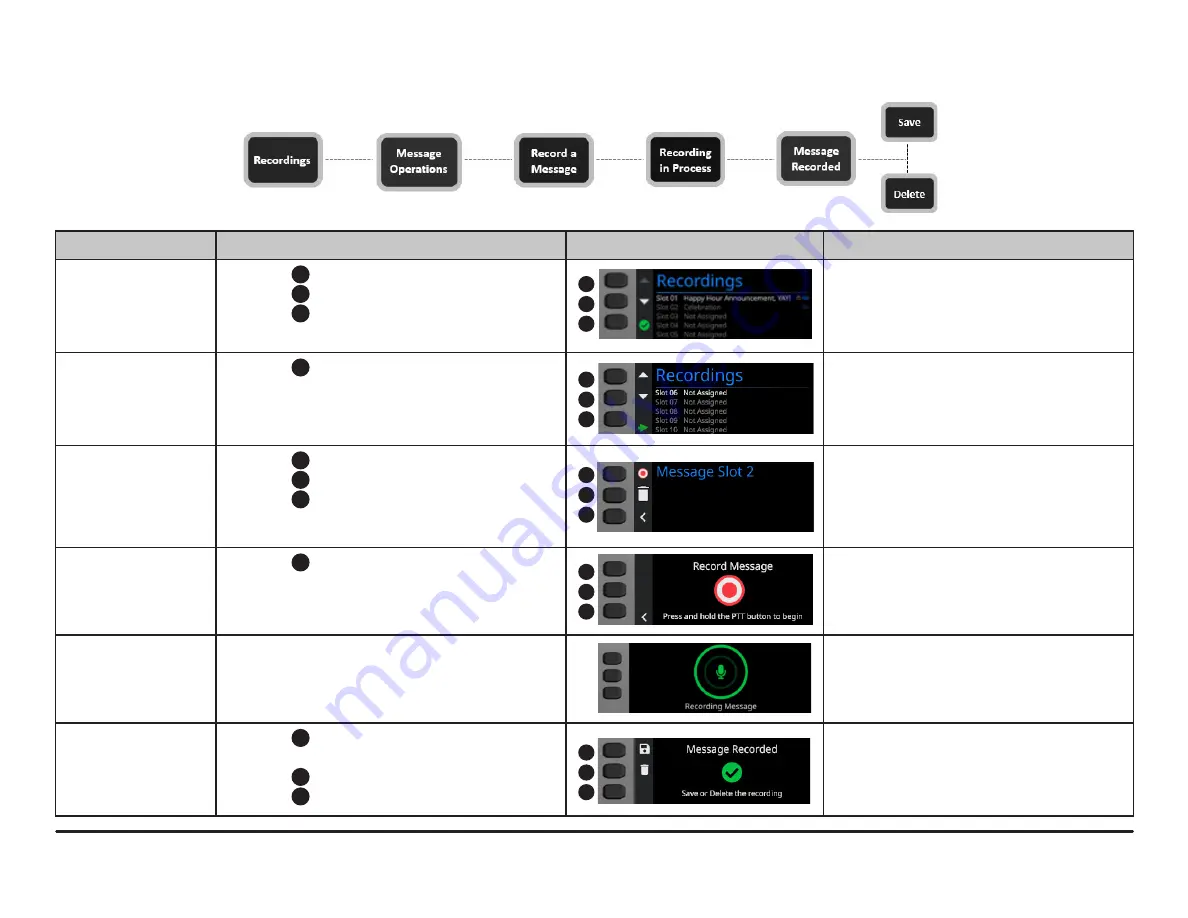
Recordings Screen

Press 

1

 to go to previous recording slot.

Press 

2

 to go to next recording slot.

Press 

3

 to go to Page Code screen if slot is

not selected.

Displays the list of assigned and unassigned 

message slots. 

Select Recording Slot •  Press 

3

 to go to Message Operations from

the selected recording slot.

Message Operations 

Screen

Press 

1

 to go to Record Message.

Press 

2

 to go to Delete Message.

Press 

3

 to return to Recordings.

Displays the message slot with record or 

delete options.

Message Recording 

Screen 

Press 

3

 to go to Message Operations.

Displays when the user is about to record a 

message.

Recording Message 

Screen

N/A

Displays when the message is being 

recorded from the microphone.

Message Recorded 

Screen

Press 

1

 to save message and return to

Recordings.

Press 

2

 to delete message.

Press 

3

 to return to Recordings.

Displays once the recording is complete.

Record a Message LCD Button Navigation

2

1

3

2

1

3

2

1

3

2

1

3

2

1

3

Summary of Contents for NPX G1040

Page 1: ...s can be set up to utilize AVB or Dante paths for paging content The NPX H1100 G1100 store up to 999 user configurable page codes and up to 10 prerecorded messages Setup and Use The Tesira software pr...

Page 2: ...llows the user to initiate announcements while holding the PTT button is down The page ends when the PTT button is released 6a Latching Button gooseneck only Keeps a page active until the button is pr...

Page 3: ...seneck may be installed in almost any location that is convenient for the room design requirements This includes setting or attaching the device on a flat surface or to a wall A Kensington lock can be...

Page 4: ...left and lift it away from the device Turn the bracket 180 degrees as shown in Figure 12 5 Attach the bracket to a single or double gang box with flat head screws as shown in Figure 13 screws and gan...

Page 5: ...xt page code Press and hold 3 and then press 2 to go to Device Information Press and hold 3 and then press 1 to go to Recordings Press 3 to return to Page Code The default Page Code screen displays af...

Page 6: ...one or speak more quietly to get to an acceptable level Playback a recorded message 3 At the Page Code screen press the top or middle LCD buttons next to to navigate to and highlight a specific page c...

Page 7: ...ble in Progress Press 3 to cancel preamble Displays when preamble is in progress Note that this cancels the preamble and the following action either live page or prerecorded message playback Message P...

Page 8: ...on and then press the top button to go to the Recordings screen 2 Press the top or middle LCD buttons next to to navigate to and highlight a specific recording slot 3 Press the bottom LCD button next...

Page 9: ...erations Screen Press 1 to go to Record Message Press 2 to go to Delete Message Press 3 to return to Recordings Displays the message slot with record or delete options Message Recording Screen Press 3...

Page 10: ...e is active unmuted Talk now Paging microphone is inactive muted Recorded announcement is being played to the destination zones Destination zones are busy Page will fail Please wait Return to the home...

Page 11: ...digit PIN is required if the station is locked Page codes must be entered as 3 digits For example to show page code nine the user would enter 0 0 9 For page code 20 the user would enter 0 2 0 The 4 b...

Page 12: ...page 12 Installation and Operation Guide NPX...

Page 13: ...NPX Installation and Operation Guide page 13...

Page 14: ...page 14 Installation and Operation Guide NPX...

Page 15: ...R 97008 USA W www biamp com DEC 2021 CONTACT US Email support biamp com Web support biamp com Warranty www biamp com legal warranty information Safety and Compliance www biamp com compliance Dante is...

Reviews: