PL290
Instrucciones de montaje y utilización
Instructions for assembly and use
Instructions de montage et d’utilisation
Hinweise zur Montage und Benutzung
Page 1: ...PL290 Instrucciones de montaje y utilizaci n Instructions for assembly and use Instructions de montage et d utilisation Hinweise zur Montage und Benutzung...
Page 2: ...g Las reparaciones incorrectas y o las modificaciones estructurales del equipo Ejemplo Retirar o el reemplazar piezas no originales pueden poner en peligro la seguridad del usuario Los componentes da...
Page 3: ...330lbs 150kg Incorrect repairs and or structural modifications to the equipment E g Removal of parts or non original replacement parts can endanger the user s safety Damaged components may endanger yo...
Page 4: ...aration incorrecte et ou modification de la structure de l quipement Exemple retirer ou substituer des pi ces avec d autres non originales peut repr senter un danger pour la s curit de l utilisateur L...
Page 5: ...chgem e Reparaturen und oder strukturelle Ver nderungen an dem Ger t z B das Entfernen von Teilen die Verwendung anderer als der Originalteile k nnen eine Gefahr f r die Sicherheit des Benutzers darst...
Page 6: ...re that there are no missing parts Sortir l unit de son emballage v rifier la pr sence de toutes les pi ces l aide de la liste figurant en Fig A et Fig B afin de garantir qu il ne manque aucune pi ce...
Page 7: ...7 7 1 8 1 9 1 10 2...
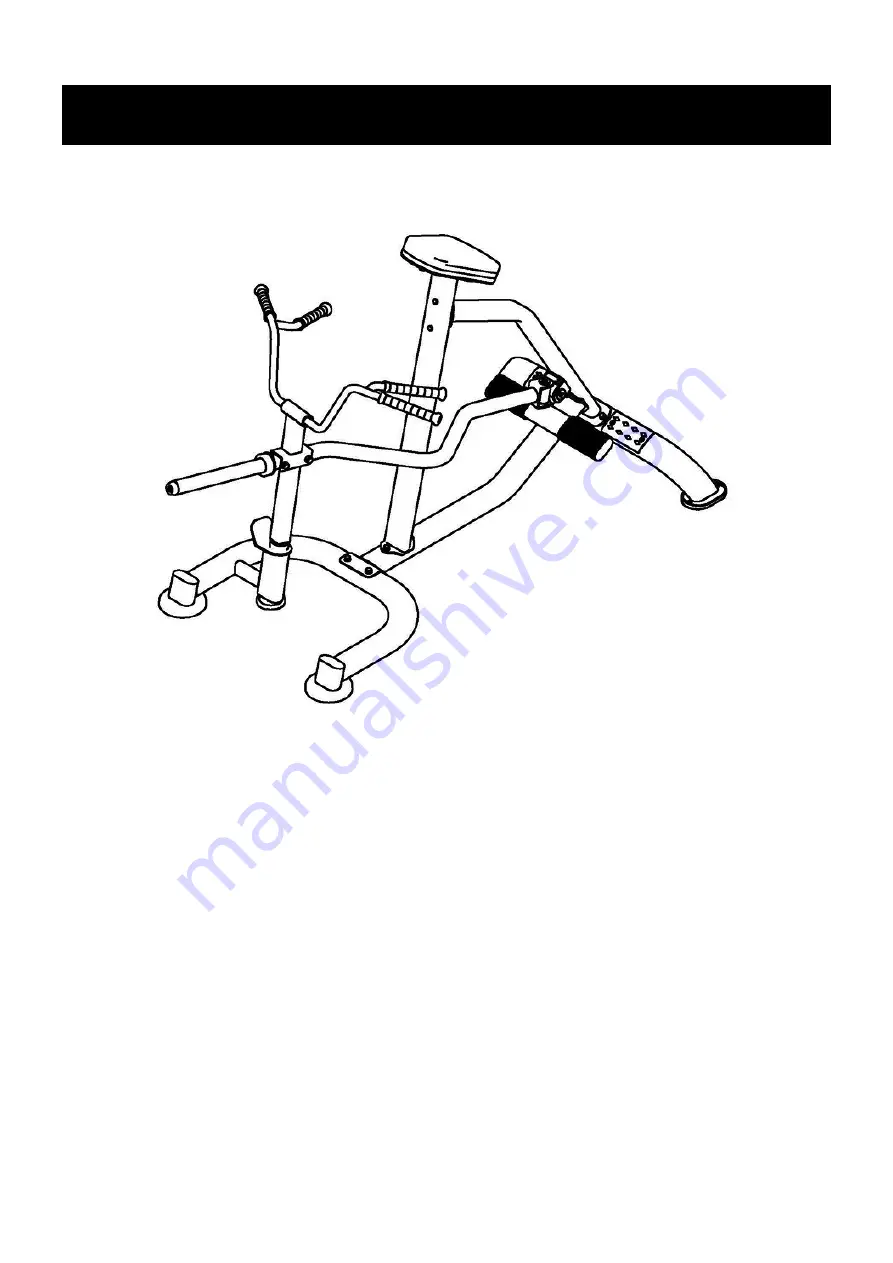
Page 8: ...SSEMBLY NOTE The description of the parts with respect to the figures always corresponds to the position the person adopts on the equipment when exercising INSTRUCTIONS DE MONTAGE REMARQUE La descript...
Page 9: ...ert the screws 14 fit the flat washers 16 and washers 18 and tighten securely Approcher le tube du support avant 1 au corps central 3 introduire les vis 14 placer les rondelles plates 16 et les rondel...
Page 10: ...s 12 fit the flat washers 16 and washers 18 and tighten securely Approcher le tube 5 au corps central 3 introduire les vis 12 placer les rondelles plates 16 et les rondelles 18 et visser solidement Ap...
Page 11: ...dy 3 insert the screws 12 fit the flat washers 16 and washers 18 and tighten securely Approcher le tube 5 et 2 au corps central 3 introduire les vis 12 placer les rondelles plates 16 et les rondelles...
Page 12: ...18 Place the U bracket on the bar 7 onto the spacer 6 Fit screws 12 along with the washers 11 18 Introduire l espaceur 6 dans le support 4 et le centrer Introduire l espaceur 10 et le visser en utilis...
Page 13: ...on the pad 9 on the bracket 5 and secure using screws 13 along with the washers 16 Placer le U du support de quidon 8 sur le support 7 Le visser en utilisant les vis 15 les rondelles 19 et 17 Position...
Page 14: ...After assembling the unit check that all of the screws have been fitted to the machine and that they are tightened securely TR S IMPORTANT Une fois le montage effectu v rifier que toutes les vis soien...
Page 15: ...PL290...
Page 16: ......
Page 17: ...y Conjunto soporte trasero A PL29002ASSY 2 1 Rear Bottom Frame Soporte trasero A PL2900200 2 2 Aluminium Foot plate Superficie aluminio A IT70191300 2 3 Foot Pad Soporte goma 166x56x6 A IT60031600V1 2...
Page 18: ...Aluminium Ring D25 Anillo Al D39 8xD26 8x18 A IT90102200 8 5 Plastic Cap Tornillo A BNH0720 8 6 Flat Head Cap Screw M10 30 Tornillo avellanado M10x30 A CNLM10 30 30N19NL 8 7 Set Screw 10 32 3 2 Torni...
Page 19: ...1 www bh com mx BH HIPOWER CHINA BH China Co Ltd Block A NO 68 Branch Lane 455 Lane 822 Zhen Nan RD Li Zi Yuan Putuo Shanghai 200331 P R C Tel 86 021 5284 6694 Fax 86 021 5284 6814 e mail info i bh cn...