background image

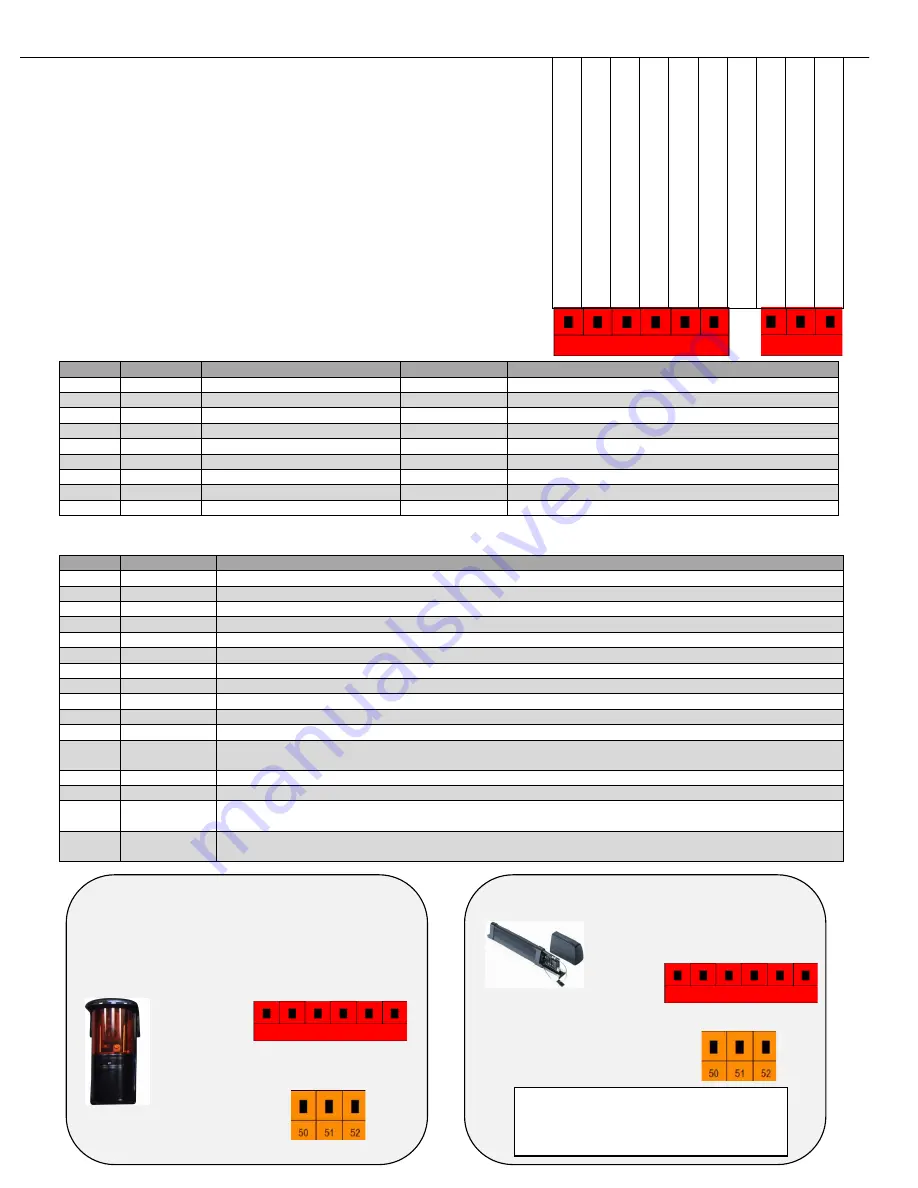
 SAFETY DEVICES 

The Thalia board provides: 

- one 

STOP

 command input;

- one  obstruction  sensing  device  input 

UL 

3

25-2016

  compatible, 

SAFE  1

  with  its

mandatory supervision circuit input 

FAULT 1

. The system reacts to the input in both

opening (stops) and closing (reverses) cycles;

- two  programmable  obstruction  sensing  device  inputs, 

SAFE  2

  and 

SAFE  3

,  both

provided with their optional supervision circuit input 

FAULT 2

 and 

FAULT 3

.

All the 

3

 safety inputs are 

N.C. (normally closed)

 contacts.  All the FAULT inputs are 

N.O. (normally open)

 contacts. Below is a table with the terminal numbers and their 

corresponding functions and default values.   

Terminal 

Name 

Description 

Default 

Notes 

70 

COM 

Safety positive common 

Common 

71 

STOP 

Stop command 

STOP 

Overrides all other commands 

72 

SAFE 1 

Safety input #1 

PHOT 

Stops operators during opening, reverses on closing 

73 

FAULT 1 

Supervisory circuit for SAFE 1 

FAULT 

Requires opposite relay state from SAFE 1 

74 

SAFE 2 

Safety input #2 

006 - BAR 

Programmable input  (see LOGIC sub-menu) 

75 

FAULT 2 

Supervisory circuit for SAFE 2 

FAULT 

Requires opposite relay state from SAFE 2 

76 

COM 

Safety positive common 

Common 

77 

SAFE 3 

Safety input #3 

015 - SHADOW 

Programmable input  (see LOGIC sub-menu) 

78 

FAULT 3 

Supervisory circuit for SAFE 3 

FAULT 

Requires opposite relay state from SAFE 3 

VALUE 

FUNCTION 

DESCRIPTION 

000 

PHOT 

System reacts to the input in both opening (stops) and closing (reverses) cycles 

001 

PHOT TEST 

Same as above. Requires the device to be supervised (FAULT active) 

002 

PHOT OP 

System reacts to the input only during the opening cycle (stops) 

003 

PHOT OP TEST 

Same as above. Requires the device to be supervised (FAULT active) 

004 

PHOT CL 

System reacts to the input only during the closing cycle (reverses) 

005 

PHOT CL TEST 

Same as above. Requires the device to be supervised (FAULT active) 

006 

BAR 

Safety edge input. It reacts in both opening and closing. It stops and partially reverses 

007 

BAR TEST 

Same as above. Requires the device to be supervised (FAULT active).  

008 

BAR 8K2 

Safety edge input with EOL resistor as supervision method. 

Active only on SAFE 2


009 

BAR OP 

Safety edge input. During opening it stops and partially reverses. During closing it stops. 

010 

BAR OP TEST 

Same as above. Requires the device to be supervised (FAULT active) 

011 

BAR OP 8K2 

Safety edge input with EOL resistor as supervision method. During opening it stops and partially reverses.  

During closing it stops. 

Active only on SAFE 2


012 

BAR CL 

Safety edge input. During closing it stops and partially reverses. During opening it stops. 

013 

BAR CL TEST 

Same as above. Requires the device to be supervised (FAULT active) 

014 

BAR CL 8K2 

Safety edge input with EOL resistor as supervision method. During closing it stops and partially reverses.  

During closing it stops. 

Active only on SAFE 2


015 

SHADOW 

Safety loop input. If the contact is closed, it prevents any movement of the leafs when gate is open (VALUE 0 of the 

LOGIC


SHADOW

) or when the gate is both open and closed (VALUE 1 of the

 LOGIC


SHADOW

). See chart example N. 3 on next page. 

Both 

SAFE 2

 and 

SAFE 3

 can be programmed to perform any of the following functions under the 

LOGIC 

sub-menu: 

EXAMPLE 1

:  UL 

3

25-201

6

SAFETY PHOTO BEAM SENSOR WIRING 

RELAY N.

O

RELAY N.C. 

COMMON 

POWER 24V +  

POWER 24V -  

EXAMPLE 2

:  SAFETY EDGE WIRING 

RELAY N.C. 

COMMON  

PROGRAMMING

:  

LOGIC > SAFE 2 > 006 (BAR) 

7

0

 -

 C

o

m

m

o

n


7

1

 -

 S

T

O

P


72 

– 

SAFE 

1: 

 PHOT 

UL 

3

25-16 

(obstruction) 

73 

– 

FAULT 


UL 

3

25 

2016


7

4

 –

 S

A

F

E

 2

 –

 p

ro

g

ra

m

m

a

b

le

 -

 d

e

fa

u

lt

 i

BA

R


(s

a

fe

ty

 e

d

g

e

7

5

 –

 F

A

U

L

T

 2


7

6

 -

 C

o

m

m

o

n


7

7

 –

 S

A

F

E

 3

 –

 p

ro

g

ra

m

m

a

b

le

 –

 d

e

fa

u

lt

 i

S

H

A

D

O

W

 (

sa

fe

ty

 l

o

o

p

7

8

 –

 F

A

U

L

T

 3


76     77     78 

20

70


71


72


73


74


75

70


71


72


73


74


75


70


71


72


73


74


75


Summary of Contents for KUSTOS ULTRA BT

Page 1: ...i n s t a l l a t i o nma n u a l version 612016 Professional installation suggested welding might be required KUSTOS ULTRA BT Thalia control board ...

Page 2: ... e dr o l l e r s 2 T h eo p e r a t o r i s i n t e n d e df o r i n s t a l l a t i o no n l yo ng a t e s u s e df o r v e h i c l e s P e d e s t r i a n s mu s t b es u p p l i e dw i t has e p a r a t ea c c e s s o p e n i n g T h e p e d e s t r i a na c c e s s o p e n i n gs h a l l b ed e s i g n e dt op r o mo t ep e d e s t r i a nu s a g e L o c a t et h eg a t es u c ht h a t p e r ...

Page 3: ...a n dt oo p e ni t C O NT R O L T h e r ea r ev a r i o u s o p t i o n s w h e ni t c o me s t ot h ec o n t r o l s y s t e m ma n u a l r e mo t ec o n t r o l a c c e s s c o n t r o l w i t hma g n e t i c b a d g e e t c d e p e n d i n go n t h ei n s t a l l a t i o ns n e e d s a n dc h a r a c t e r i s t i c s S e et h er e l e v a n t i n s t r u c t i o n s f o r t h ev a r i o u s c ...

Page 4: ... a l C o n t r o l B o x 1 3 Mo t o r C o n n e c t i o n s 1 4 Qu i c kS e t u pMe n u 1 5 P r e s e t s 1 7 A c c e s s o r yC o n n e c t i o n s 1 9 A c c e s s o r yP o we r C o mma n dI n p u t s S a f e t yDe v i c e s 2 0 S a f e t yL o o pDe t e c t o r Wi r i n g A u x i l i a r yOu t p u t s 2 1 S h a d o wL o o pDe t e c t o r Wi r i n g Na v i g a t i n gt h eMa i nMe n u 2 2 P r o g ...

Page 5: ...e product warranty may be voided if installed or serviced by a unqualified person a n e x t e r n a l l o c k i n g me c h a n i s mi s s u g g e s t e d f o r g a t e s o v e r 1 0 f e e t l o n g 5 WARNING Please read and follow all instructions before installing and operating this product Follow all local and federal building and electrical BFT is not responsible for faults or damage cause by i...

Page 6: ...the center line of the hinge and the inside edge of the gate post The black dots represent the recommended bolt placement P o s t b r a c k e t l e n g t hp o s i t i o n 1 2 3 4 H i n g e o f f s e t 1 1 8 mi n u p t o 1 5 8 u p t o 1 7 8 u p t o 2 1 4 u p t o 2 5 8 6 is best must be between 6 6 is best T h e s u g g e s t e d p o s t b r a c k e t l e n g t h p o s i t i o n s a r e a c c u r a ...

Page 7: ...t to the hinge center line If you feel that you have followed the instructions on how to mount the brackets and the distance of the hole of the gate bracket to the hinge center line is greater than that of the post bracket stop the installation process and contact technical support h i n g e c e n t e r l i n e p o s t b r a c k e t l i n e h i n g e c e n t e r l i n e p o s t b r a c k e t l i n...

Page 8: ...standard installations The post bracket should require modifications and or welding The following illustrations do not represent the actual assembly of the post bracket Its intentions is to illustrate the directions and dimensions of the bracket in relationship to the gate With the gate opened 90 the distance between the mounting hole in both brackets must be 27 inches O U T S I D E I N S I D E O ...

Page 9: ...r cable Install the o ring over the cable so that it is about 1 2 from the edge of the outer jacket 2 Turn the actuator upside down Connect the white wire to terminal 1 the red wire to terminal 2 and the black wire to terminal 3 3 Install the back cover making sure that the o ring fits inside the groove to seal the operator from moisture 9 1 2 3 MOT MOT FC 1 2 3 ...

Page 10: ... l l t h e s n a p r i n g s o n l y o n c e y o u h a v e c o mp l e t e l y f i n a l i z e d t h e i n s t a l l a t i o n a n d a l l a d j u s t me n t s l o c k n u t p i v o t b o l t s p a c e r c o l l a r f l a t w a s h e r s n a p r i n g f l a t w a s h e r s n a p r i n g MO U NT I NGT H EA C T U A T O R MAKE SURE THAT THE BODY OF THE ACTUATOR DOES NOT HIT THE MOUNTING BRACKET WHEN T...

Page 11: ...that the back end of the sensor housing is 3 1 2 from the center of the drive carriage and re attach screw that secures sensor in place 3 1 2 4 RE ENGAGE THE MANUAL RELEASE Use triangular key and turn counterclockwise to re engage gears S E T T I NGT H EL I MI T S to the controller it 3 1 2 11 SETTING THE OPEN LIMITS 1 2 CHIUDI CLOSE FERME ÖFFNEN CERRAR SLUITEN CHIUDI CLOSE FERME ÖFFNEN CERRAR SLU...

Page 12: ...g is 3 1 2 from the center of the drive carriage and re attach screw that secures sensor in place 4 RE ENGAGE THE MANUAL RELEASE Use triangular key and turn counterclockwise to re engage gears S E T T I NGT H EL I MI T S 5 FINE TUNING THE LIMITS Once the actuator is connected to the controller it must be powered and the limits might have to be fine tuned by sliding them to the correct position 3 1...

Page 13: ...ior of the enclosure Bring all your wiring and or conduits through the bottom of the enclosure For best results use a step drill bit to perforate the enclosure to the needed size opening Do not perforate the top of the enclosure I NS T A L L I NGT H EO P T I O NA LC O NT R O LB O X 13 Mo u n t i n gt h ee n c l o s u r e C o n n e c t i n gp o we r 6 3 4 12 15 1 2 ...

Page 14: ...tor wires from the gate that When installing a two leaf gate system connect the motor wires from the gate that needs to needs to open first open first to Motor 1 connections 10 11 42 and connect the motor to Motor 1 connections 10 11 42 and connect the motor wires from the gate that needs to wires from the gate that needs to close first close first to Motor 2 connections 14 15 43 to Motor 2 connec...

Page 15: ... u f l o wc h a r t Q u i c k S e t u p M e n u n a v i g a t i o n Pressing the button scrolls UP Pressing the button scrolls DOWN Pressing the OK button moves to the NEXT selection Pressing and at the same time EXITS the menu Q U I C KS E T U PME NU OK S T E P1 E n t e r Q u i c k S e t u p M e n u OK OK S T E P2 S e t t h e me n u l a n g u a g e Press the OK button once the display will immedi...

Page 16: ... e l e c t t h e t y p e o f o p e r a t o r OK and then press ok to select S T E P5 S e t t h e o p e n i n g d i r e c t i o n OK dir direction will be displayed for a second followed by int interior OK select int if the gates open in or OK press and select ext exterior if the gates open out Q U I C KS E T U PME NU S T E P6 S e t t h e d e s i r e d p r e s e t OK preset will be displayed OK fol...

Page 17: ...for 3 seconds before energizing the motors Uninterrupted Open Cycle Remote controls and START input is ignored during the open cycle Instant Reverse On Closing A START command will instantly re open gates during the close cycle Otherwise a START command first stops the gate requiring a second command to re open Hold To Run START command is disabled Gate requires a constant open or close command fo...

Page 18: ...down the 2 top buttons on your mitto remote when the screen reads release release the two buttons OK OK after selecting your preset the screen will display prog programming for a few seconds the screen will display autoset be aware that the gate will run at full torque during the process press ok when ready S T E P7 R u n t h e A U T O S E T make sure that the path of the gate is clear of traffic ...

Page 19: ...ing Partially opens Motor 1 only T I M E R Hold Open input Holds partially open motor 1 P E D T I M E RP E D Command inputs 1 and 2 can be re programmed to perform any of the following functions A C C E S S O R YP O WE R A C C E S S O R YC O NNE C T I O NS Please refer to LOGIC programming for IC 1 and IC 2 re programming C O MMA NDI NP U T S P R O G R A M M I N G L O G I C I C 0 0 0 0 0 6 50 51 5...

Page 20: ...ring the closing cycle reverses 005 PHOT CL TEST Same as above Requires the device to be supervised FAULT active 006 BAR Safety edge input It reacts in both opening and closing It stops and partially reverses 007 BAR TEST Same as above Requires the device to be supervised FAULT active 008 BAR 8K2 Safety edge input with EOL resistor as supervision method Active only on SAFE 2 009 BAR OP Safety edge...

Page 21: ...CLOSED 0 CLOSED Opening allowed CLOSED 0 OPEN Opening allowed IN MOVEMENT 0 CLOSED No effect IN MOVEMENT 0 OPEN No effect OPEN 0 CLOSED Closing allowed OPEN 0 OPEN Closing not allowed CLOSED 1 CLOSED Opening allowed CLOSED 1 OPEN Opening not allowed IN MOVEMENT 1 CLOSED No effect IN MOVEMENT 1 OPEN No effect OPEN 1 CLOSED Closing allowed OPEN 1 OPEN Closing not allowed 76 77 78 21 ...

Page 22: ... t i n g s H a s n o e f f e c t o nR A D I Op r o g r a mmi n g L A N G U A G E S e l e c t i o no f me n ul a n g u a g e A U T O S E T M o t o r l e a r nf e a t u r e S T A T P r o v i d e s f i r mw a r e a n d me mo r y i n f o r ma t i o n P A S S WO R D P a s s w o r d s e t t i n g f o r w i r e l e s s p r o g r a mme r M a i n P r o g r a mmi n g M e n u n a v i g a t i o n Pressing the...

Page 23: ...in seconds 1 0 10 CLS DELAY TIME Motor 1 closing delay in seconds 1 0 10 TCA Auto close time adjustment in seconds 10 1 180 TRF LGHT CLR T Traffic zone clear time adjustment in seconds 40 1 180 OP DIST SLOWD Slowdown starting distance from end of open travel expressed in percentage 10 0 50 CL DIST SLOWD Slowdown starting distance from end of close travel expressed in percentage 10 0 50 DIST DECEL ...

Page 24: ... NGB F T2 4 VA C D CR E L A Y O T H E RA C C E S S O R I E SC O NNE C T I O NS 4 5 3 Transformer Power plug YELLOW normally closed contact BLUE common RED 24V WHITE 24V Dedicated power supply B A T T E R YB A C K U PWI R I NGD I A G R A M 20 2 1 P N KRELAY24V SBS battery backup board 12v batteries GY BK 24 1 2 3 4 5 ...

Page 25: ... D E T E C T E D E R 3 7 M O T O R1 O B S T A C L ED E T E C T I O ND U R I N GO P E N I N GS L O WD O WN E R 2 7 M O T O R1 O P P O S I T EM O V E M E N T E R 3 8 M O T O R1 O B S T A C L ED E T E C T I O ND U R I N GC L O S I N GS L O WD O WN E R 3 0 M O T O R2 O B S T A C L ED E T E C T I O ND U R I N GO P E N I N G E R 4 0 T H E R M A LO V E R L O A D E R 3 1 M O T O R2 O B S T A C L ED E T E ...

Page 26: ... ME NTP A R T S It is highly recommended to when necessary replace both the limit sensors and motor board together 26 Gate Bracket Magnet Holder P N N999427 End Cap P N I105800 OPTIONS AND ACCESSORIES BOTTOM Thalia UL SE Small enclosure no battery back up UL Alarm and Reset Included in small and large enclosure ...

Page 27: ...Q Bo Touch P N P121024 10 channel wireless keypad With memory for up to 99 codes a single keypad can control up to 10 devices in a single location AEL 433 P N D113632 External antenna tuned for 433Mhz doubles the standard range of the remote controls POLARIZED IR SENSOR P N KIRPOLAPHOT001 30 ft range The polarized lens improves performance of the sensor under rainy foggy or damp conditions 2 axis ...

Page 28: ... s f o r c e s s p e e d s L O G I C S u b me n u A l l f e a t u r e s a n d f u n c t i o n s a r e s e l e c t e d i n t h i s a r e a R A D I O S u b me n u B u i l t i n r e c e i v e r p r o g r a mmi n g r e mo t e c o n t r o l s a n d w i r e l e s s d e v i c e s D E F A U L T R e s t o r e s a l l f a c t o r y s e t t i n g s H a s n o e f f e c t o n R A D I O p r o g r a mmi n g L A ...

Reviews: