background image

10

Warning notice for a safe and correct method of use

This microscope is not suitable for children under 8 years, since it contains small parts, which pose a choking hazard to 

young children. It is not a toy! It is pointed out to parents and teachers that the microscope is a scientific device. Cover slips, 

microscope slides, and sharp instruments belong to the microscope. Children are not allowed to work with these, unless 

supervised by adults, as there is a possible danger of getting hurt. Always follow the specified safety regulations! With the 

colourful learning microscope made by Betzold you have the option to directly view specimens on microscope slides as well 

as objects such as plants, coins or insects.

This is possible through the dual LED illumination, which enables you to light the object from below (transmitted light) as 

well as from above (reflected light). Batteries make you independent from electric supply lines, and enables you to use it 

outdoors. There are two different application options in one set of the colourful learning microscope, promising many hours of 

fun and learning.

Maintenance, care, and storage of the microscope

WARNING:

 To avoid fire or short circuit, never expose the microscope to dampness or moisture.

-   Turn the light off whenever you do not need it, in order to prolong the life of the batteries.  

Make sure, both lights are turned off, e.g. the switch is in the middle position.

-   Clean the microscope exclusively with a soft cloth. Fingerprints and stains can be removed with a moistened cloth.  

When it is necessary to clean the lenses, try to do it with a cotton-wool ball, very slightly moistened with alcohol.  

Dry the lenses with a dry cotton-wool ball or with special cleaning paper.

-  Store the microscope in a cool and dry place.
-  Cover the microscope with the included dust cover, or put it back into its case whenever not in use.
-  When you use it outside, make sure it is in an upright position, to prevent the eyepiece from falling out.
-  Eyepiece and objective should be kept installed, to prevent dust getting into the tube.
-   Store the unused microscope slides in the provided container. Always be careful with glass and sharp objects and keep 

them inaccessible for small children.

-   When the light begins to weaken, replace the type AA (Mignon LR6) batteries. 

  The LED lights have life time durability and should not have to be replaced.
-  Normal batteries are not rechargeable! Replace used batteries with new ones.
-  Do not mix old and new batteries.
-  Do not keep used batteries in the battery holder for a longer period of time.
-  Only use batteries of the same type.
-  Please take care to match the right polarities.

-  Do not expose batteries to fire or high temperatures!

Notes for disposal

Please dispose of all packaging material immediately after unpacking in an environmentally-friendly fashion.

Plastic wrappings represent a danger of suffocation for small children. Please dispose of the used microscope  

according to local ordinance regulations.

Electrical waste is not to be disposed of in household waste.

If you cannot use the microscope any more, the consumer is legally bound to dispose of the used electrical devices separa-

tely from the household waste e.g. at a collection point of his municipality / city. This is indicated by the following symbol.

GB

Summary of Contents for 757943

Page 1: ...Arnulf Betzold GmbH Buntes Lern Mikroskop Nr Art 757943 Colourful learning Microscope Nr Art 757943 Microscope d apprentissage color Nr Art 757943...

Page 2: ...apier Bewahren Sie Ihr Mikroskop an einem k hlen trockenen Platz auf Bedecken Sie das Mikroskop mit der beigef gten Staubh lle oder stellen Sie es zur ck in den Karton wenn Sie es nicht verwenden Wenn...

Page 3: ...ukt erworben haben Technische Daten und Lieferumfang a Vergr erungen Die Gesamtvergr erung errechnet sich aus der Multiplikation der Okularvergr erung immer 10 mit der Linse des Objektivs Okular unter...

Page 4: ...h das Okular und drehen Sie den Einstellknopf LANGSAM bis das Objekt klar zu sehen ist Achten Sie darauf dass der Objekttr ger nicht das Objektiv ber hrt Tipps f r die Arbeit mit dem Durchlicht Die Lo...

Page 5: ...nd beobachten Sie die Wiederkristallisierung des Salzes Zuckers 3 Sch tteln Sie etwas Pollen aus einer Bl te auf einen leeren Objekttr ger 4 Haare auch die von Haustieren oder Teile von Federn lassen...

Page 6: ...ht Das d nne Deckglas wird bei zu starkem Druck brechen 6 Tupfen Sie eventuell ausgetretenes Wasser vorsichtig auf 7 Platzieren Sie nun das Pr parat vorsichtig unter dem Mikroskop Deckglas nach oben u...

Page 7: ...ie folgenden Bauteile des Mikroskops in den angegebenen Farben an Beschrifte die Bauteile Tubus Grau Objekttisch Schwarz Objektklammern Silbergrau Beleuchtung Gelb Einstellknopf Blau Okular Gr n 1 2 3...

Page 8: ...6 Einstellknopf Trieb 7 Standfu 8 Durchlicht 9 Objektklemme 10 Objekttisch 11 Objektive 12 Objektivrevolver 13 Petrischale 14 F rbefl ssigkeit 15 Deckgl schen 16 Objekttr ger 17 Reagenzglas 18 Pipett...

Page 9: ...E Darauf lege ich den Gegenstand den ich betrachten will G Dient zum Tragen des Mikroskops I Damit kann ich das Bild scharf einstellen H Damit wird das Objekt beleuchtet J Sie halten den Objekttr ger...

Page 10: ...necessary to clean the lenses try to do it with a cotton wool ball very slightly moistened with alcohol Dry the lenses with a dry cotton wool ball or with special cleaning paper Store the microscope...

Page 11: ...maged or faulty goods at the time of purchase is not necessary In case of guarantee claims please contact place of purchase Technical dates and delivery schedule a Magnifications The total magnificati...

Page 12: ...for the bottom light so that it shines through the opening and through the object holder onto the stage Look through the eyepiece and turn the focus knob SLOWLY until the object can be seen clearly Ma...

Page 13: ...me drops on an object holder Let them dry and observe the recrystallisation of the salt sugar 3 Shake some pollen of a blossom onto an empty object holder 4 It is interesting to observe parts of feath...

Page 14: ...s possible to avoid bubbles Caution The thin cover glass will break when the pressure is too strong 6 Carefully dab up eventually spilled water 7 Now place the specimen carefully under the microscope...

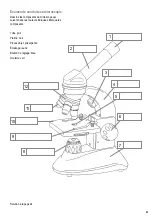
Page 15: ...lowing components of the microscope with the indicated colours Label the components Lens barrel grey Stage black Specimen clamps silver grey Illumination yellow Adjustment knob blue Eyepiece green 1 2...

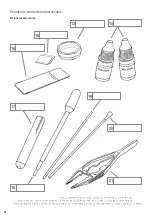
Page 16: ...m 5 Orifice plate 6 Focus knob 7 Base 8 Transmitted light 9 Stage clip 10 Stage 11 Objektive 12 Objective turret 13 Petridish 14 Colouring liquid 15 Cover glasses 16 Slide holders 17 Test tubes 18 Pip...

Page 17: ...specimen which I would like to view on this G It serves to carry the microscope I It is used to focus on the picture H It is used to illuminate the specimen J They keep the specimen holders in place...

Page 18: ...ntes ou des taches peuvent tre enlev es avec un tissu l g rement mouill Si besoin nettoyez les lentilles avec un tampon de coton tr s l g rement mouill d alcool s chez les lentilles avec un tampon de...

Page 19: ...La pile contient du plomb Cd La pile contient du cadmium Hg La pile contient du mercure Garantie Vous avez une pleine garantie de 5 ans au del des d lais de garantie l gaux et sans que ceux l soient...

Page 20: ...en bas qui va traverser le porte objet Regardez travers l oculaire et tournez le bouton de r glage LENTEMENT jusqu obtenir une vue nette ATTENTION Le porte objet ne doit pas toucher l objectif Conseil...

Page 21: ...eux des poils d animaux ou des plumes sont adapt s l observation Essayez de comparer des poils ani maux diff rents Vous pouvez les fixer avec un petit bout de scotch sur la lamelle 5 Regardez les fibr...

Page 22: ...i platement que possible pour viter des bulles d air ATTENTION Le couvre objet tr s fin peut casser en cas de pression trop forte 6 pongez en cas de d bordement 7 Placez l chantillon sous le microscop...

Page 23: ...ine les composants du microscope qui suivent dans les couleurs indiqu es Marque les composants Tube gris Platine noir Pinces objet gris argent clairage jaune Bouton de r glage bleu Oculaire vert 1 2 3...

Page 24: ...rture 6 Bouton de r glage 7 Pied 8 Lumi re transmise 9 Pinces objet 10 Platine 11 Objektif 12 Revolver d objectifs 13 Boite de petri 14 Liquide pour coloration 15 Couvre objets 16 Porte objets 17 prou...

Page 25: ...sition stable E Je pose l objet que je voudrais regarder l dessus G Sert porter le microscope I Avec cela je peux mettre l image au point H Avec cela l objet est clair J Vous tenez fermement le porte...

Page 26: ...26 F r Ihre Notizen For your notes Pour vos notes...

Page 27: ...27 F r Ihre Notizen For your notes Pour vos notes...

Page 28: ...479 Ellwangen Telefon 49 7961 9000 0 Telefax 49 7961 9000 50 E Mail service betzold de www betzold de AT Arnulf Betzold GmbH Seeb hel 1 6233 Kramsach Tirol Telefon 43 5337 644 50 Telefax 43 5337 644 5...

Reviews: