background image

TrailMax™ II Fixed Rear Seat – Installation Instructions

Rev. 4 0907

39437 pg. 2

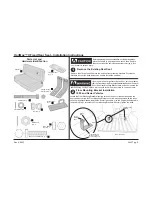
Parts List and 

Hardware Identifi cation

Floor Mounting Bracket Installation
1986 and Newer Vehicles

Seat, Qty - 1

Tapping Plate., 
Qty - 3

Pivot Bolt, Qty - 2

Striker Plate, 
Qty - 1

If your vehicle has carpet covering the fl oor, cut the carpet so 
that the Floor Mounting Brackets are installed fl ush on the metal 
fl oor. If the Floor Mounting Brackets are not fl ush mounted, the 

seatback may not lock in place, which could result in serious injury to you and others. 

Remove the Existing Rear Seat

Floor Mounting 
Brackets, Qty - 2

Flat Washer, 
Qty - 3

M8-1.25 Hex 
Nut Qty - 3

M8-1.25 x 35mm Bolt, Qty - 3

Before beginning the seat installation, set the parking brake, 
place the vehicle in gear or park and chock the wheels to 
reduce the risk of the vehicle unexpectedly moving, which 

could result in serious injury.

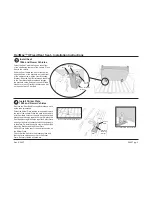
Locate the Floor Mounting Bracket mounting holes on the fl oor of the vehicle behind the 
front seat risers. Align the Floor Mounting Brackets over the mounting holes with the loops 
on each bracket positioned towards the front of the vehicle. Use the original bolts that were 
removed in Step 1 to install the Floor Mounting Brackets. Securely tighten the bolts.

Rear of Vehicle

Floor Mounting 
Brackets

Front

Loops 
toward 
front

Floor Mounting 
Bracket - Place 
over existing hole

Original 
Bolt

Remove the old rear seat. Remove the existing front mounting brackets. Discard the 
brackets, but set the bolts aside to be used to install the new seat.

Flat Washer, Qty - 2

Nut, Qty - 2

Summary of Contents for TrailMax II

Page 1: ...sy TOOLS Vehicle Application Jeep CJ5s CJ7s and Wranglers 1955 1995 Part Number 39437 TrailMax II Fixed Rear Seat www Bestop com We re here to help Visit our web site and click on Ask a Question Click here for more Jeep Accessories by Bestop 13 mm and 5 8 T 50 25 64 Bit ...

Page 2: ...nningtheseatinstallation settheparkingbrake place the vehicle in gear or park and chock the wheels to reduce the risk of the vehicle unexpectedly moving which could result in serious injury Locate the Floor Mounting Bracket mounting holes on the floor of the vehicle behind the front seat risers Align the Floor Mounting Brackets over the mounting holes with the loops on each bracket positioned towa...

Page 3: ...eat Belt Mounting Bracket and the Striker Plate Hook the lock on the rear of the seat to the catch on the Striker Plate Check that the Seat is in the proper position and that the Latch catches securely to the Striker Plate Securely tighten all hardware Remove Seat Belt Mounting Bracket Hook Seat Latch to Striker Plate Orient the Seat with the Legs on the bottom of the seat facing the rear of the v...

Page 4: ...unting Brackets as templates to mark the hole locations of the Floor Mounting Brackets Remove the Pivot Bolts Nuts and Washers and remove the Seat from the vehicle Center punch and drill a 25 64 hole at each mark Remove the Floor Mounting Brackets from the seat Align the Floor Mounting Brackets over the drilled holes with the loops on the brackets facing toward the front of the vehicle From undern...

Page 5: ...or 13mm wrench Check that the Seat is in the proper position and that the Latch catches securely to the Striker Plate Securely tighten all hardware Install Striker Plate 1985 and Older Vehicles Rear Striker Plate Tapping Plate under floor M8 1 25 x 35mm Bolt Flat Washer M8 1 25 Hex Nut under floor Check for wiring and fuel lines before drilling holes in floor In 1985 and older vehicles the seat in...

Page 6: ...D GOODS MANUFACTURED BY OUR COMPANY USING PRIMARILY METALS PLASTICS AND OR FIBERGLASS ONE YEAR FROM DATE OF PURCHASE ANY IMPLIED WARRANTIES OF MERCHANTABILITY AND OR FITNESS FOR A PARTICULAR PURPOSE CREATED HEREBY ARE LIMITED IN DURATION TO THE SAME DURATION AND SCOPE AS THE EXPRESS WRITTEN WARRANTY OUR COMPANY SHALL NOT BE LIABLE FOR ANY INCIDENTAL OR CONSEQUENTIAL DAMAGE Some states do not allow...

Reviews: