background image

- 8 -

INSTALL THE DUCTWORK 

FIG. 6

ROOF CAP

48" TO 72" ABOVE

COOKING SURFACE

HOOD

8" ROUND

DUCT

8" ROUND

TO 3¼” X 14”

REDUCER

3¼” X 14”

UNDER

EAVE

VENT

8" ROUND

DUCT

 WARNING: To reduce the 

risk of fire, use only metal duc-

twork.

1.  Decide where the ductwork will 

run between the hood and the

outside. Fig. 6.

2.  A straight, short duct run will

allow the hood to perform most 

efficiently.

3.  Long duct runs, elbows, and

transitions will reduce the per-

formance of the hood. Use as

few of them as possible. Larger 

ducting may be required for

best performance with longer

duct runs.

4.  Install a roof cap, wall cap, or under-eave vent. Connect round metal ductwork to cap/vent 

and work back towards hood location. Use duct tape to seal the joints between ductwork

sections.

5.  The blower can be rotated according to the air outlet location. See Fig. 7 for air outlet

dimensions.

8¾”

13¾”

8¾”

21

11

/

16

FIG. 7

- OR -

LOCATION OF HOOD OUTLET

NON-DUCTED INSTALLATION

Purchase Model ANKCC34 Non-ducted 

Recircuation Kit from your local dealer.

See instructions supplied with the 

recirculation kit. 

Summary of Contents for CC34IQSB

Page 1: ...LISH 2 FRANÇAIS 17 ESPAÑOL 33 In USA BEST Hartford Wisconsin In CANADA BEST Drummondville QC Canada REGISTER YOUR PRODUCT ONLINE AT www BestRangeHoods com register For additional Information visit www BestRangeHoods com ...

Page 2: ...ent air is needed for proper combustion and exhausting of gases through the flue chimney of fuel burning equipment to prevent backdrafting Follow the heating equipment manufacturer s guidelines and safety standards such as those published by the National Fire Protection Association NFPA and the American Society for Heating Refrigeration and Air Conditioning Engineers ASHRAE and the local code auth...

Page 3: ...ol generates uses and can radiate radio frequency energy and if not installed and used in accordance with the instructions may cause harmful interference to radio communications However there is no guarantee that interference will not occur in a particular installation If this equipment does cause harmful interference to radio or television reception which can be determined by turning the equipmen...

Page 4: ...eed high to low The LED ring L1 flashes blue at a speed proportionate to the blower setting i e four flashes is high speed one flash is low speed etc Continue pressing this switch to turn the blower off P4 Blower Speed Increase and On Switch Press this switch to turn the blower on to low speed Press again to increase blower speed low to high The LED ring L1 flashes blue at a speed proportionate to...

Page 5: ...g possible negative effects on the environment and health REMOTE CONTROL The remote control is linked to the hood at the factory If for some reason the link is lost follow the directions below To Link Remote Control to Hood 1 Turn off hood motor and hood lights 2 Press and buttons on the remote simultaneaously for 5 seconds until the remote control Indicator Light turns on Fig 3 Release and button...

Page 6: ...ainless Steel Cleaning DO Regularly wash with clean cloth or rag soaked with warm water and mild soap or liquid dish detergent Always clean in the direction of original polish lines Always rinse well with clear water 2 or 3 times after cleaning Wipe dry completely You may also use a specialized household stainless steel cleaner DON T Use any steel or stainless steel wool or any other scrapers to r...

Page 7: ...tents You should receive 1 Range Hood Body 1 Remote Control 6 Grease Filters 2 Screws 4 x 9 5 mm 6 Lag Bolts 6 x 70 mm 6 Washers 6 LAG BOLTS 6 x 70 mm FIG 5 REMOTE CONTROL RANGE HOOD BODY with DAMPER 6 GREASE FILTERS 6 WASHERS 2 SCREWS 4 x 9 5 mm ...

Page 8: ...he per formance of the hood Use as few of them as possible Larger ducting may be required for best performance with longer duct runs 4 Install a roof cap wall cap or under eave vent Connect round metal ductwork to cap vent and work back towards hood location Use duct tape to seal the joints between ductwork sections 5 The blower can be rotated according to the air outlet location See Fig 7 for air...

Page 9: ...PILOT HOLE 6 PREPARE THE CEILING OPENING The hood should always be centered over the cooktop Make sure there is adequate space in the ceiling structure to install the hood and ductwork The hood should be mounted 48 to 72 above the cook top for best removal of cooking impurities Fig 6 Use joist size lumber to frame in around the range hood opening The ceiling structure must be able to support the w...

Page 10: ...f blower box Fig 10 2 Insert control box into opening Fig 11 3 Attach control box with 2 4 x 9 5 mm screws provided Fig 12 FIG 10 FIG 11 FIG 12 CONTROL BOX TAPED TO BLOWER HOUSING CONTROL BOX OPENING IN HOOD ATTACH SCREWS ON FILTER SIDE 2 4mm X 9 5mm SCREWS ...

Page 11: ...t height of the telescoping support frame to ensure a tight fit between the hood and finished ceiling 6 At the blower discharge collar connect ductwork that exhausts air to the outside discharge 7 Duct tape all joints to ensure an air tight seal FIG 13 SCREWS 4 FIG 14 2 X 4 WOOD FRAME 6 WASHERS LAG BOLTS CONNECT THE WIRING WARNING All electrical wiring should be done by a qualified person s in acc...

Page 12: ... box Connect white to white black to black and green to ground 8 Replace the wiring box cover and the screws Make sure wires are not pinched between the cover and box 9 Replace the electrical compartments ac cess panel and 4 screws MAKE UP AIR DAMPER CAUTION The hood is compatible only with Broan Make Up Air Damper Model MD6T Model MD8T or Model MD10T optional Purchase separately Make the connecti...

Page 13: ... up and stay on for up to 13 minutes The blower will start and begin the calibration process When calibration is complete one of two things will occur 1 The blower turns off and calibration button light stays on Successful calibration Press the button to turn off the LED Note The LED will also turn off if you select any blower speed on the control 2 The blower turns off and calibration button ligh...

Page 14: ...el CC34IQSB Three options are available if your hood system has too much restriction 1 Accept airflow as is a Press the calibration button to accept airflow as is The IQ Blower System is now configured to the highest possible performance The blinking calibration light goes out Note The LED will also turn off if you select any blower speed on the control 2 Correct duct restriction clear the origina...

Page 15: ...CC34IQSB CAS 125 124 474 477 343 250 9 AQI IME US CIRRUS BLDC 64 362 439 507 506 202 ARU 202 116 202 115 415 03202288 415 03202288 415 03202288 03292596 415 03202288 415 03202288 415 03202288 415 ACR3 67 06102601 67A 06102598 ...

Page 16: ...ired or replaced Product or replacement parts to you at no charge You are responsible for all costs for removal reinstallation and shipping insurance or other freight charges incurred in the shipment of the Product or part to the Company If you must send the Product or part to the Company as instructed by the Company you must properly pack the Product or part the Company is not responsible for dam...

Page 17: ...RANÇAIS 17 ESPAÑOL 33 Aux États Unis BEST Hartford Wisconsin Au CANADA BEST Drummondville QC Canada ENREGISTREZ VOTRE PRODUIT EN LIGNE À www BestRangeHoods com register Pour de plus amples informations visitez www BestRangeHoods com ...

Page 18: ...cendies 4 Pour éviter les refoulements l apport d air doit être suffisant pour brûler les gaz produits par les appareils à combustion et les évacuer dans le conduit de fumée cheminée Respectez les directives du fabricant de l appareil de chauffage et les normes de sécurité notamment celles publiées par la National Fire Protection Association NFPA l American Society for Heating Refrigeration and Ai...

Page 19: ...u de les rendre bruyantes débarrassez l appareil de la poussière de plâtre de construction etc 7 Le moteur de la hotte est muni d un dispositif de protection thermique qui coupe automatiquement le moteur en cas de surchauffe Il se remet en marche lorsqu il a refroidi Faites réparer la hotte si le moteur continue à fonctionner par intermittence 8 Pour mieux capter les vapeurs de cuisson le bas de l...

Page 20: ...ent de l anneau DEL L1 en bleu est fonction du réglage choisi par ex quatre clignotements correspondent au régime maximal un clignotement au régime lent etc Pour arrêter le ventilateur continuez d appuyer sur l interrupteur P4 Bouton de mise en marche et d augmentation de la vitesse du ventilateur Appuyez une fois pour mettre le ventilateur en marche au régime le plus lent Appuyez de nouveau pour ...

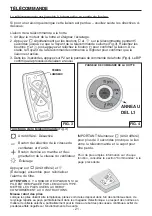
Page 21: ...les boutons et puis appuyez et relâchez le bouton pour confirmer la liaison À ce stade le Voyant de la télécommande commence à clignoter pour confirmer que la liaison est active 3 Dans les 3 secondes appuyez sur P2 sur le panneau de commande de la hotte Fig 4 Le BIP confim que le processus de liaison a réussi Miseau rebut des piles Lorsque les piles doivent être remplacées prenez soin de les dépos...

Page 22: ...ces avec un chiffon propre imbibé d eau tiède et de savon doux ou de liquide à vaisselle Nettoyez toujours dans le sens des lignes du poli original Rincez toujours à l eau propre 2 ou 3 fois après le nettoyage Séchez complètement en essuyant Vous pouvez également utiliser un nettoyant spécial pour acier inoxydable À NE PAS FAIRE N utilisez pas de laine d acier ordinaire ni de laine d acier inoxyda...

Page 23: ...oîte Celle ci doit contenir les éléments suivants 1 Boîtier de hotte 1 Télécommande 6 Filtres à graisses 2 Vis 4 x 9 5 mm 6 Tire fonds 6 x 70 mm 6 Rondelles 6 TIRE FONDS 6 x 70 mm FIG 5 TÉLÉCOMMANDE BOÎTIER DE HOTTE avec CLAPET 6 FILTRES À GRAISSES 6 RONDELLES 2 VIS 4 x 9 5 mm ...

Page 24: ...cacité N en utilisez que le moins possible Pour plus d efficacité des conduits plus gros peuvent être nécessaires si le parcours est trop long 4 Installez un capuchon mural ou de toit ou un évent d avant toit Connectez le conduit métallique rond au capuchon ou évent en progressant vers la hotte Scellez les joints avec du ruban à conduit à chaque section 5 L orientation du ventilateur peut être cha...

Page 25: ... PRÉPARATION DE L OUVERTURE DU PLAFOND La hotte doit être centrée au dessus de la surface de cuisson Assurez vous d un espace adéquat dans la structure du plafond pour l installation de la hotte et des conduits Pour mieux capter les vapeurs de cuisson la hotte doit être 122 cm 48 po à 183 cm 72 po au dessus de la cuisinière Fig 6 Utilisez du bois de la taille des solives pour fabriquer une charpen...

Page 26: ...Insérer le boîtier de commande dans l ouverture Fig 11 3 Fixez le boîtier de commande avec les 2 vis de 4 x 9 5 mm fournies Fig 12 FIG 10 FIG 11 FIG 12 BOÎTIER DE COMMANDE FIXÉ AU VENTILATEUR AVEC DU RUBAN ADHÉSIF BOÎTIER DE COMMANDE OUVERTURE DANS LA HOTTE POSER LES VIS SUR LE CÔTÉ DU FILTRE 2 VIS de 4 x 9 5 mm ...

Page 27: ...lescopiques pour assurer un ajustement parfait de la hotte et de la surface finie du plafond 6 Sur le collier de sortie du ventilateur raccordez le conduit qui évacue l air à l extérieur 7 Scellez les joints avec du ruban à conduit FIG 13 4 VIS FIG 14 CADRE DE 2 X 4 EN BOIS 6 TIRE FONDS ET RONDELLES CONNEXION DU CÂBLAGE AVERTISSEMENT Les travaux d électricité doivent être effectués par des personn...

Page 28: ... le fil vert avec le fil de terre 8 Replacez le couvercle du boîtier de câblage et les vis Assurez vous qu aucun des câbles n est coincé entre le couvercle et le boîtier 9 Replacez le panneau d accès du compartiment électrique et les 4 vis CLAPET D AIR DE COMPENSATION ATTENTION La hotte est compatible seulement avec le Clapet d air de compensation Broan modèle MD6T modèle MC8T ou modèle MD10T en o...

Page 29: ... minutes Le ventilateur se met en marche et le calibrage commence Une fois le calibrage terminé il y a deux possibilités A Le ventilateur s arrête et la lumière du bouton de calibrage reste allumée Calibrage réussi Appuyez sur le bouton pour éteindre la DEL Remarque La DEL s éteindra aussi si vous sélectionnez n importe quelle vitesse de ventilateur à l aide de la commande B Le ventilateur s arrêt...

Page 30: ...CC34IQSB Trois options s offrent à vous si le débit de votre hotte est soumis à une restriction trop importante 1 Accepter le débit tel quel a Appuyez sur le bouton de calibrage pour accepter le débit d air tel quel Le ventilateur IQMC est maintenant configuré au meilleur rendement possible Le témoin de calibrage clignotant s éteint Remarque La DEL s éteindra aussi si vous sélectionnez n importe q...

Page 31: ...le CC34IQSB CAS 125 124 474 477 343 250 9 AQI IME US CIRRUS BLDC 64 362 439 507 506 202 ARU 202 116 202 115 415 03202288 415 03202288 415 03202288 03292596 415 03202288 415 03202288 415 03202288 415 ACR3 67 06102601 67A 06102598 ...

Page 32: ...our tout produit ou toute pièce de produit dans la mesure où l entreprise constate que la présente garantie limitée s applique à ce produit ou à cette pièce dans le contexte d une utilisation et d un entretien normaux L entreprise vous expédiera le produit réparé son remplacement ou les pièces de rechange sans frais Vous assumez la totalité des coûts de mise hors service de réinstallation d expédi...

Page 33: ...C et BESTᴹᴰ se réservent le droitde modifierles prix les couleurs les composants les produits les spécifications et les modèles de déplacer le lieu de fabrication et de cesser la production d un modèle ou d un produit et ce en tout temps et sans préavis Best Broan NuTone LLC 926 W State Street Hartford WI 53207 1 800 637 1453 Bestᴹᴰ 550 boul Lemire Drummondville Québec Canada 1 866 737 7770 fr bestr...

Page 34: ...ISH 2 FRANÇAIS 17 ESPAÑOL 33 En EE UU BEST Hartford Wisconsin En CANADÁ BEST Drummondville QC Canadá REGISTRE SU PRODUCTO EN LÍNEA EN www BestRangeHoods com register Si desea información adicional visite www BestRangeHoods com ...

Page 35: ... a través del tubo de humos chimenea del equipo quemador de combustible con el fin de evitar el contratiro Siga las directrices y las normas de seguridad del fabricante del equipo de calefacción como las publicadas por la Asociación Nacional de Protección contra Incendios National Fire Protection Association NFPA y la Sociedad Americana de Ingenieros en Calefacción Refrigeración y Aire Acondiciona...

Page 36: ...egida contra rociados de yeso polvos de construcción etc 7 Este motor de campana tiene una protección contra sobrecargas térmicas que automáticamente apagará el motor en caso de sobrecalentamiento El motor reanudará su funcionamiento cuando se enfríe Si el motor continúa apagándose y encendiéndose solicite servicio para la campana 8 Para capturar mejor las impurezas producidas al cocinar la parte ...

Page 37: ... azul a una velocidad proporcional al ajuste del ventilador es decir cuatro destellos es alta velocidad un destello es baja velocidad etc Siga presionando este interruptor para apagar el ventilador P4 Interruptor para aumentar la velocidad del ventilador y encenderlo Presione este interruptor para encender el ventilador a baja velocidad Presiónelo otra vez para aumentar la velocidad del ventilador...

Page 38: ...L REMOTO El control remoto se enlaza a la campana en la fábrica Si por alguna razón se pierde el enlace siga estas instrucciones Para enlazar el control remoto a la campana 1 Apague el motor y las luces de la campana 2 Pulse los botones y del mando a distanciasimultáneamente durante 5 segundos hasta que elIndicador de Luz del mando a distancia se enciende Fig 3 Suelte los botones y y pulse y suelt...

Page 39: ...COSAS QUE PUEDE HACER Regularmente lave con una tela o trapo limpio remojado con agua tibia y jabón o detergente líquido para platos Siempre limpie en la dirección de las líneas originales de pulido Siempre enjuague bien con agua limpia 2 o 3 veces después de la limpieza Séquelo por completo También puede usar un limpiador casero especializado para acero inoxidable COSAS QUE NO DEBE HACER Usar lan...

Page 40: ...ener lo siguiente 1 Cuerpo de la campana 1 Control remoto 6 Filtros de grasa 2 Tornillos 4 x 9 5 mm 6 Ttornillos para madera 6 x 70 mm 6 Arandelas 6 TORNILLOS PARA MADERA 6 x 70 mm FIG 5 CONTROL REMOTO CUERPO DE LA CAMPANA CON REGULADOR 6 FILTROS DE GRASA 6 ARANDELAS 2 TORNILLOS 4 x 9 5 mm ...

Page 41: ...Use tan pocos de ellos como sea posible Es posible que se requieran conductos más grandes para un mejor funcionamiento con tramos más largos de conductos 4 Instale una tapa de techo una tapa de pared o un respiradero debajo del alero Conecte un conducto metálico redondo en la tapa respiradero y trabaje hacia atrás hacia la ubicación de la campana Use cinta para conductos para sellar las uniones en...

Page 42: ...DE 1 8 pulg 6 PREPARE LA ABERTURA DEL CIELO RASO La campana siempre debe centrarse por encima de la estufa Asegúrese de tener espacio adecuado en la estructura del cielo raso para instalar la campana y los conductos La campana debe montarse de 48 a 72 pulg 122 a 183 cm por encima de la estufa para poder eliminar mejor las impurezas al cocinar Fig 6 Use madera del tamaño de la viga para enmarcar al...

Page 43: ...rte la caja de control en la abertura Fig 11 3 Fije la caja de control con 2 tornillos 4 x 9 5 mm suministrados Fig 12 FIG 10 FIG 11 FIG 12 CAJA DE CONTROL PEGADA CON CINTA A LA CUBIERTA DEL VENTILADOR CAJA DE CONTROL ABERTURA EN LA CAMPANA FIJE LOS TORNILLOS POR EL LADO DEL FILTRO 2 TORNILLOS DE 4 X 9 5 mm ...

Page 44: ...antizar un ajuste apretado entre la campana y el cielo raso terminado 6 En el collarín de descarga del ventilador conecte el conducto que extrae el aire hacia la descarga exterior 7 Pegue con cinta todas las uniones para garantizar un sello de aire hermético FIG 13 TORNILLOS 4 FIG 14 MARCO DE MADERA 2 X 4 6 ARANDELAS Y TORNILLOS PARA MADERA CONECTE EL CABLEADO ADVERTENCIA Una o más personas califi...

Page 45: ...a 8 Vuelva a colocar la cubierta de la caja de conexiones y los tornillos Asegúrese de que los cables no queden atrapados entre la cubierta y la caja 9 Regrese a su lugar el panel de acceso para compar timientos eléctricos y 4 tornillos REGULADOR DE AIRE DE REPUESTO Precaución La campana es compatible solamente con el regulador de aire de repuesto Broan Modelo MD6T Modelo MD8T o Modelo MD10T opcio...

Page 46: ...alibración 3 segundos el botón se encenderá y estará así hasta por 13 minutos El ventilador arrancará y comenzará el proceso de calibración Cuando se termine la calibración ocurrirá una de dos cosas 1 El ventilador se apaga y la luz del botón de calibración permanece encendida Calibración exitosa Presione el botón para apagar la luz LED Nota La luz LED también se apagará si selecciona alguna veloc...

Page 47: ...tema de campana tiene demasiada restricción 1 Aceptar el flujo de aire como está a Presione el botón de calibración para aceptar el flujo de aire tal cual El ventilador IQ está configurado ahora en el rendimiento más alto posible La luz de calibración destellante se apaga Nota La luz LED también se apagará si selecciona alguna velocidad del ventilador en el control 2 Corrija la restricción del con...

Page 48: ...lo CC34IQSB CAS 125 124 474 477 343 250 9 AQI IME US CIRRUS BLDC 64 362 439 507 506 202 ARU 202 116 202 115 415 03202288 415 03202288 415 03202288 03292596 415 03202288 415 03202288 415 03202288 415 ACR3 67 06102601 67A 06102598 ...

Page 49: ...arantía limitadaaplicable la Compañía según su criterio proporcionará piezas de repuesto o servicios de reparación o reemplazo sin cargo alguno para cualquier Producto o pieza de Producto en la medida en que la Compañíaconstata a que esta garantía cubre este Producto o esta pieza bajo un uso y mantenimiento normales y b que la garantía queda incumplida La Compañíale enviará el Producto reparado el...

Page 50: ...nes y las especificaciones en este catálogo están establecidas según la información que era la más reciente en el momento en cual fue producido Broan NuTone LLC y BEST se reservan el derecho de cambiar en cualquier momento y sin previo aviso los precios colores materiales productos especificaciones y modelos y el lugar de fabricación así como de parar la producción de un modelo o producto Best Broan...

Page 51: ... 51 ...

Page 52: ...04308639 3 99045156G ...

Reviews: