Use your pool-packing list to separate all pool components,
becoming familiar with each part. The following sub-assemblies
should be done at this time. Take your time, and be careful not to lose
any hardware.
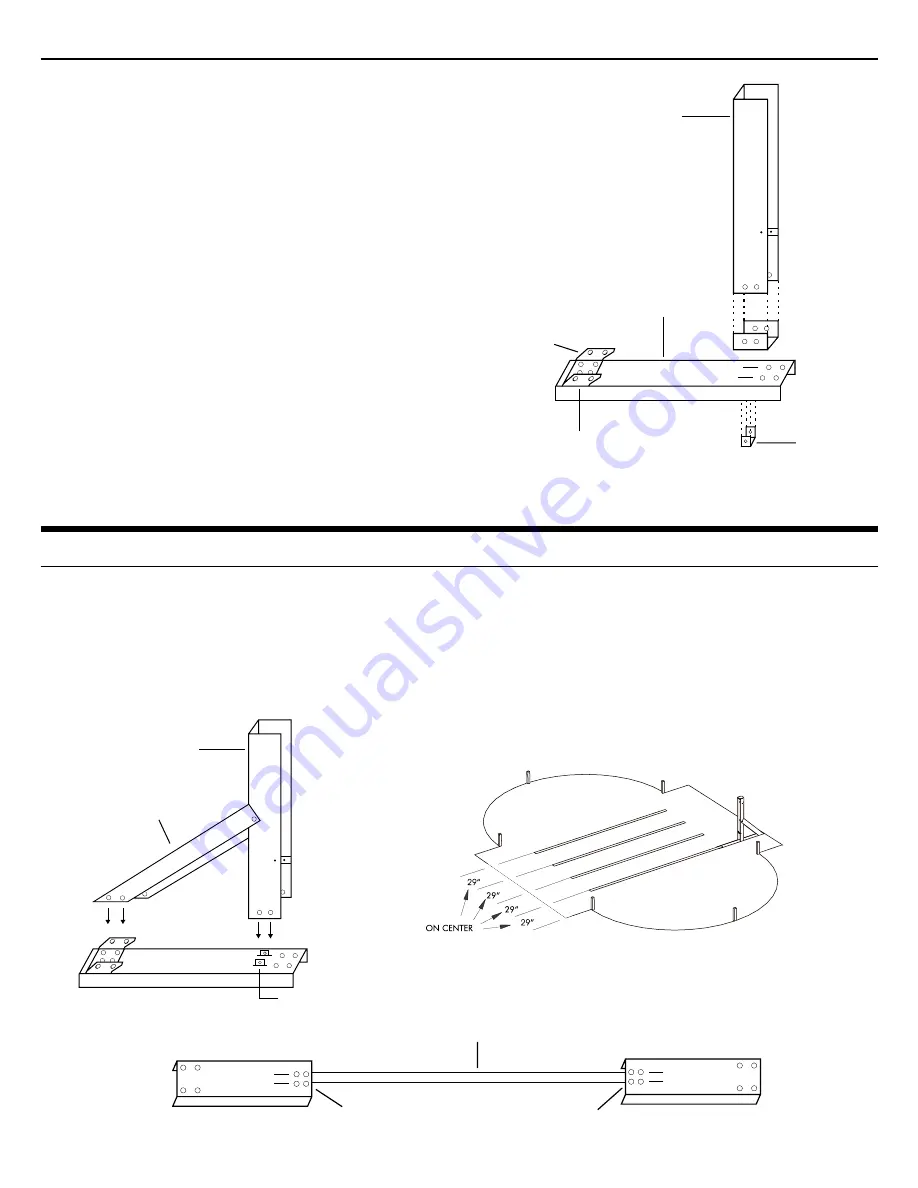
1) Attach hold down plate clip to oval upright using #12 screws.
2) Attach U-bracket clip to the bottom of the oval uprights using two
5
/
16
" x ½" bolts and two
5
/
16
" nuts on each. These bolts should be
put in the two holes farthest away from the open end of the
upright.
3) Attach struts to oval uprights using
5
/
16
" - 20 x 4 ½" bolts, and
two
5
/
16
" nuts (make sure the end of the oval upright with the hold
down plate clip is on bottom as shown in the picture).
4) Attach the strut connectors to the side of the strap end channel
that will be outside of the pool. Do so using four ¼"-20 x ½" bolts
and four ¼"-20 nuts in each.
STEP 2: PRE-ASSEMBLY
STEP 3: STRAP LAYOUT
Unwind and straighten straps. Bolt the strap end channels to each end of every strap using four ¼-20 x ½" bolts and four ¼"
nuts per channel. Place the straps on the ground 29" apart on center, as shown in the diagram below. Then, with the straps in
their approximate position, attach the oval uprights and struts to the strap end channels by inserting the strut and oval upright
over the strut connector and the U-bracket. Once that is done, bolt the oval upright to the U-bracket using a
5
/
16
"-20 x 4 ½" bolt
and a
5
/
16
" nut. Now secure the strut to the strut connector in the same fashion using two ¼"-20 x 4 ½" bolts and two ¼" nuts.
Oval
Upright
Strut
Connector
Strut Connector Attached
with four
1
/
4
- 20 x
1
/
2
" bolts
& four
1
/
4
- 20 nuts
Strap End
Channel
U-Bracket
Oval
Upright
Strut
U-Bracket
Strap
four
1
/
4
- 20 x
1
/
2
" bolts &
1
/
4
- 20 nuts


