background image

12

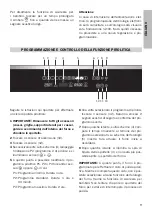
PROBLEMA

CAUSA

SOLUZIONE

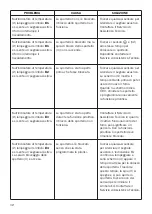
Sull’indicatore di temperatura
(2) lampeggia il simbolo 

E:1

e si sente un segnale acustico.
Il forno interrompe il
riscaldamento.

Lo sportello non si è bloccato.
Il blocco dello sportello non
funziona.

Toccare qualsiasi sensore per
silenziare il segnale acustico.
Contattare il Servizio di
Assistenza Tecnica.

Sull’indicatore di temperatura
(2) lampeggia il simbolo 

E:1

e si sente un segnale acustico.
Il forno interrompe il
riscaldamento.

Lo sportello è bloccato ma la
spia di blocco dello sportello
(3) non si accende.

Toccare i sensori 

e (12)

allo stesso tempo per
sbloccare lo sportello.
Dopodiché contattare il
Servizio di Assistenza Tecnica. 

Sull’indicatore di temperatura
(2) lampeggia il simbolo 

E:2

e si sente un segnale acustico.

Lo sportello è stato aperto
prima che fosse bloccato.

Toccare qualsiasi sensore per
silenziare il segnale acustico.
Lo schermo (4) mostra il
tempo restante prima di poter
usare di nuovo il forno.
Quando lo schermo indica
0:00, chiudere lo sportello 
e programmare nuovamente
la funzione pirolitica.

Sull’indicatore di temperatura
(2) lampeggia il simbolo 

E:3

e si sente un segnale acustico.

Lo sportello è stato aperto
durante la funzione pirolitica.
Il blocco dello sportello non
funziona.

Contattare il Servizio di
Assistenza Tecnica in quanto 
il cattivo funzionamento del
forno può significare un
pericolo. Con la funzione
pirolitica lo sportello deve
rimanere bloccato.

Sull’indicatore di temperatura
(2) lampeggia il simbolo 

E:4

e si sente un segnale acustico.
La spia di bloccaggio dello
sportello (3) è accesa.

Lo sportello si è bloccato
senza che sia stata
programmata la pirolisi.

Toccare qualsiasi sensore 
per silenziare il segnale
acustico. L’indicazione E4
continua a lampeggiare e
sullo schermo (4) appare il
tempo di attesa per lo sblocco
dello sportello. Trascorso
questo tempo, la spia (3) si
spegne e si può aprire lo
sportello. Toccare uno dei
sensori per eliminare il
simbolo E4. Contattare il
Servizio di Assistenza Tecnica. 

Summary of Contents for F60CONXE

Page 1: ...Specifiche tecniche Feature List Feuille de Caractéristiques Hoja de Características Datenblatt Gegevensblad Характеристики F60CONXE ...

Page 2: ...e Bertazzoni And we vow to continue building this great enterprise into the future DALLA SCRIVANIA DEL PRESIDENTE Gentile proprietario di un prodotto Bertazzoni Abbiamo costruito un impresa che porta nelle case di tutto il mondo prodotti con altissime prestazioni il meglio del Design italiano con sicurezza e rispetto per l ambiente Abbiamo costruito un impresa che eleva la preparazione e la condiv...

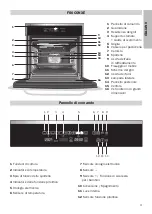
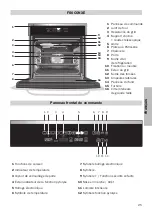
Page 3: ...Pannello posteriore 15 Ventola 16 Vetro interno di grandi dimensioni 2 3 5 7 6 8 4 10 9 11 13 12 14 15 16 1 F60CONXE 1 Funzioni di cottura 2 Indicatore di temperatura 3 Spia di blocco dello sportello 4 Indicatore della funzione pirolitica 5 Orologio elettronico 6 Sensore di temperatura Pannello di comando 7 Sensore orologio elettronico 8 Sensore 9 Sensore Funzione di sicurezza per i bambini 10 Acc...

Page 4: ...to in particolar modo per alimenti di grandi dimensioni come pollame selvaggina Si consiglia di collocare la carne sulla griglia del forno e il vassoio al di sotto per raccogliere il liquido o i grassi di cottura Attenzione Durante l uso della funzione Grill Maxigrill o MaxiGrill ventilata lo sportello deve essere tenuto chiuso Standard ventilato Adatto per arrosti e pasticceria La ventola distrib...

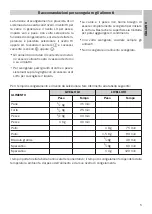
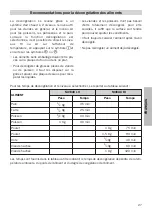
Page 5: ... raccogliere il liquido La carne e il pesce non hanno bisogno di essere completamente scongelati per iniziare la cottura Basta che la superficie sia morbida per poter aggiungere il condimento Una volta scongelati cucinare sempre gli alimenti Non ricongelare un alimento scongelato Per i tempi di scongelamento e il livello da selezionare fare riferimento alla tabella seguente I tempi riportati nella...

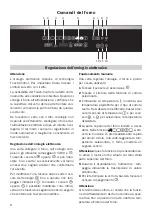
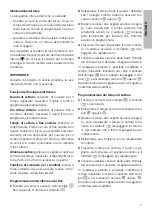
Page 6: ...e l ora Infine verranno emessi due segnali acustici di seguito che confermano l avvenuta modifica Funzionamento manuale Una volta regolato l orologio il forno è pronto per essere utilizzato 1 Toccare il sensore di accensione 2 Toccare il simbolo della funzione di cottura selezionata 3 L indicatore di temperatura mostrerà una temperatura predefinita per il tipo di cottura scelto Se si desidera modi...

Page 7: ...co 1 Toccare più volte il sensore dell orologio fino a quando si illumina il simbolo 2 Selezionare il tempo dopo il quale si desidera che l orologio emetta l allarme acustico toc cando i sensori oppure 3 Saranno emessi due segnali acustici di segui to sarà visualizzato il tempo restante fino all allarme acustico e il simbolo lampeg gerà lentamente per indicare che l allarme acustico è programmato ...

Page 8: ...e più volte il sensore dell orologio fino a quando si illumina il simbolo 15 Selezionare l ora di fine cottura toccando i sensori oppure 16 Saranno emessi due segnali acustici di seguito sarà visualizzata l ora corrente e il simbolo resterà illuminato 17 Selezionare una funzione e una temperatura di cottura 18 Il forno resterà spento e il simbolo rimarrà illuminato mentre il simbolo lampeggerà len...

Page 9: ... sensori e 5 A questo punto è possibile modificare il pro gramma pirolitico P1 P2 o P3 toccando i sen sori oppure in cui P1 Programma minimo Durata 1 ora P2 Programma standard Durata 1 ora e 30 minuti P3 Programma massimo Durata 2 ore 6 Una volta selezionato il programma di pirolisi toccare il sensore 12 Saranno emessi 2 segnali acustici di seguito a conferma del pro gramma scelto 7 Dopo qualche i...

Page 10: ...nticare di rimettere in posizione i supporti e gli accessori 15 Il forno è pronto per una nuova cottura IMPORTANTE Se si riscontrano problemi nella programmazione e nel controllo di questa fun zione consultare Problemi nel funzionamen to della pirolisi ANNULLAMENTO DEL CICLO DI PULIZIA PIROLITICA Per annullare il programma di pulizia pirolitica occorre considerare quanto segue a Il forno è freddo ...

Page 11: ...a porta è aperta Chiudere la porta per dare inizio alla pulizia È programmata la funzione pirolitica il forno funziona correttamente ma la spia 3 non si accende La spia 3 non funziona correttamente Contattare il Servizio di Assistenza Tecnica Il programma di pirolisi si è concluso ma lo sportello del forno è bloccato Il forno non si è raffreddato fino a raggiungere la temperatura di sicurezza Atte...

Page 12: ...a il tempo restante prima di poter usare di nuovo il forno Quando lo schermo indica 0 00 chiudere lo sportello e programmare nuovamente la funzione pirolitica Sull indicatore di temperatura 2 lampeggia il simbolo E 3 e si sente un segnale acustico Lo sportello è stato aperto durante la funzione pirolitica Il blocco dello sportello non funziona Contattare il Servizio di Assistenza Tecnica in quanto...

Page 13: ...chermo indica 0 00 la spia 3 si spegne e sarà possibile aprire lo sportello e usare il forno normalmente Sono state seguite le indicazioni di cui sopra ma lo sportello resta bloccato e il forno è freddo Senza causa specifica Toccare i sensori e 12 allo stesso tempo per sbloccare lo sportello Lo sportello è sbloccato la spia 3 è illuminata e sul display centrale appare 0 00 Durante il processo di a...

Page 14: ...t 14 Back Wall Panel 15 Fan 16 Large Inner Glass Door 2 3 5 7 6 8 4 10 9 11 13 12 14 15 16 1 F60CONXE 11 Cooking functions 12 Temperature display 13 Door lock indicator light 14 Pyrolytic function indicator display 15 Electronic timer 16 Temperature sensor Control Panel 17 Electronic timer sensor 18 Sensor 19 Sensor Child safety function 10 On Off 11 Inside light 12 Pyrolytic function sensor 1 2 3...

Page 15: ...s for use when baking cakes where the heat should be even to give a spongy texture Lower Element Heat only comes from beneath Suitable for warming plates or letting dough rise Grill and Lower Element Ideal for roasts This function can be used with any size joints of meat Grill Toasting and browning This function allows the surface to be cooked without affecting the inside of the food Suitable for ...

Page 16: ...llect any liquid Meat and fish do not need to be completely thawed before cooking Condiments can be added once the surface is soft Food should always be cooked after defrosting Do not refreeze defrosted food See the following chart for defrosting times and temperature levels The times shown in the chart are a guide The time needed for defrosting will depend on the temperature of the room weight of...

Page 17: ...sensor until the indicator flashes Change the time by touching the or sensors The two beeps you hear after that will confirm the new time has been set Manual Operation After setting the clock the oven is ready for use 1 Press the On sensor 2 Press on the desired cooking function symbol 3 The temperature display will show the preset temperature for that cooking function Press on the temperature sen...

Page 18: ...rom playing with it Programming the Timer Alarm 1 Press on the clock sensor several times until the symbol lights up 2 Select the length of time after which you want the alarm to sound by pressing on the or sensors 3 You will then hear two beeps the display will show the time left before the alarm sounds and the symbol will flash slowly indicating that the timer has been set 4 Once the programmed ...

Page 19: ...ooking time The symbol will flash slowly 14 Press on the clock sensor several times until the symbol lights up 15 Select the cooking stop time by pressing the or sensors 16 This will be confirmed by two beeps The current time will show on the display and the symbol will remain lit 17 Select a cooking function and temperature 18 The oven will remain off with the symbol lit and the symbol flashing s...

Page 20: ...e pyrolytic programme to P1 P2 or P3 by pressing the or sen sors P1 Minimum programme Duration 1 hour P2 Standard programme Duration 1 hour and 30 minutes P3 Maximum programme Duration 2 hours 6 Once the pyrolytic programme is selected touch sensor 12 You will hear a double beep confirming that the programme is set 7 After a short time you will see the time remaining for the selected programme on ...

Page 21: ...orts and accessories 15 The oven is now ready to be used again IMPORTANT If any incidents are detected in the programming and operation of this function consult the section Incidents while Operating the Pyrolytic Function CANCELLING THE PYROLYTIC CLEANING CYCLE To cancel the pyrolytic cleaning cycle remember a The oven is cold Switch off the oven by touching sensor 10 You will see the time remaini...

Page 22: ...rolytic cleaning cycle but the door is open Close the door to enable the function to be carried out I have programmed the pyrolytic function the oven is working properly but indicator light 3 is not lit up Indicator light 3 does not work properly Call the Technical Assistance Service The pyrolytic programme has finished but the oven door is locked The oven has not cooled down to the safe temperatu...

Page 23: ...oven can be used again on the display 4 When the display shows 0 00 close the door before programming the pyrolytic function again A flashing symbol E 3 appears on the temperature display 2 and an alarm sounds You have opened the door during the pyrolytic function The door lock has not worked Call the Technical Assistance Service your oven is operating in potentially dangerous conditions The door ...

Page 24: ... 3 will turn off and you will be able to open the oven door and use the oven as normal I have followed the above instructions but the door is still locked and the oven is cold No specific cause Press sensors and 12 at the same time and the door should unlock The door is locked indicator light 3 is on and 0 00 is shown on the central display During the cancellation process you have not waited for t...

Page 25: ... du fond 15 Turbine 16 Vitre intérieure de grande taille 2 3 5 7 6 8 4 10 9 11 13 12 14 15 16 1 F60CONXE 11 Fonctions de cuisson 12 Indicateur de température 13 Voyant de verrouillage de porte 14 Écran indicateur de la fonction pyrolyse 15 Horloge électronique 16 Symbole de température Panneau frontal de commande 17 Symbole horloge électronique 18 Symbole 19 Symbole Fonction sécurité enfants 10 Mi...

Page 26: ...la chaleur de cuisson doit être uniforme et pour obtenir une texture spongieuse Sole Chaleur seulement depuis la partie inférieure Idéale pour chauffer des plats ou faire lever des pâtes à gâteaux et autres Grill et sole Spécialement conçus pour les rôtis Ils peuvent être utilisés pour tout type de morceaux indépendamment de la taille Grill Gratins et rôtis en cuisson superficielle Il permet de do...

Page 27: ...e dessous pour récu pérer les liquides Les viandes et les poissons n ont pas besoin d être totalement décongelés pour être cuisinés Il suffit que la surface soit tendre pour pouvoir ajouter les condiments Il faut toujours cuisiner l aliment après l avoir décongelé Ne pas recongeler un aliment déjà décongelé Pour les temps de décongélation et le niveau à sélectionner se reporter au tableau suivant ...

Page 28: ...symbole de l horloge jusqu à ce que le témoin clignote En appuyant sur les symboles ou vous pourrez modifier l heure Vous entendrez ensuite deux bips consécutifs confirmant la modification effectuée Fonctionnement manuel Une fois l horloge réglée votre four est prêt à fonctionner 1 Appuyez sur le symbole de Mise en Marche 2 Appuyez sur le symbole de la fonction de cuisson sélectionnée 3 L indicate...

Page 29: ... évite que les enfants en bas âge le manipulent Programmation de l avertisseur 1 Appuyez à plusieurs reprises sur le symbole de l horloge jusqu à ce que le symbole s allume 2 Sélectionnez le temps après lequel vous souhaitez que l horloge sonne en appuyant sur les symboles ou 3 Il y aura ensuite 2 bips consécutifs indiquant le temps restant avant que l horloge ne sonne et le symbole clignotera len...

Page 30: ...yez à plusieurs reprises sur le symbole de l horloge jusqu à ce que le symbole s allume 15 Sélectionnez l heure de fin de la cuisson en appuyant sur les symboles ou 16 Il y aura ensuite 2 bips consécutifs l heure actuelle s affichera et le symbole restera allumé 17 Sélectionnez une fonction et une température de cuisson 18 Le four restera éteint le symbole allumé et le symbole clignotera lentement...

Page 31: ...t s allument 5 À ce moment il est possible de passer au pro gramme de pyrolyse P1 P2 ou P3 en appuyant sur les touches ou P1 Programme minimum Durée 1 heure P2 Programme standard Durée 1 heure et 30 minutes P3 Programme maximum Durée 2 heures 6 Une fois le programme de pyrolyse sélection né appuyez sur le symbole 12 Vous enten drez 2 bips consécutifs qui confirmeront la programmation choisie 7 Apr...

Page 32: ...e les supports et les ustensiles 15 Le four est prêt pour une prochaine utilisation IMPORTANT Si vous repérez un quelconque problème dans la programmation et l utilisation de cette fonction reportez vous au chapitre Problèmes d utilisation de la fonction pyrolyse ANNULATION DU CYCLE DE NETTOYAGE PYROLYTIQUE Pour annuler le programme de nettoyage pyroly tique il faut tenir compte des éléments suiva...

Page 33: ...réaliser une pyrolyse mais la porte est ouverte Veuillez fermer la porte pour que la fonction soit réalisée J ai programmé la fonction pyrolyse le four fonctionne correctement mais le témoin 3 ne s allume pas Le témoin 3 ne fonctionne pas correctement Veuillez contacter le Service d assistance technique Le programme de pyrolyse s est achevé mais la porte du four est bloquée Le four ne s est pas re...

Page 34: ... Le temps restant avant que le four ne puisse être réutilisé apparaîtra sur l écran 4 Lorsque l écran indiquera 0 00 fermez la porte et reprogrammez alors la fonction pyrolyse Le symbole E 2 clignote sur l indicateur de température 3 et un signal sonore retentit Vous avez ouvert la porte pendant la fonction pyrolyse Ensuite le verrouillage de la porte n a pas fonctionné Veuillez contacter le Servi...

Page 35: ...indiquera 0 00 le voyant 3 s allumera vous pourrez ouvrir la porte du four et l utiliser normalement J ai suivi les indications précédentes mais la porte reste verrouillée et le four est froid Il n existe aucune cause concrète Appuyez en même temps sur les symboles et 12 et la porte doit se verrouiller La porte est verrouillée le voyant 3 est allumé et 0 00 apparaît sur l écran central Pendant le ...

Page 36: ... 14 Panel Trasero 15 Turbina 16 Cristal Interior de Gran Tamaño 2 3 5 7 6 8 4 10 9 11 13 12 14 15 16 1 F60CONXE 1 Funciones de cocinado 2 Indicador de temperatura 3 Piloto bloqueo de puerta 4 Pantalla indicadora de la función pirólisis 5 Reloj electrónico 6 Sensor de temperatura Frontal de Mandos 7 Sensor reloj electrónico 8 Sensor 9 Sensor Función seguridad niños 10 Puesta en marcha Apagado 11 Lu...

Page 37: ...a Se recomienda colocar la pieza de carne sobre la parrilla del horno y la bandeja por debajo para el escurrido de jugos Atención Durante el uso de la función Grill Maxigrill o MaxiGrill con Turbina la puerta debe mantenerse cerrada Convencional con Turbina Adecuado para asados y pastelería El ventilador reparte de forma uniforme el calor en el interior del horno reduciendo el tiempo y la temperat...

Page 38: ...dos Las carnes y pescados no necesitan estar totalmente descongelados para cocinarlos Es suficiente que la superficie esté blanda para poder añadir los condimentos Siempre se debe cocinar el alimento después de la descongelación No congelar de nuevo un alimento ya descon gelado Para los tiempos de descongelación y el nivel a seleccionar observe la siguiente tabla Los tiempos mostrados en la tabla ...

Page 39: ...ratura de forma apropiada 39 ESPAÑOL Manejo del Horno Atención Su reloj electrónico incorpora tecnología Touch Control Para manejarlo es suficiente con tocar los símbolos del cristal con su dedo La sensibilidad del touch control se adapta con tinuamente a las condiciones ambientales Al conectar su horno a la red tenga la precaución que la superficie del cristal del frontal de man dos esté limpia y...

Page 40: ...os peque ños Programación del Avisador 1 Toque varias veces el sensor del reloj hasta que el símbolo se ilumine 2 Seleccione el tiempo tras el cual desea que el reloj avise tocando los sensores ó 3 Posteriormente sonarán 2 beep seguidos se mostrará el tiempo restante hasta que el reloj avise y el símbolo parpadeará lentamen te indicando que el avisador ya está progra mado 4 Transcurrido el tiempo ...

Page 41: ...eces el sensor del reloj hasta que el símbolo se ilumine 15 Seleccione la hora de finalización del coci nado tocando los sensores ó 16 Posteriormente sonarán 2 beep seguidos se mostrará la hora actual y el símbolo permanecerá iluminado 17 Seleccione una función y una temperatura de cocinado 18 El horno permanecerá desconectado que dándose iluminado el símbolo y con el símbolo parpadeando lentament...

Page 42: ...an 5 En ese instante se puede modificar el progra ma de pirólisis a P1 P2 ó P3 tocando los sen sores ó donde P1 Programa mínimo Duración 1 hora P2 Programa estándar Duración 1 hora y 30 minutos P3 Programa máximo Duración 2 horas 6 Una vez seleccionado el programa de pirolisis toque el sensor 12 Se escucharán 2 beep seguidos como confirmación de la progra mación elegida 7 Tras un breve tiempo en l...

Page 43: ... el interior del horno no olvide instalar de nuevo los soportes y sus acceso rios 15 El horno ya está preparado para un nuevo cocinado IMPORTANTE Si detecta alguna incidencia en la programación y manejo de esta función consulte la sección Incidencias en el Manejo de la Función Pirólisis CANCELACIÓN DEL CICLO DE LIMPIEZA PIROLÍTICA Para cancelar el programa de limpieza pirolítica debe tener en cuen...

Page 44: ... una pirólisis pero la puerta está abierta Por favor cierre la puerta para que se realice la función He programado la función pirolisis el horno funciona correctamente pero el piloto 3 no se ilumina El piloto 3 no funciona correctamente Por favor llame al Servicio de Asistencia Técnica El programa de pirolisis ha finalizado pero la puerta del horno está bloqueada El horno no se ha enfriado hasta a...

Page 45: ...ntalla 4 verá el tiempo restante hasta que el horno pueda utilizarse de nuevo Cuando la pantalla indique 0 00 cierre la puerta y entonces debe programar otra vez la función pirólisis En el indicador de temperatura 2 se observa parpadeando E 3 y se oye una señal sonora Ha abierto la puerta durante la función pirólisis Luego el bloqueo de puerta no ha funcionado Por favor llame al Servicio de Asiste...

Page 46: ...ndique 0 00 el piloto 3 se apagará podrá abrir la puerta el horno y manejarlo con normalidad He seguido las indicaciones anteriores pero la puerta continúa bloqueada y el horno está frío No hay una causa concreta Toque a la vez los sensores y 12 y la puerta debe desbloquearse La puerta está bloqueada el piloto 3 está iluminado y en el display central se muestra 0 00 Durante el proceso de cancelaci...

Page 47: ...12 Abzug 13 Seitenlampen 14 Rückwand 15 Ventilator 16 Große Innenglasscheibe 2 3 5 7 6 8 4 9 11 13 12 14 15 16 1 F60CONXE 11 Garfunktionen 12 Temperaturanzeige 13 Lampe Türverriegelung 14 Anzeige Pyrolyse Funktion 15 Elektronische Uhr 16 Temperatursensor Bedienfeld 17 Sensor elektronische Uhr 18 Sensor 19 Sensor Kindersicherung 10 Ein Ausschalter 11 Innenlicht 12 Sensor Pyrolyse Funktion 1 2 3 4 5...

Page 48: ... Hitze benötigen um eine luftige Konsistenz zu erhalten Unterhitze Hitze nur von der Unterseite Geeignet zum Anwärmen von Tellern oder zum Aufgehenlassen von Teig oder ähnlichem Grill mit Unterhitze Besonders für Braten geeignet Kann für Gargut beliebiger Größe genutzt werden Grill Gratinieren und Überbacken Ermöglicht das Bräunen der Oberfläche ohne das Innere des Garguts zu beeinflussen Empfohle...

Page 49: ...ufzufangen Fleisch oder Fisch müssen vor der Garung nicht komplett aufgetaut werden Es reicht aus wenn die Oberfläche weich genug ist um sie zu würzen Die Lebensmittel sollten immer gleich nach dem Auftauen gegart werden Aufgetaute Lebensmittel nicht nochmals einfrieren Die Auftauzeit und die entsprechende Auftaustufe entnehmen Sie bitte der nachstehenden Tabelle Die in der Tabelle angegebenen Zei...

Page 50: ...ne zur Bestätigung der gewählten Uhrzeit Zur Änderung der Uhrzeit berühren Sie mehrmals den Uhrsensor bis die Anzeige blinkt Durch Berührung der Sensoren oder können Sie die Uhrzeit ändern Schließlich hören Sie zwei aufeinander folgende Pieptöne zur Bestätigung der durchgeführten Änderung Manueller Betrieb Nachdem die Uhrzeit eingestellt wurde ist der Backofen betriebsbereit 1 Berühren Sie den Sta...

Page 51: ... nicht Kindersicherung Blockiert den Backofen und ver hindert eine Manipulation durch Kleinkinder Programmierung des Weckers 1 Berühren Sie mehrmals den Uhrsensor bis das Symbol aufleuchtet 2 Wählen Sie die Zeitdauer nach deren Ablauf der Timer ertönen soll indem Sie die Symbole oder drücken 3 Danach hören Sie 2 aufeinander folgende Pieptöne die Restzeit bis zum Ertönen des Timers erscheint und da...

Page 52: ...den Uhrsensor bis das Symbol aufleuchtet 15 Wählen Sie das Garzeit Ende indem Sie die Sensoren oder berühren 16 Danach hören Sie 2 aufeinander folgende Pieptöne die aktuelle Uhrzeit wird angezeigt und das Symbol leuchtet 17 Wählen Sie eine Funktion und eine Gartemperatur 18 Der Backofen bleibt ausgeschaltet das Symbol bleibt erleuchtet und das Symbol blinkt langsam Auf der Uhranzeige sehen Sie die...

Page 53: ... kann man durch Drücken der Sensoren bzw das Pyrolyse Programm auf P1 P2 oder P3 wechseln wobei P1 Kürzestes Programm Dauer 1 Stunde P2 Standard Programm Dauer 1 Stunde und 30 Minuten P3 Längstes Programm Dauer 2 Stunden 6 Nach Anwahl des Pyrolyse Programms drück en Sie bitte den Sensor 12 Es ertönen 2 kurze Pieptöne als Bestätigung der gewählten Programmierung 7 Nach kurzer Zeit erscheint auf der...

Page 54: ...r wieder zu installieren 15 Ihr Backofen ist jetzt für einen neuen Garvorgang bereit WICHTIG Wenn bei der Programmierung oder Bedienung dieser Funktion irgendein Problem auftritt konsultieren Sie den Abschnitt Probleme bei der Bedienung der Pyrolyse Funktion ABBRUCH DES PYROLYSE REINIGUNGSVORGANGS Beim Abbruch des Pyrolyse Reinigungsprogramms ist Folgendes zu beacht en a Der Backofen ist kalt Scha...

Page 55: ... Pyrolyse Funktion programmiert aber die Tür ist geöffnet Schließen Sie die Tür damit die Funktion durchgeführt werden kann Ich habe die Funktion Pyrolyse eingestellt der Backofen funktioniert korrekt aber die Lampe 3 leuchtet nicht Die Lampe 3 funktioniert nicht richtig Verständigen Sie den technischen Kundendienst Das Pyrolyse Programm ist abgeschlossen aber die Backofentür ist verriegelt Der Ba...

Page 56: ... die Restzeit bis der Backofen wieder eingesetzt werden kann Sobald die Anzeige 0 00 anzeigt schließen Sie bitte die Tür Anschließend müssen Sie die Pyrolyse Funktion neu programmieren Auf der Temperaturanzeige 2 blinkt E 3 und ein Signal ertönt Sie haben die Tür während der Pyrolyse Funktion geöffnet Danach hat die Türverriegelung nicht funktioniert Verständigen Sie den technischen Kundendienst I...

Page 57: ...eigt schaltet die Lampe 3 aus Sie können die Backofentür öffnen und den Backofen normal bedienen Ich habe die o a Anweisungen befolgt aber die Tür ist weiter verriegelt und der Backofen ist kalt Es gibt keine konkrete Ursache Berühren Sie die Sensoren und 12 Die Tür muss sich entriegeln Die Tür ist verriegelt die Anzeige 3 leuchtet und auf der mittleren Anzeige wird 0 00 angezeigt Während des Abbr...

Page 58: ...aat 13 Zijlamp 14 Achterpaneel 15 Turbine 16 Groot binnenglas 2 3 5 7 6 8 4 10 9 11 13 12 14 15 16 1 F60CONXE 1 Bakfuncties 2 Temperatuurindicator 3 Lampje van deurvergrendeling 4 Scherm van pyrolysefunctie 5 Elektronische klok 6 Temperatuursensor Bedieningspaneel 7 Sensor van elektronische klok 8 Sensor 9 Sensor Kinderbeveiliging 10 In uitschakelen 11 Binnenlicht 12 Sensor van pyrolysefunctie 1 2...

Page 59: ...terde gerechten Speciaal voor grote stukken zoals gevogelte wild etc Aanbevolen wordt om het stuk vlees op de rooster van de oven te leggen en de bakplaat eronder te plaatsen zodat het vleessap hierop kan uitdruipen Attentie Bij gebruik van de functies Grill Maxigrill of MaxiGrill met turbine moet de deur gesloten blijven Conventioneel met Turbine Geschikt voor braadgerechten en gebak De ventilato...

Page 60: ...n vis hoeven niet helemaal te worden ontdooid om ze te bereiden Het is voldoende als de buitenlaag zacht is zodat het vlees of de vis kan worden gekruid Na het ontdooien moeten de etenswaren altijd bereid worden Vries een eerder ontdooid product nooit opnieuw in Zie onderstaande tabel voor de ontdooitijden en het te selecteren niveau De in de tabel aangegeven tijden dienen ter oriëntatie De ontdoo...

Page 61: ...ven Attentie Uw elektronische klok is uitgerust met Touch Control technologie Voor de bediening hoeft u de symbolen op het glas enkel met uw vinger aan te raken De gevoeligheid van de Touch Control past zich continu aan de omgevingsomstandigheden aan Wanneer u de oven op het elektriciteitsnet aansluit dient u erop te letten dat het glasop pervlak van het bedieningspaneel schoon en obstakelvrij is ...

Page 62: ... aan totdat het symbool oplicht 2 Selecteer de tijdsduur waarna u wilt dat de kookwekker een signaal afgeeft door de sen soren of aan te raken 3 Vervolgens hoort u 2 pieptonen achter elkaar Te zien is de resterende tijd voordat de kook wekker een signaal afgeeft Het symbool knippert langzaam waarmee wordt aangege ven dat de kookwekker geprogrammeerd is 4 Na het verstrijken van de geprogrammeerde t...

Page 63: ...jd en knippert het symbool langzaam 14 Raak de sensor van de kookwekker meerdere keren aan totdat het symbool oplicht 15 Selecteer de eindtijd van het bakproces door de sensoren of aan te raken 16 Vervolgens klinken er 2 pieptonen achter elkaar De huidige tijd verschijnt en het sym bool licht op 17 Selecteer een bakfunctie en temperatuur 18 De oven blijft uitgeschakeld Het symbool blijft verlicht ...

Page 64: ...yseprogramma worden gewijzigd naar P1 P2 of P3 door de sensoren of aan te raken met P1 Minimumprogramma 1 uur P2 Standaardprogramma 1 uur en 30 minuten P3 Maximumprogramma 2 uur 6 Raak de sensor 12 aan wanneer u het pyro lyseprogramma geselecteerd hebt Er klinken twee pieptonen ter bevestiging van het geko zen programma 7 Na een tijdje verschijnt op het scherm 4 de resterende tijd voordat het inge...

Page 65: ...n schoon is 15 De oven is nu weer klaar om te bakken BELANGRIJK Als u een incident detecteert bij de programmering en de bediening van deze functie raadpleeg dan de sectie Incidenten bij de bediening van de pyrolysefunctie DE PYROLYTISCHE REINIGINGSCYCLUS ANNULEREN Om het pyrolytische reinigingsprogramma te annuleren moet u rekening houden met het volgende a De oven is koud Schakel de oven uit met...

Page 66: ...signaal De oven is geprogrammeerd voor een pyrolytische reiniging maar de deur staat nog open Sluit de deur opdat de functie werkt Ik heb de pyrolysefunctie geprogrammeerd de oven werkt correct maar het lampje 3 brandt niet Het lampje 3 werkt niet Bel naar de Technische dienst Het pyrolyseprogramma is afgelopen maar de deur van de oven is vergrendeld De oven is nog niet afgekoeld tot de veiligheid...

Page 67: ...nt de resterende tijd voordat de oven weer kan worden gebruikt Sluit de deur wanneer op het scherm 0 00 verschijnt Programmeer de pyrolysefunctie opnieuw Op de temperatuurindicator 2 knippert E 3 en er klinkt een geluidssignaal U hebt de deur geopend tijdens de pyrolysefunctie De deurvergrendeling heeft daarna niet gewerkt Bel naar de Technische dienst Uw oven werkt onder omstandigheden die gevaar...

Page 68: ... het scherm 0 00 verschijnt gaat het lampje 3 uit U kunt de ovendeur dan openen en de oven normaal bedienen Ik heb de voorgaande instructies opgevolgd maar de deur blijft vergrendeld en de oven is koud Er is geen specifieke reden Raak de sensoren en 12 tegelijk aan De deur moet nu ontgrendelen De deur is vergrendeld het lampje 3 brandt en op het centrale scherm staat 0 00 Tijdens het annuleringspr...

Page 69: ... Задняя панель 15 Турбина 16 Внутреннее стекло большого размера 2 3 5 7 6 8 4 10 9 11 13 12 14 15 16 1 F60CONXE 1 Функции приготовления 2 Индикатор температуры 3 Индикатор блокировки дверцы 4 Экран указывающий на функцию пиролитической чистки 5 Электронные часы 6 Сенсор температуры Панель управления 7 Сенсор электронных часов 8 Сенсор 9 Сенсор Функция безопасности детей 10 Пуск Отключение 11 Внутр...

Page 70: ... для продуктов большого объема таких как птица дичь и пр Рекомендуется помещать мясо на решетку духовки и установить под нее поднос для сбора жира и соков Внимание Во время использования функций Гриль Максигриль или Максигриль с турбиной дверца духового шкафа должна быть закрыта Обычный с турбиной Подходит для жаркого и кондитерской выпечки Вентилятор равномерно распространяет тепло в духовке сокр...

Page 71: ...дкости Нет необходимости в полном размораживании мяса и рыбы для из последующего приготовления Достаточно того чтобы поверхность продукта была достаточно мякгой для того чтобы добавить соль и специи После разморозки необходимо начать приготовление продукта Для определения времени и уровня размораживания проконсультируйтесь с нижеприведенной таблицей Время указанное в таблице является ориентировочн...

Page 72: ...коротких сигнала обозначающие подтверждение введенных изменений Управление электронными часами Ручное управление После установки текущего времени Ваш духовой шкаф готов к работе 1 Дотроньтесь до сенсора Пуск 2 Дотроньтесь до символа выбранной функции приготовления 3 Индикатор температуры указывает температуру заданую для данной функции приготовления Если Вы желаете изменить ее достаточно дотронуть...

Page 73: ...дить манипуляции с духовкой Программирование таймера 1 Несколько раз дотроньтесь до сенсора часов до тех пор пока символ не будет светиться 2 Дотрагиваясь до сенсоров или выберите время по истечение которого Вы желаете чтобы таймер сработал 3 Затем Вы услышите один за другим два сигнала появится оставшееся до оповещения время и символ будет медленно мигать указывая на то что таймер запрограммирова...

Page 74: ...и и символ будет медленно светиться 14 Несколько раз дотроньтесь до сенсора часов до тех пор пока символ не будет светиться 15 Выберите время окончания готовки при помощи сенсоров или 16 Затем Вы услышите один за другим два сигнала появится текущее время и символ будет светиться 17 Выберите функцию и температуру готовки 18 Духовой шкаф будет отключен символ будет светиться и символ будет медленно ...

Page 75: ...ры и будут светиться 5 В этот момент возможно изменить программу пиролиза на P1 P2 или P3 при помощи сенсоров или P1 короткая программа Длительность 1 час P2 Стандартная программа Длительность 1 час и 30 минут P3 Программа максимум Длительность 2 часа 6 Как только программа будет выбрана дотроньтесь до сенсора 12 Вы услышите один за другим два сигнала в качестве подтверждения выбранной програмы 7 ...

Page 76: ... установить аксессуары и направляющие 15 Духовой шкаф готов к работе ВАЖНО если Вы заметили какое либо нару шение в процессе программирования и управления этой функцией проконсультируй тесь в разделе Неполадки в управлении функцией пиролитической чистки ОТМЕНА ЦИКЛА ПИРОЛИТИЧЕСКОЙ ЧИСТКИ Для отмены программы пиролитической чист ки следует иметь ввиду a При холодной духовке Выключите духовку дотрон...

Page 77: ...проведения цикла пиролитической чистки но дверца открыта Следует закрыть дверцу духового шкафа Функция пиролитической чистки запрограммирована духовка работает нормально но индикатор 3 не светиться Индикатор 3 функционирует не верно Пожалуйста свяжитесь со Службой Технической Поддержки Программа пиролитической чистки завершена но дверца остается заблокированой Духовой шкаф не достаточно остыл и не...

Page 78: ...ования духового шкафа Когда это время будет показывать 0 00 закройте дверцу и снова запрограммируйте функцию пиролитической чистки Индикатор температуры 2 мигает E 3 и слышен звуковой сигнал Дверца была открыта во время работы цикла пиролитической чистки Затем блокировка дверцы не сработала Пожалуйста свяжитесь со Службой Технической Поддержки духовкой шкаф работает в условиях пораждающих опасност...

Page 79: ... 0 00 индикатор 3 отключится и можно будет открыть дверцу духовки и пользовоться ей в обчном режиме Все предыдущие указания были соблюдены но дверца остается заблокированой а духовой шкаф холодным Конкретная причина отсутствует Одновременно дотроньтесь до сенсора и 12 дверца должна разблокироваться Дверца заблокирована индикатор 3 светиться и на центральном диспее показано 0 00 Во время процесса о...

Page 80: ......

Page 81: ......

Page 82: ......

Page 83: ...ection Energy consumption Conventional heating Forced convection Net volume litres Size Small Medium Large Cooking time with normal load Conventional heating Forced convection Cooking surface Noise dB A re 1 pW Classe d efficience énergétique sur une échelle de A le plus efficient à G le moins efficient Fonction de chauffage Chauffage traditionnel Convection forcée Consommation d énergie Chauffage...

Page 84: ...ie efficiëntie op een schaal van A meest efficiënt tot G minst efficiënt Verwarmings functie Conventionele verwarming Geforceerde convectie Energieverbruik Conventionele verwarming Geforceerde convectie Nettovolume liter Type Klein Middelgroot Groot Baktijd bij normale belasting Conventionele verwarming Geforceerde convectie Bakoppervlak Geluid db A re 1 pW Класс энергетической эффективности по шк...

Reviews: