background image

11

EN

BEFORE FIRST USE

Remove any fi lm and other packaging residue 
from the inside and outside of the oven.

Remove and wash all accessories.

Run  the  oven  for  30  min.  at  250°C  without 
placing any food inside (during this operation 
it  is  normal  for  manufacturing  residue  to 
produce some smoke and odours).

Let the oven cool down.

Open  the  door  and  air  the  oven  out  for  15 
minutes.

Clean the inside of the oven.

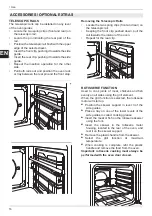
RACK POSITIONING

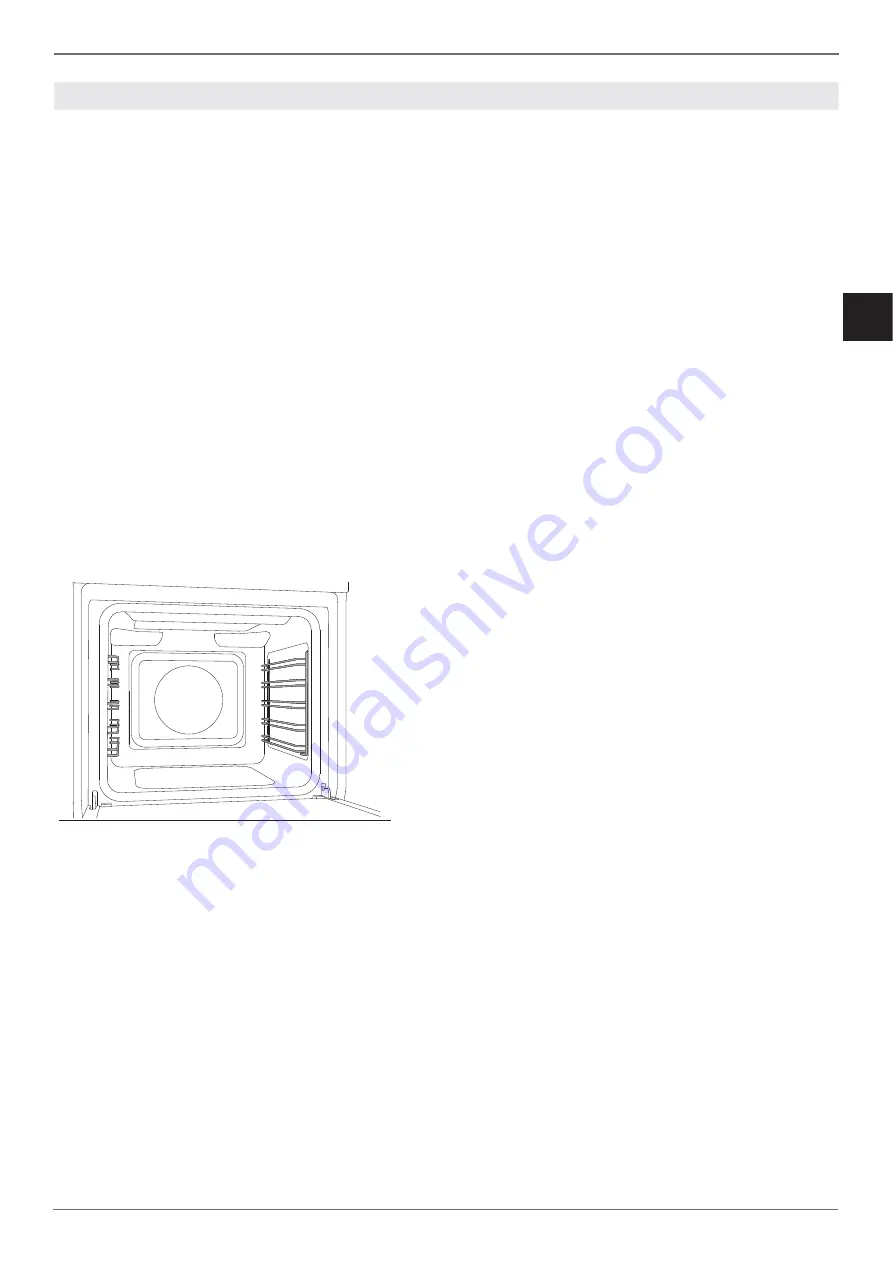
Racks  and  trays  must  be  inserted  into  the  side 
guides  until  they  come  to  a  complete  stop  to 
prevent contact with the oven door.
When removing accessories beyond halfway they 
are blocked to facilitate removing dishes.
The oven has fi ve cooking levels indicated on the 
right-hand side of the front of the oven.

COOLING

The oven is equipped with a cooling system which 
operates during cooking.
Air fl ow between the control panel and door allows 
the controls to be kept at a usable temperature.
The cooling system turns on and off  automatically 
(it is normal for this to continue running after the 
oven is switched off ). 

PRE-HEATING

Most recipes will require the dish to be placed in 
the oven when it has already reached the specifi ed 
cooking temperature.
The  pre-heating  time  will  depend  on  the 
temperature  set  and  the  number  of  accessories 
present in the oven.

COOKING MODES

1.  Insert the rack at the required level
2.  Select the oven function by rotating the knob
3.  Set  the  temperature  by  turning  the  knob 

clockwise

4.  Where applicable, set manual or timed cooking 

using  the  TIMER  knob  or  with  the  DISPLAY 
WITH TOUCH CONTROL.

The  indicator  light  on  the  control  panel  turns  off  
when the set temperature is reached.

The  oven  is  equipped  with  various  heating 
elements which create the various cooking modes 
when activated individually or in combination.

Warning:  all  cooking  operations  must  take 
place with the door closed.

Pre-heating

Use this function to bring the oven to the required 
temperature in a short period of time.
This  function  is  designed  only  for  heating  the 
oven, and not for cooking food.

Static

Heat from above and below.

Cooking on a single level: ideal for roasts, bread 
and cakes.

Roasts: level 2 or 3

Cakes: level 2 or 3 to ensure correct cooking 
of the bottom without burning the top 

Bottom element

Heat from below.

Cooking on a single level, ideal for slow cooking 
and for heating plates.
At high temperatures, use this function for baked 
goods which you do not wish to brown. 

Level 2 or 3

Top element

Heat from above.

Cooking  on  a  single  level,  ideal  for  reheating 
dishes  or  when  you  wish  to  brown  the  top  of 
dishes.

Level 3 or 4

Grill

Heat from the grill (broiler) element. Max 
temperture 200°C.

Cooking  on  a  single  level,  ideal  for  grilling 
sausages, chops, bacon, fi sh or toast
Browning or gratinating food at the end of cooking

Level 4 or 5

/ Use

USE

1

2

3

4

5
Summary of Contents for F609MODESX

Page 1: ...OTRABLES FR BERTAZZONI INSTRUCTIONS D INSTALLATION ET D UTILISATION FOURS ENCASTRABLES ÉLECTRIQUES IT BERTAZZONI ISTRUZIONI PER L INSTALLAZIONE ED USO FORNI DA INCASSO ELETTRICI EN BERTAZZONI INSTALLATION AND USER MANUAL BUILT IN ELECTRIC OVENS 3100399 WWW BERTAZZONI COM ...

Page 2: ...____________________________________________ POSIZIONAMENTO GRIGLIE______________________________________________________ RAFFREDDAMENTO ____________________________________________________________ PRERISCALDAMENTO___________________________________________________________ MODI DI COTTURA______________________________________________________________ FUNZIONI SPECIALI_______________________________...

Page 3: ...te italiano e una tecnologia d alto livello La nostra missione è quella di costruire elettrodomestici dal funzionamento perfetto che soddisfino pienamente chi li usa Creando prodotti di elevata qualità estetica rispondiamo alle esigenze dei nostri clienti I nostri elettrodomestici sono inoltre versatili e maneggevoli perciò cucinare diventa un vero piacere Questo manuale ti aiuterà ad utilizzare e ...

Page 4: ...nsabilità la conformità a tutte le normative eu ropee sulla sicurezza la salute e i requisiti ambi entali stabiliti dalla legislazione di questo prodotto TUTELA DELL AMBIENTE Questo apparecchio dispone di contrassegno ai sensi della direttiva europea 2012 19 UE in materia di apparecchi elettrici ed elettronici waste electrical and electronic equipment WEEE Questa direttiva definisce le norme per la...

Page 5: ...ovocare la rottu ra del vetro durante l uso non versare liquidi freddi sulla porta forno L uso del forno genera calore umidità venti lare bene l ambiente durante il funzionamento Non riporre oggetti infiammabili nel forno Non aprire la porta del forno quando fuoriesce del fumo Disattivare l apparecchio e scolle gare il forno dalla rete elettrica il forno è dotato di elementi elettronici che potrebb...

Page 6: ...RIMENTO DEL FORNO Dopo aver tolto le varie parti mobili dai loro imballi interni ed esterni assicurarsi che il forno sia inte gro Non utilizzare l apparecchio in caso di dubbio e contattare il centro assistenza Considerando le dimensioni critiche dell apparec chio verificare che il mobile sia adatto all incasso del forno AVVERTENZE IMPORTANTI Il forno può essere installato solo incassato Le pareti ...

Page 7: ...areazione richieste per il pi ano cottura sono da sommare a quelle richieste per il forno Il costruttore declina ogni responsabilità nel caso in cui venga installato un piano cottura di un altra marca INSTALLAZIONE A COLONNA La distanza tra il forno e i mobili da cucina deve essere tale da garantire una sufficiente ventilazi one ed un sufficiente scarico dell aria Assicurarsi che nella parte superiore...

Page 8: ...ttrica siano adatte ai dati riportati sull etichetta di identifi cazione La presa e l impianto siano muniti di collega mento a terra secondo le normative vigenti Quando il collegamento alla rete di alimentazione è effettuato tramite presa Applicare al cavo di alimentazione una spina normalizzata adatta al carico indicato sull et ichetta segnaletica Allacciare i cavetti sec ondo lo schema della Figur...

Page 9: ...Il cavo di terra non deve essere interrotto dall interruttore e fissato all impianto di terra In alternativa il collegamento elettrico può es sere anche protetto con un interruttore differ enziale SOSTITUZIONE DEI COMPONENTI Prima di effettuare qualsiasi operazione di manutenzione disinserire l apparecchio dalla rete elettrica Per la sostituzione di componenti funzionali rivolgersi ad un centro assis...

Page 10: ... temperatura COMANDI FORNO 2 MANOPOLE 1 Selettore funzioni 2 Display con touch control 3 Selettore temperatura FUNZIONI FORNO PANNELLO COMANDI PANNELLO COMANDI SIMBOLO DESCRIZIONE FORNO 5 FUNZIONI FORNO 9 FUNZIONI Pre riscaldamento Statico Riscaldamento inferiore Riscaldamanto superiore Grill Grill ventilato statico ventilato Ventilato Pizza 100 150 220 270 180 LOW HIGH ...

Page 11: ... 1 Inserire la griglia nel livello desiderato 2 Selezionare la funzione forno ruotando la ma nopola 3 Impostarelatemperaturaruotandolamanopola in senso orario 4 dove presenti impostare la cottura manuale o temporizzata tramite la manopola TIMER o tramite il DISPLAY CON TOUCH CONTROL Lo spegnimento della spia presente sul pannello comandi indica il raggiungimento della temper atura impostata Il for...

Page 12: ... luce a forno spento impostare la cottura manuale ruotare la manopola funzioni sulla funzione STATICO senza ruotare la manop ola termostato CONDENSA E normale che durante la cottura di cibi particolar mente ricchi di acqua si formi condensa sul vetro interno della porta forno e sul pannello di control lo Durante la cottura la condensa evaporerà au tonomamente CONSIGLI PER LA COTTURA La temperatura...

Page 13: ... 15 5 Costine 1 5 grill ventilato 175 10 10 Pancetta di maiale 0 7 grill 200 7 8 Filetto di maiale 1 5 grill ventilato 175 10 5 Filetto di manzo 1 grill 200 10 7 Trota salmonata 1 2 statico ventilato 150 160 35 40 Coda di rospo 1 5 statico ventilato 160 60 65 Rombo 1 5 statico ventilato 160 45 50 Pizza 1 Pizza MAX 8 9 Pane 1 ventilato 190 200 25 30 Focaccia 1 statico ventilato 180 190 20 25 Ciambe...

Page 14: ...ticamente Fine Cottura Questa funzione permette di impostare l orario al quale il forno si spegne automaticamente Selezionato una funzione di cottura tra quelle dis ponibili ed impostata la temperatura desiderata Premere il tasto M per almeno 2 secondi Il simbolo si accende Rilasciare e premere nuovamente il tasto M Sul display inizia a lampeggiare il simbolo A e appare la dicitura end Impostare l...

Page 15: ... gio del puntino premere il tasto o per modificare l ora Per variare il volume della suoneria Premere il tasto M Viene visualizzato a dis play la scritta ton seguita da un numero Selezionare con il tasto o il volume desid erato L interruzione della corrente elettrica provoca l an nullamento delle funzioni programmate orologio compreso Una volta ripristinata la corrente il pro grammatore può essere ...

Page 16: ... clip frontale tirare la guida verso l interno del forno Ripetere l operazione per la clip posteriore FUNZIONE GIRARROSTO Usato per cuocere con il grill carne pollo e pesce in modo uniforme su tutti i lati Quando si seleziona la funzione grill il motore del girarrosto si avvia Posizionare il supporto spiedo nel livello 3 delle guide laterali Mettere un vassoio su un livello inferiore delle guide l...

Page 17: ...lmente reperibili in commercio Non usare mai polveri o spugne abrasive Rimuovere immediatamente le macchie di calcare grasso amido o albume Pulizia del vetro Per sgrassare usare del detersivo per piatti e aceto e poi risciacquare oppure pulire con del detersivo per piatti risciacquare passare con lo straccio umido e asciugare Per togliere le incrostazioni mettere sopra la zona interessata dell acq...

Page 18: ...piatto tra il coperchio di vetro e l alloggiamento della lampada Ruotare delicatamente la punta del cacciavite per allentare il vetro tenendolo in posizione con le dita per evitare che cada e si rompa Rimuovere il vetro e rimuovere la lampadina alogena Inserire una nuova lampadina alogena nel la sua fessura NON toccare la lampadina a mani nude Premere di nuovo il coperchio in vetro e ripo sizionar...

Page 19: ...e Richiudere lentamente la porta fino al punto di bloccaggio verificando che le leve abbiano bloccato la porta Togliere la copertura superiore della porta pre mendo a dx e sx con le dita sui tasti rotondi Sollevare la copertura superiore ed estrarla Facendo attenzione al lato dei vetri Estrarre i vetri facendoli scorrere Pulire i vetri Ripetere le operazioni in ordine inverso per ri assemblare la po...

Page 20: ...sicurare una giusta circolazione del calore Verificare con un tecnico specializzato l effettiva tensione di rete Si forma condensa sul vetro forno E normale che durante la cottura di cibi particolar mente ricchi di acqua si formi condensa sul vetro interno della porta forno e sul pannello di control lo Durante la cottura la condensa evaporerà au tonomamente Pre riscaldare il forno per ridurre la for...

Page 21: ...EN BERTAZZONI INSTALLATION AND USER MANUAL BUILT IN ELECTRIC OVENS 3100399 WWW BERTAZZONI COM ...

Page 22: ...___________________________________________ RACKPOSITIONING______________________________________________________________ COOLING _____________________________________________________________________ PRE HEATING___________________________________________________________________ COOKING MODES______________________________________________________________ SPECIALFUNCTIONS_____________________________...

Page 23: ...ecause of their unique blend of authentic Italian design and superior appliance technology It is our mission to make products that function perfectly and bring joy to their owners By making beautiful products we respond to our customers flair for good design By making them versatile and easy to use cooking with Bertazzoni becomes a real pleasure This manual will help you learn to use and care for y...

Page 24: ...ation under the manufacturer s full responsibility that the product complies with all European health safety and environmental requirements laid out in the legislation covering this product type ENVIRONMENTAL PROTECTION This appliance is marked in accordance with European Community Directive 2012 19 EU on waste electrical and electronic equipment WEEE This directive defines the standards for the co...

Page 25: ...eakage or cracking in the glass shut off the oven immediately and disconnect it from the power supply Contact technical support Sudden and extreme changes in temperature can cause the glass to break never pour cold liquids onto the oven door Using the oven generates heat and moisture keep the area well ventilated during operation Never place flammable objects in the oven Do not open the door if smok...

Page 26: ...om their inner and outer packaging In the event of any uncertainty do not use the appliance and contact technical support Checkthatthekitchenunitissuitableforinstallation of the oven referring to the dimensions given in this guide The oven must not be installed behind a decorative door in order to avoid overheating IMPORTANT INFORMATION The oven is only suitable for installation inside a fitted kit...

Page 27: ...he entire compartment see figure Any ventilation openings required for the hob are to be added to those required by the oven The manufacturer shall bear no liability in the event of the oven being installed in combination with a hob from another manufacturer INSTALLING THE OVEN IN A TALL APPLIANCE HOUSING The clearance between the oven and the kitchen units must be enough to ensure sufficient ventila...

Page 28: ...a plate The circuit wiring and outlet are equipped with a compliant earth connection When the oven is connected to the mains power supply via a socket Wire a plug onto the power cable which must comply with applicable standards in the country of use the plug and its fuse where applicable must be suitable for the rated load specified on the appliance data plate Connect the cores of the cable in acco...

Page 29: ...ot be switched by the breaker and must be connected to the earthing system As an alternative an RCBO may also be used or RCD protection in addition to or instead of a fuse or MCB depending on the applicable electrical code REPLACING COMPONENTS Isolate the appliance s power supply before performing any maintenance Contact an authorised service centre if functional components require replacement WAR...

Page 30: ...Thermometer 3 Temperature selector TWO KNOB OVEN CONTROLS 1 Function selector 2 Display with touch control 3 Temperature selector OVEN FUNCTIONS CONTROL PANEL CONTROL PANEL SYMBOL DESCRIPTION FIVE FUNCTION OVEN NINE FUNCTION OVEN Pre heating Static Bottom element Top element Grill Fan with grill Fan assisted Fan Pizza 100 150 220 270 180 LOW HIGH ...

Page 31: ... 1 Insert the rack at the required level 2 Select the oven function by rotating the knob 3 Set the temperature by turning the knob clockwise 4 Where applicable set manual or timed cooking using the TIMER knob or with the DISPLAY WITH TOUCH CONTROL The indicator light on the control panel turns off when the set temperature is reached The oven is equipped with various heating elements which create th...

Page 32: ...ven is operating To turn on the light when the oven is off set manual cooking then turn the function knob to the STATIC function without turning the thermostat knob CONDENSATION When cooking foods with a high water content it is normal for condensation to form on the inside of the oven door and on the control panel This condensation will evaporate by itself during cooking COOKING TIPS The set tempe...

Page 33: ...h grill 175 15 5 Spare ribs 1 5 Fan with grill 175 10 10 Bacon 0 7 grill 200 7 8 Pork fillet 1 5 Fan with grill 175 10 5 Beef fillet 1 grill 200 10 7 Rainbow trout 1 2 Fan assisted 150 160 35 40 Monkfish 1 5 Fan assisted 160 60 65 Turbot 1 5 Fan assisted 160 45 50 Pizza 1 Pizza MAX 8 9 Bread 1 Fan 190 200 25 30 Focaccia 1 Fan assisted 180 190 20 25 Bundt cake 1 Fan 160 55 60 Jam tart 1 Fan 160 35 40 ...

Page 34: ...ically After selecting a cooking function from those available and setting the required temperature Press and hold the M button for at least 2 seconds The symbol will turn on Release the M button then press it again The A symbol will start flashing on the display and the following text will be displayed end Set the required end of cooking time by pressing the or button The oven will turn on after a...

Page 35: ...l the dot flashes Press the or button to change the time Adjusting the buzzer volume Press the M button The following text will be shown on the display ton followed by a number Select the required volume using the or button A power cut will cause the programmed settings including the clock to be lost Once the power is back on the programmer can be reprogrammed TIMER where applicable Manual Cooking ...

Page 36: ...he rail towards the interior of the oven Repeat for the rear clip ROTISSERIE FUNCTION Used to cook joints of meat chickens and fish evenly on all sides using the grill element When the grill function is selected the rotisserie motor will start up Position the skewer support in level 3 of the side guides Place a tray on one of the lower levels of the side guides to collect cooking grease Insert the ...

Page 37: ...eriodic use of commonly available products Never use scouring powders or pads Immediately remove limescale grease starch or egg white stains Cleaning the Door Glazing To degrease use washing up liquid and vinegar then rinse otherwise clean with washing up liquid rinse then pass over with a moist cloth before drying To remove encrusted food soak with soapy water or washing up liquid for a few minut...

Page 38: ...s from the oven Slide the tip of a flat head screwdriver between the glass cover and the bulb housing Gently turn the tip of the screwdriver to loosen the glass while keeping it in position with your fingers to prevent it falling and breaking Remove the glass and take out the old halogen bulb Insert a new halogen bulb in the holder DO NOT touch the bulb with your bare hands Press the glass cover bac...

Page 39: ... both hinges Slowly close the door until it blocks checking that the levers have blocked the door Remove the top cover of the door by pressing the round buttons on the left and right Lift the top cover and remove Paying close attention to the sides of the glass Slide the panes of glass out Clean the glass Repeat the operations above in reverse to reassemble the door If the hinges are not correctly...

Page 40: ...und the oven dish to allow heat to circulate correctly Have a technician check the actual mains voltage Condensation forms on the oven door glass When cooking foods with a high water content it is normal for condensation to form on the inside of the oven door and on the control panel This condensation will evaporate by itself during cooking Pre heat the oven to reduce condensation build up Smoke f...

Page 41: ...1 FR BERTAZZONI INSTRUCTIONS D INSTALLATION ET D UTILISATION FOURS ENCASTRABLES ÉLECTRIQUES 3100399 WWW BERTAZZONI COM ...

Page 42: ...SATION ______________________________________________ POSITIONNEMENT DES GRILLES _________________________________________________ REFROIDISSEMENT ____________________________________________________________ PRÉCHAUFFAGE _______________________________________________________________ MODES DE CUISSON ___________________________________________________________ FONCTIONS SPÉCIALES __________________...

Page 43: ... italien et d une technologie d avant garde Notre mission est de réaliser des produits qui fonctionnent parfaitement et procurent du plaisir à leurs utilisateurs En réalisant des produits à l esthétique sans pareille nous répondons aux attentes de nos clients en matière de design irréprochable En réalisant des produits polyvalents et simples à utiliser cuisiner avec Bertazzoni devient un vrai plai...

Page 44: ...NTION en apposant le marquage sur le produit objet du présent manuel le fabricant certifie en engageant sa seule responsabilité la conformité de l appareil à toutes les normes européennes de sécurité de santé et de protection de l environnement PROTECTION DE L ENVIRONNEMENT L appareil objet du présent manuel est marqué conformément à la directive européenne 2012 19 UE en matière de déchets d équipe...

Page 45: ...re aussi ne pas verser de liquides froids sur la porte du four pendant son utilisation L utilisation du four génère de la chaleur et de l humidité veiller à bien ventiler la pièce pendant le fonctionnement Ne pas ranger d objets inflammables dans le four Ne pas ouvrir la porte du four si de la fumée s en échappe Éteindre le four et le débrancher du secteur d alimentation électrique Le four est doté...

Page 46: ...individuelle INTÉGRATION DU FOUR Après avoir retiré les différentes parties mobiles de leur emballage interne et externe s assurer que le four est intact Au moindre doute ne pas utiliser le four et contacter le centre d assistance Compte tenu des dimensions importantes de l appareil s assurer que le meuble est adapté à l encastrement du four AVERTISSEMENTS IMPORTANTS Le four peut être installé uniq...

Page 47: ...entuelles ouvertures requises pour le plan de cuisson doivent s ajouter à celles nécessaires pour le four Le fabricant décline toute responsabilité en cas d installation d un plan de cuisson d une autre marque INSTALLATION SUR COLONNE La distance entre le four et les meubles de cuisine doit garantir une ventilation et une évacuation de l air suffisantes S assurer de la présence d une ouverture sur l...

Page 48: ...adaptées aux données figurant sur l étiquette d identification La prise et l installation sont reliées à la terre conformément aux normes en vigueur Quand le branchement au secteur d alimentation est effectué par l intermédiaire d une prise Appliquer au câble d alimentation une fiche aux normes adaptée à la charge indiquée sur l étiquette d identification Brancher les fils conducteurs en faisant référen...

Page 49: ...ction de la charge de l appareil Le câble de terre ne doit pas être interrompu par l interrupteur et doit être relié à la terre Différemment le branchement électrique peut aussi être protégé par un interrupteur différentiel REMPLACEMENT DES COMPOSANTS Avantd effectuertouteopérationd entretien veiller à débrancher l appareil du secteur d alimentation électrique Pour le remplacement de composants fonct...

Page 50: ...re 3 Sélecteur de température COMMANDES DU FOUR À 2 BOUTONS 1 Sélecteur des fonctions 2 Écran à commande tactile 3 Sélecteur de température FONCTIONS DU FOUR PANNEAU DE COMMANDE PANNEAU DE COMMANDE SYMBOLE DESCRIPTION FOUR À 5 FONCTIONS FOUR À 9 FONCTIONS Préchauffage Statique Chauffage inférieur Chauffage supérieur Grill Grill ventilé Statique ventilé Ventilé Pizza 100 150 220 270 180 LOW HIGH ...

Page 51: ...lle au niveau voulu 2 Sélectionner la fonction du four désirée en tournant le bouton 3 Réglerlatempératureentournantleboutondans le sens horaire 4 Sélectionnerlacuissonmanuelleoutemporisée à l aide du bouton TIMER ou de l ÉCRAN À COMMANDE TACTILE le cas échéant Lorsque le voyant présent sur le tableau de commande s éteint cela indique que la température programmée a été atteinte Le four est équipé...

Page 52: ...t éteint sélectionner la cuisson manuelle et tourner le bouton des fonctions sur la fonction STATIQUE sans tourner le bouton du thermostat CONDENSATION Pendant la cuisson des aliments particulièrement riches en eau il est normal que de la condensation se forme sur le verre intérieur de la porte du four et sur le panneau de commande Pendant la cuisson cette condensation s évapore d elle même CONSEI...

Page 53: ... 15 5 Travers de porc 1 5 Grill ventilé 175 10 10 Bacon 0 7 Grill 200 7 8 Filet mignon 1 5 Grill ventilé 175 10 5 Filet de bœuf 1 Grill 200 10 7 Truite saumonée 1 2 Statique ventilé 150 160 35 40 Queue de lotte 1 5 Statique ventilé 160 60 65 Turbot 1 5 Statique ventilé 160 45 50 Pizza 1 Pizza MAX 8 9 Pain 1 Ventilé 190 200 25 30 Fougasse 1 Statique ventilé 180 190 20 25 Ciambella 1 Ventilé 160 55 ...

Page 54: ...s éteint automatiquement Fin de cuisson Cette fonction permet de régler l heure à laquelle le four s éteint automatiquement Sélectionner une fonction de cuisson parmi celles disponibles et régler la température voulue Appuyer sur la touche M pendant au moins 2 secondes Le symbole s allume Relâcher la touche M et appuyer à nouveau dessus Sur l écran le symbole A se met à clignoter et l indication e...

Page 55: ...difier l heure Pour modifier le volume de la sonnerie Appuyer sur la touche M L écran affiche l indication ton suivie d un chiffre À l aide des touches et sélectionner le volume voulu Une coupure de courant entraîne l annulation des fonctions programmées horloge comprise Une fois l alimentation électrique rétablie le programmateur peut être reprogrammé TIMER le cas échéant Cuisson manuelle Tourner le b...

Page 56: ... l opération pour le clip arrière FONCTION TOURNEBROCHE La fonction tournebroche est utilisée pour cuire avec le grill une pièce de viande une volaille ou un poisson de manière uniforme de tous les côtés Quand la fonction grill est sélectionnée le moteur du tournebroche se met en marche Positionner le support de la broche sur le niveau 3 des guides latéraux Placer un lèchefrite sur un niveau infér...

Page 57: ...vendus dans le commerce Ne jamais utiliser de poudres ni d éponges abrasives Éliminer immédiatement les taches de calcaire de graisse d amidon ou de blanc d œuf Nettoyage du verre Pourdégraisserleverre utiliserduliquidevaisselle et du vinaigre puis rincer ou bien nettoyer avec du liquide vaisselle rincer passer un chiffon humide et essuyer Pour retirer les incrustations les mouiller avec de l eau s...

Page 58: ... logement de l ampoule Tourner délicatement la pointe du tournevis pour dégager le verre tout en le maintenant en position avec les doigts afin d éviter qu il ne tombe et se rompe Retirer le verre puis l ampoule halogène Mettre en place une ampoule halogène neuve dans le logement prévu à cet effet NE PAS toucher l ampoule à mains nues Remettre le couvercle en verre en place en faisant pression et re...

Page 59: ... Refermer lentement la porte du four jusqu au point de blocage en s assurant que les leviers ont bloqué la porte Retirer le cache supérieur de la porte en faisant pression avec les doigts sur les touches rondes situées à droite et à gauche Soulever le cache supérieur et l extraire En faisant attention au côté des verres Extraire les verres en les faisant coulisser Nettoyer les verres Effectuer les ...

Page 60: ...ir une bonne circulation de la chaleur Faire contrôler la tension de secteur par un technicien qualifié De la condensation se forme sur le verre du four Pendant la cuisson des aliments particulièrement riches en eau il est normal que de la condensation se forme sur le verre intérieur de la porte du four et sur le panneau de commande Pendant la cuisson cette condensation s évapore d elle même Précha...

Page 61: ...1 ES BERTAZZONI INSTRUCCIONES DE INSTALACIÓN Y USO HORNOS ELÉCTRICOS EMPOTRABLES 3100399 WWW BERTAZZONI COM ...

Page 62: ...EZ______________________________________________ COLOCACIÓN DE LAS REJILLAS _________________________________________________ ENFRIAMIENTO ________________________________________________________________ PRECALENTAMIENTO __________________________________________________________ MODOS DE COCCIÓN ___________________________________________________________ FUNCIONES ESPECIALES ______________________...

Page 63: ...or ofrecer una combinación única de auténtico diseño italiano y excelente tecnología Nuestra misión es hacer productos que funcionen perfectamente y que encanten a sus propietarios Fabricando productos bonitos deseamos satisfacer las exigencias de nuestros clientes interesados en un diseño estupendo Por su versatilidad y facilidad de uso cocinar con Bertazzoni se convierte en un auténtico placer E...

Page 64: ...a bajo su propia responsabilidad que el aparato cumple todas las normativas europeas aplicables en materia de seguridad salud y medio ambiente PROTECCIÓN DEL MEDIO AMBIENTE Este aparato está marcado con el símbolo que indica que debe ser eliminado con arreglo a la directiva europea 2012 19 UE sobre residuos de aparatos eléctricos y electrónicos RAEE Dicha directiva define las normas para recogida y...

Page 65: ... provocar la rotura del cristal no vierta líquidos fríos sobre la puerta del horno durante el uso El uso del horno genera calor y humedad ventile bien el ambiente durante el funcionamiento No introduzca objetos inflamables en el horno No abra la puerta del horno cuando salga humo Apague el aparato y desconéctelo de la red eléctrica Elhornoestádotadodeelementoselectrónicos que podrían interferir con...

Page 66: ... haber retirado de los distintos componentes móviles sus embalajes internos y externos asegúrese de que el horno está en perfecto estado No utilice el aparato en caso de duda y póngase en contacto con el centro de asistencia Teniendo en cuenta las dimensiones del aparato compruebe que el mueble es idóneo para empotrar en él el horno ADVERTENCIAS IMPORTANTES El horno solo puede instalarse empotrado...

Page 67: ...aberturas de ventilación requeridas para la placa de cocción deben sumarse a las requeridas para el horno El fabricante declina toda responsabilidad en caso de que se instale una placa de cocción de otra marca INSTALACIÓN EN UNA COLUMNA La distancia entre el horno y los muebles de cocina debe ser suficiente para garantizar una adecuada ventilación y evacuación del aire Asegúrese de que el mueble ti...

Page 68: ... en la etiqueta de identificación la toma y la instalación están provistas de conexión a tierra según las normativas vigentes Si la conexión a la red de alimentación se realiza mediante una toma instale en el cable de alimentación un enchufe normalizado adaptado a la carga indicada en la etiqueta de identificación Conecte los cables según el esquema de la ilustración asegurándose de respetar las cor...

Page 69: ...erra no debe ser interrumpido por el interruptor ni fijarse a la instalación de tierra como alternativa la conexión eléctrica también puede protegerse con un interruptor diferencial SUSTITUCIÓN DE COMPONENTES Antes de realizar cualquier operación de mantenimiento desconecte el aparato de la red eléctrica Para la sustitución de componentes funcionales póngase en contacto con un centro de asistencia ...

Page 70: ...ctor de la temperatura HORNO CON 2 MANDOS 1 Selector de funciones 2 Pantalla táctil 3 Selector de la temperatura FUNCIONES DEL HORNO PANEL DE MANDOS PANEL DE MANDOS SÍMBOLO DESCRIPCIÓN HORNO 5 FUNCIONES HORNO 9 FUNCIONES Precalentamiento Estático Calentamiento inferior Calentamiento superior Grill Grill ventilado Estático ventilado Ventilado Pizza 100 150 220 270 180 LOW HIGH ...

Page 71: ...ÓN 1 Introduzca la rejilla en el nivel deseado 2 Seleccionelafuncióndelhornogirandoelmando 3 Ajuste la temperatura girando el mando en el sentido de las agujas del reloj 4 Según el caso active la cocción manual o temporizada mediante el mando TEMPORIZADOR o mediante la PANTALLA TÁCTIL El apagado del indicador luminoso presente en el panel de mandos indica que se ha alcanzado la temperatura ajustad...

Page 72: ...ra encender la luz con el horno apagado seleccione la cocción manual y gire el mando de las funciones hasta la función ESTÁTICO sin girar el mando del termostato CONDENSACIÓN Es normal que durante la cocción de alimentos especialmente húmedos se forme condensación en el cristal interno de la puerta del horno y en el panel de control Durante la cocción la condensación se evaporará por sí sola CONSE...

Page 73: ...llar 1 5 grill ventilado 175 10 10 Panceta de cerdo 0 7 grill 200 7 8 Solomillo de cerdo 1 5 grill ventilado 175 10 5 Solomillo de ternera 1 grill 200 10 7 Trucha asalmonada 1 2 estático ventilado 150 160 35 40 Rape 1 5 estático ventilado 160 60 65 Rodaballo 1 5 estático ventilado 160 45 50 Pizza 1 Pizza MÁX 8 9 Pan 1 ventilado 190 200 25 30 Focaccia 1 estático ventilado 180 190 20 25 Roscón de bi...

Page 74: ...ión Esta función permite programar una hora a la que el horno se apague automáticamente Tras haber seleccionado una función de cocción y ajustado la temperatura deseada realice lo siguiente Pulse el botón M durante al menos 2 segundos Se enciende el símbolo Suelte y pulse de nuevo el botón M En la pantalla empieza a parpadear el símbolo A y aparece la indicación end Ajuste la hora deseada de fin de...

Page 75: ...ones o para modificar la hora Para modificar el volumen del timbre realice lo siguiente Pulse el botón M En la pantalla se muestra la indicación ton seguida de un número Seleccione el volumen deseado por medio de los botones o Un corte de la corriente eléctrica anula las funciones programadas incluido el reloj Al restablecerse la corriente es necesario volver a programar el programador TEMPORIZADOR ...

Page 76: ...guía hacia el interior del horno Repita la operación con el clip trasero FUNCIÓN ASADOR Se usa para cocinar con el grill carne pollo y pescado de forma uniforme por todos los lados Al seleccionar la función grill se pone en marcha el motor del asador Coloque el soporte del espeto en el nivel 3 de las guías laterales Ponga una bandeja en un nivel inferior de las guías laterales para recoger las gra...

Page 77: ... productos específicos habitualmente disponibles en los comercios No use nunca polvos o estropajos abrasivos Retire inmediatamente las manchas de cal grasa almidón o clara de huevo Limpieza del cristal Para desengrasar use detergente lavavajillas y vinagre y después enjuague o bien limpie con detergente lavavajillas enjuague pase un paño húmedo y seque Para quitar las incrustaciones ponga sobre la ...

Page 78: ...el horno Introduzca la punta de un destornillador plano entre la tapa de vidrio y el alojamiento de la lámpara Gire delicadamente la punta del destornillador para soltar el vidrio sujetándolo con los dedos para evitar que caiga y se rompa Retire el vidrio y quite la bombilla halógena Coloque una nueva bombilla halógena en la ranura NO toque la bombilla con las manos Instale la tapa de vidrio ejerc...

Page 79: ...ras Cierre lentamente la puerta hasta el punto de bloqueo comprobando que las palancas han bloqueado la puerta Quite el recubrimiento superior de la puerta presionando con los dedos sobre los pulsadores redondos situados a ambos lados Levante el recubrimiento superior y extráigalo Prestando atención al lateral de los cristales Extraiga los cristales deslizándolos Limpie los cristales Repita las op...

Page 80: ...adecuada circulación del calor Llame a un técnico especializado para que compruebe la tensión de red real Se forma condensación sobre el cristal del horno Es normal que durante la cocción de alimentos especialmente húmedos se forme condensación en el cristal interno de la puerta del horno y en el panel de control Durante la cocción la condensación se evaporará por sí sola Precaliente el horno para...

Reviews: