1210SHH_AMEN,page 12/29
Attention: Serious damage can occur to burner
relay when faulty connection of thermostat, reset
switch or burner failure lamp. Switching of wires
for reset switch and flame failure (e.g. in a remote
control box) will destroy the burner relay.
GAS CONNECTION
Connection to a gas service may only be carried out by
suitably qualified persons. All piping must be in
accordance with requirements outlined in the National
Gas Codes (different for each country). Gas supply
piping installation should also conform to good practice
and any local codes. Support gas piping with pipe
hangers, metal strapping, or other suitable material.
Do not rely on the unit to support the gas
pipe!
All sealing products shall be resistant to the action of
liquefied petroleum gas or any other chemical
constituents of the gas being supplied. Install a ground
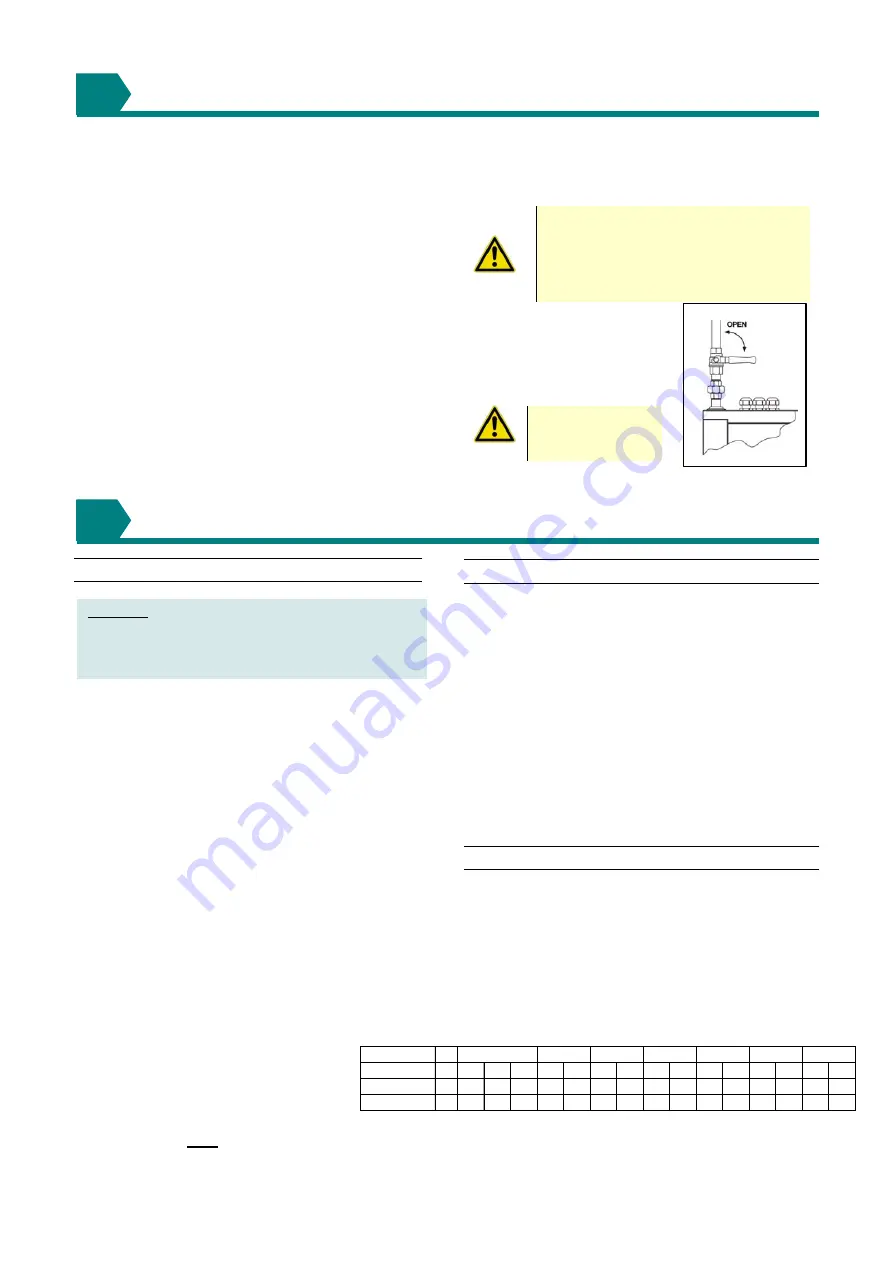
joint union and manual shutoff the gas cock upstream of
the unit control system (see figure 9). The unit is
equipped with a nipple that extends outside the cabinet.
The gas connection is 3/4”. Leak test all connections by
brushing on a leak detecting solution. Check that the
gas category is in accordance with the data described
on the air heater. An adequate gas supply sized to
provide the dynamic pressure for the volume required by
the air heater(s) is essential to maintain the nominal
heat input.
Ensure that a gas supply line includes a filter and has
been tested and purged in accordance with prescribed
practice prior to commissioning and taking the air heater
into service.
This appliance is equipped for a
maximum gas supply pressure of
50mbar. Pressure testing supply piping:
test pressures above 50mbar:
disconnect the heater and manual valve
from the gas supply line that is to be
tested. Cap or plug the supply line..
Figure 9 :
Gas connection detail
NEVER use a
FLAME
to test for GAS
SOUNDNESS !
ELECTRICAL CONNECTION
8.1
Electrical supply & connections
The electrical installation may only be carried out by an
appropriately qualified person current to IEE
Regulations. The supply line to the heater should
include a main switch adjacent to the appliance. The
minimum
clearance
distance between the contacts must
be more than 3 mm. All electrical connections should be
made in the heater control compartment (refer to figure
10). Connections should be in accordance with the
terminal markings and the wiring diagram affixed to the
air heater. The minimum external control required for the
air heater is a room thermostat.
It is essential that the
main input line and neutral to terminals L and N
remain live at all times even when the heater is
switched off to ensure correct operation of the unit
and to let the fan operate independent of the heating
control. Never incorporate controls that isolate the
appliance electrically.
A burner reset switch with red indicator light is fitted on
the heater. To add a remote reset button, make
connections to the terminals in the electric box as
indicated on the wiring diagram.
IMPORTANT : If the reset button requires activating
for any reason, the cause must be determined. After
determining and correcting the problem, restart the
heater and monitor long enough to ensure proper
operation (approx. 5 minutes).
Check that the electrical specification is in
accordance with the specified data on the
air heater. A unique appliance wiring
diagram is supplied as a separate document
attached to this one plus an additional copy
attached to the air heater.
These appliances
must
be earthed.
8.2 Thermostat
controls
Ancillary controls are required to provide timed heat
cycles, room comfort temperature level, frost protection,
override air circulation etc. These are not included with
the appliance and should be ordered separately.
Do not attempt to control more than 1 air heater from
a single thermostat or control panel unless a properly
wired relay is fitted. Follow the instructions supplied
with such panels.
The location of the room thermostat or sensor is very
important. It should not be positioned on a cold wall or
cold surface. Avoid location in draughty areas or where it
may be influenced by heat sources e.g. the sun, process
plant, etc. The thermostat should be mounted on a
vibration free surface and mounted about 1,5 metres
above floor level. Follow the thermostat manufacturers
instructions. The thermostat must be suitable for
potential free contacts.
8.3 Fan
motors
The centrifugal blowers fitted to the BSHH/RHH air
heaters are of the forward curved type therefore, the
speed setting for the static pressure imposed by the air
distribution system will govern the motor loading. All
heaters leave the factory with the drives set to the
specified conditions of the appliance. Table 4 provides
the motor characteristics for the various sizes. Refer to
section 9 to learn how to carry out adjustments necessary
to alter the fan speed and motor load factors.
Table 4 : Maximum motor load rating
(1) only possible on 083 model
7
8
Motor rating kW
Phase
~
1
3
3
3
3
3
3
3
3
3
3
3
3
3
3
Voltage
V
230 230 400 230 400 230 400 230 400 230 400 230 400 230 400
Load rating
A
5,2
3,3
1,9
4,5
2,6
5,9
3,4
8,3
4,8
11
6,5
15
8,6
19
11
3
4
5,5
0,75(1)
1,1
1,5
2,2


