background image

Working with Android OS

50

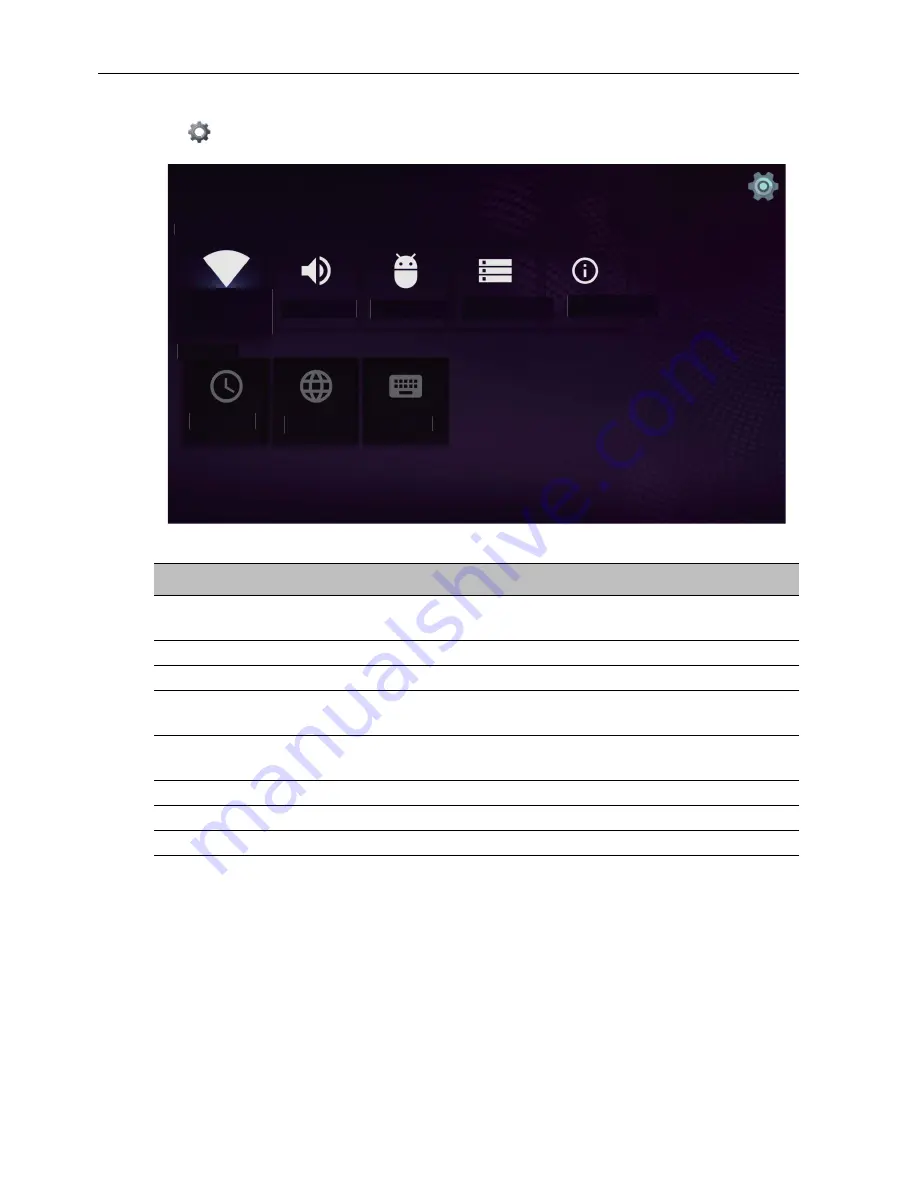
Settings

Tap 

 to launch 

Settings

. With this application, you can view and configure the 

settings of your device.

Tap the desired menu option to enter its submenu.

Device

Preferences

System 
sounds

Apps

Storage & 
reset

About

Network

Date & 
time

Language

Keyboard

Menu Option

Description

Network

Select this option to view the network status or configure 

the network connection.

System sounds

Select this option to change system sounds.

Apps

Select this option to open Apps.

Storage & reset

Select this option to view the total and available storage  

space or to perform a reset.

About

Select this option to view the model name and other 

hardware/software information.

Date & Time

Select this option to set the date and time.

Language

Select this option to change the system language.

Keyboard

Select this option to configure the input method settings.

Summary of Contents for ST750K

Page 1: ...ST750K ST860K LCD Monitor User Manual ...

Page 2: ...contents thereof without obligation to notify any person of such revision or changes Copyright Copyright 2018 BenQ Corporation All rights reserved No part of this publication may be reproduced transmitted transcribed stored in a retrieval system or translated into any language or computer language in any form or by any means electronic mechanical magnetic optical chemical manual or otherwise witho...

Page 3: ...y 10 Installing the display on a wall 10 Parts of the display and their functions 12 Rear panel 12 Input output terminals 14 Input output terminals 15 Remote control 17 Using the remote control 19 Connection 21 Connecting audio video signals 21 Connecting power 22 Basic operations 24 Turning the display on or off 24 Switching input signals 26 Adjusting audio volume level 26 Setting up Internet con...

Page 4: ...Multimedia buttons on the remote control 36 Viewing files 37 Working with Android OS 47 About All Apps 48 Browser 49 Settings 50 X Sign 51 BenQ Suggest 52 ES File Explorer 53 Multimedia 54 WPS Office 55 Product information 57 Specifications 57 Dimensions 59 Supported input signal resolution 61 Troubleshooting 62 2 27 18 ...

Page 5: ...y Using wrong or unsuitable accessories may cause the display to fall and result in serious personal injuries Make sure that the surface and fixing points are strong enough to sustain the weight of the display To reduce the risk of electric shock do not remove covers No user serviceable parts inside Refer servicing to qualified service personnel To prevent personal injuries mounting the display or...

Page 6: ...ion to avoid injury from tip over 13 Unplug this apparatus during lightning storms or when unused for long periods of time 14 Refer all servicing to qualified service personnel Servicing is required when the apparatus has been damaged in any way such as power supply cord or plug is damaged liquid has been spilled or objects have fallen into the apparatus the apparatus has been exposed to rain or m...

Page 7: ...ment is needed Safety notice for remote control Do not put the remote control in the direct heat humidity and avoid fire Do not drop the remote control Do not expose the remote control to water or moisture Failure to do so could result in malfunction Confirm there is no object between the remote control and the remote sensor of the product When the remote control will not be used for an extended p...

Page 8: ...rds pertaining to environmental management BenQ has spared no efforts in pushing our initiatives further to incorporate life cycle design in the aspects of material selection manufacturing packaging transportation using and disposal of the products BenQ ecoFACTS label lists key eco friendly design highlights of each product hoping to ensure that consumers make informed green choices at purchase Ch...

Page 9: ...x 1 Quick start guide The type of power cord supplied may differ from that illustrated depending on your region of purchase Before discarding the package check that you haven t left any accessories inside the box Dispose of packaging materials wisely You can recycle the cardboard carton Consider storing the package if possible for future transport of the display Do not leave plastic bags within re...

Page 10: ...the cloth is larger than the display 2 Gently lay the display on the cloth with the LCD screen facing down 3 Remove the desktop stands from the display if installed 4 Identify the wall mounting screw holes on the back of the display as shown in the illustration 5 Install the wall mounting bracket on the display and attach the display to the wall according to the mounting bracket s instructions The...

Page 11: ...25 mm To maintain proper ventilation keep at least 10 mm of clear space from the back cover of the display to the wall Please consult a professional technician for wall mount installations The manufacturer accepts no liability for installations not performed by a professional technician 10mm 0 39 ...

Page 12: ...unctions 12 Parts of the display and their functions Rear panel No Name Description Scroll through settings and options in the OSD menu up down right and left Turn the display on or off MENU Open or close the OSD menu OK ST750K 1 2 3 ...

Page 13: ...l through settings and options in the OSD menu up and down Scroll through settings and options in the OSD menu Hot keys for audio volume adjustment MENU Open or close the OSD menu Turn the display on or off MENU USB4 USB3 USB3 0 USB2 USB1 Coaxial OUT AC IN HDMI3 HDMI2 ARC HDMI1 AUDIO R AUDIO L VIDEO AUDIO OUT AV IN OFF ON LAN INPUT ST860K 1 2 3 4 5 ...

Page 14: ...t use the USB port to update the software The USB ports only support FAT FAT32 format USB 2 Access multimedia files on USB drives directly USB 1 Access multimedia files on USB drives directly COAXIAL OUT Output digital audio signals via a coaxial cable to an external device ST750K USB4 USB3 USB3 0 USB2 USB1 Coaxial OUT AC IN HDMI3 HDMI2 ARC HDMI1 AUDIO R AUDIO L VIDEO AUDIO OUT AV IN OFF ON LAN ST...

Page 15: ... output terminals WFEJP BW JO AUDIO L AUDIO R HDMI 2_ ARC _ AUDIO OUT ST750K WFEJP BW JO AUDIO L AUDIO R HDMI 2_ ARC _ AUDIO OUT USB4 USB3 USB3 0 USB2 USB1 Coaxial OUT AC IN HDMI3 HDMI2 ARC HDMI1 AUDIO R AUDIO L VIDEO AUDIO OUT AV IN OFF ON LAN ST860K ...

Page 16: ...2_ ARC _ Receive 4K2K 60Hz supported signals from an external device ARC Audio Return Channel allows you to transfer audio from the display back down the HDMI cable to a soundbar or a home theater receiver You can listen to your display s audio through other audio systems instead of the display s speakers HDMI 1 Receive 4K2K 60Hz supported signals from an external device AUDIO OUT Output audio sig...

Page 17: ...ge to the different mode under non Android system Mode Full 4 3 Film Subtitle PC mode MULTI MEDIA buttons The buttons are used to operate the media functions under Multi Media APP Numeric buttons 0 9 Press to enter numbers SCREEN SHOT Capture the printed screen and save to the USB drive CHLIST Delete a character view program list Note It is only working on some specific regions MUTE Turn on off th...

Page 18: ...the screen the screen will turn black when the OSD menu is off Press again to resume MENU Activate the OSD menu FREEZE Freeze the screen OK Confirm the selected options or save changes CURSOR KEYS Scroll through settings and options in the OSD menu BACK Press this key to return to previous page HOME Show the main screen of Android system 2 3 1 7 8 9 12 16 14 18 22 21 23 5 6 4 10 13 11 17 15 19 24 ...

Page 19: ...rtment cover 2 Insert the supplied batteries ensuring that the positive and negative marked battery terminals match the and marks in the battery compartment The supplied batteries are provided for your convenience so that you can operate the display straight away You should replace them as soon as possible 3 Refit the battery compartment cover ...

Page 20: ... the display s remote control sensor window is exposed to direct sunlight or strong light the remote control may not operate properly In this situation change the light source readjust the angle of the display or operate the remote control from a location closer to the display s remote control sensor window Keypad remote control lock SOP Press and hold CH on remote control Enable Disable keypad fu...

Page 21: ...Do not remove cables from the ports by pulling the cable itself Always grasp and pull the connectors at the end of the cable Ensure that all cables are fully inserted and firmly seated Connecting the digital inputs 1 Connect the HDMI output jack of a computer or A V device such as a VCR or DVD player to the HDMI 1 input jack on the display using an HDMI cable 2 To view a video image from this inpu...

Page 22: ...nsert the USB a notice will be popped up which would lead the users to the Multi media mode Connecting power Plug one end of the power cord into the Power jack on the display and the other end into an appropriate power outlet if the outlet is switched turn on the switch 86 USB flash drive The USB ports can not be connected with the devices over 0 5A ST750K ...

Page 23: ...yed or change the plug type on the power cord Be aware of the power loading when you use extension cords or multiple outlet power boards There are no user serviceable parts in this display Never unscrew or remove any covers There are dangerous voltages inside the display Turn off the power and unplug the power cord if you intend to move the display USB4 USB3 USB3 0 USB2 USB1 Coaxial OUT AC IN HDMI...

Page 24: ...r switch is set to ON The system will enter standby mode USB4 USB3 USB3 0 USB2 USB1 Coaxial OUT AC IN HDMI3 HDMI2 ARC HDMI1 AUDIO R AUDIO L VIDEO AUDIO OUT AV IN OFF ON LAN ST860K Power Switch The display s standby mode still consumes power To completely cut off power supply set the Power switch to OFF O and then disconnect the power cord from the power outlet OK ST750K Power Button ...

Page 25: ...ower button on the display s control panel or on the remote control Turning off the power still consumes power The users have to un plug the plug to completely cut off the power supply USB4 USB3 USB3 0 USB2 USB1 Coaxial OUT AC IN HDMI3 HDMI2 ARC HDMI1 AUDIO R AUDIO L VIDEO AUDIO OUT AV IN OFF ON LAN MENU INPUT Power Button ST860K ...

Page 26: ...ntrol and select ANDROID 4 On the home screen select All Apps Settings Network 5 In the Network menu select Wired 6 In the Wired menu set Open Ethernet to On to configure the network settings Then do the following If the router setting enables obtaining IP address automatically select The Automatic Acquisition IP Address and press the OK button Your display will obtain the IP address automatically...

Page 27: ...to download it every time you turn on the display If you want to update the software press Download immediately Or your can skip this step and update the software later Software update process may take some time to complete During the update process do not turn off the device or disconnect the Internet connection Any interruptions during the software update process may permanently damage your disp...

Page 28: ...Color Temperature Zoom Mode Image Noise Reduction 30 Sound Sound Mode 120Hz 500Hz 1 5KHz 5KHz 10KHz Balance Surround SPDIF Output Audio only 32 Setting Menu Time Sleep Time Auto BackLight BackLight Power Mode Boot Source Power Save Power Logo HDMI EDID Version HDR Restore User Default Software Update USB 34 Some options are only available when a certain input signal source is selected ...

Page 29: ...anges 5 Press MENU to close the OSD menu 5 Press MENU to close the OSD menu USB4 USB3 USB3 0 USB2 USB1 Coaxial OUT AC IN HDMI3 HDMI2 ARC HDMI1 AUDIO R AUDIO L VIDEO AUDIO OUT AV IN OFF ON LAN MENU INPUT USB4 USB3 USB3 0 USB2 USB1 Coaxial OUT AC IN HDMI3 HDMI2 ARC HDMI1 AUDIO R AUDIO L VIDEO AUDIO OUT AV IN OFF ON LAN MENU INPUT USB4 USB3 USB3 0 USB2 USB1 Coaxial OUT AC IN HDMI3 HDMI2 ARC HDMI1 AUD...

Page 30: ... Hue Sharpness Saturation Color Temperature Standard 50 50 50 50 50 Standard Move Switch Menu Exit OK Source Select Picture Brightness Hue Sharpness Saturation Color Temperature Zoom Mode Image Noise Reduction 50 50 50 50 Standard Meeting mode Middle Move Switch Menu Exit OK Source Select ...

Page 31: ... the analog value to increase green and decrease the analog value to increase purple 0 100 Sharpness Adjust the sharpness of images increase the analog value to increase the definition and decrease the analog value to reduce the definition 0 100 Saturation Adjust the color depth of images increase the analog value to improve the depth and decrease the analog value to reduce the depth 0 100 Color T...

Page 32: ...u Sound Sound Mode 120Hz 500Hz 1 5KHz 5KHz 10KHz Balance Standard 50 50 50 50 50 0 Move Switch Menu Exit OK Source Select Sound 1 5KHz 5KHz 10KHz Balance Surround SPDIF Output Audio only 50 50 50 0 Off PCM Move Switch Menu Exit OK Source Select ...

Page 33: ...Adjust the balance degree of the right left sound track move the analog value to left to increase the left volume move the analog value to right to increase the right volume L50 R50 Generally the balance is set to 0 Surround Select to turn on off the surrounding sound SPDIF Output Select the digital audio output mode PCM Auto Audio only Select this option to blank and output the audio only press a...

Page 34: ...me Sleep Time Auto BackLight BackLight Power Mode Boot Source Power Save Power Logo 15 Seconds Off On 100 Secondary Last Input Low Default Move Switch Menu Exit OK Source Select Setting Boot Source Power Save Power Logo HDMI EDID Version HDR Restore User Default Software Update USB Last Input Low Default EDID 1 4 Off Move Switch Menu Exit OK Source Select ...

Page 35: ...droid Power Save There are three modes Off The system won t go into power saving mode or do any action without an external signal source The system will keep the power on state High In the absence of an external signal source over five minutes the system will enter standby mode shutdown Low In the absence of an external signal source over five minutes the system will enter blank backlight off audi...

Page 36: ...PP The users can decide if they want to turn the APP on or not 3 Select your desired menu to operate Multimedia buttons on the remote control To operate the multimedia buttons use the buttons on the remote control No Name Description MENU Switch to the OSD menu BACK Go back to the root page of the disk selection OK Select deselect an item Directional arrows for selecting a desired item REV Fast re...

Page 37: ... functions as provided on the screen according to your needs Picture Player Menu Options Play the previous picture Zoom out the picture Pause Play lantern slide Rotate 90 left Play the next picture Rotate 90 right Zoom in the picture Show details of the picture Instead of pressing INFO button on the remote control the metadata of the selection on the cursor will be revealed around 3 seconds later ...

Page 38: ...ptions Play the previous track Pause resume music playing Play the next track Set the repeat playing mode All Single Random View the playing list Show details of the music Instead of pressing INFO button on the remote control the metadata of the selection on the cursor will be revealed around 3 seconds later Use and OK to select multiple files as a playlist ...

Page 39: ... playing list Show details of the video Play setup show hide subtitle and adjust the audio progress in this option Set A B repeat playing set point A and point B and the video will repeat between A and B A dual screen display start or off dual display function Select playing screen Instead of pressing INFO button on the remote control the metadata of the selection on the cursor will be revealed ar...

Page 40: ...nsport stream ts trp tp MKV mkv MPEG1 2 1080P 60fps 40Mbps MP HL MPEG program stream DAT VOB MPG MPEG MPEG transport stream ts trp tp MP4 mp4 mov 3GPP 3gpp 3gp AVI avi MKV mkv MPEG4 Simple Profile Advanced Simple Profile Level 5 GMC is not supported MP4 mp4 mov 3GPP 3gpp 3gp AVI avi MKV mkv DivX 3 11 DivX 4 12 DivX 5 x DivX 6 XviD DivX divx MP4 mp4 mov AVI avi MKV mkv Sorenson H 263 FLV flv AVI av...

Page 41: ...n profile Level 6 0 3GPP 3gpp 3gp MP4 mp4 mov MPEG transport stream ts trp tp AVS 50Mbps Broadcasting profile Level 6 0 1 08 60 3GPP 3gpp 3gp MP4 mp4 mov MPEG transport stream ts trp tp WMV3 40Mbps ASF asf AVI avi MKV mkv WMV wmv VC1 Advanced Profile Level 3 Simple Profile Main Profile MPEG transport stream ts trp tp ASF asf WMV wmv AVI avi MKV mkv Motion JPEG 1080P 30fps 10Mbps AVI avi 3GPP 3gpp ...

Page 42: ...ogram stream DAT VOB MPG MPEG FLV flv WAV wav MPEG1 2 Layer2 8Kbps 384Kbps MPEG1 2 Layer3 8Kbps 320Kbps AC3 32KHz 44 1KHz 48KHz Up to 5 1 32Kbps 640Kbps AC3 ac3 AVI avi Matroska mkv mka DivX divx 3GPP 3gpp 3gp MP4 mp4 mov m4a MPEG transport stream ts trp tp MPEG program stream DAT VOB MPG MPEG EAC3 32KHz 44 1KHz 48KHz Up to 5 1 32Kbps 3024Kbps EAC3 ec3 3GPP 3gpp 3gp MP4 mp4 mov m4a MPEG transport ...

Page 43: ...mkv mka WAV wav Note WMA 7 WMA 8 WMA 9 Standard WMA 10 Pro M0 Up to 2 192kbps ASF wma wmv asf AVI avi Matroska mkv mka WAV wav Note No LBR mode WMA 10 Pro M1 Up to 5 1 384kbps ASF wma wmv asf AVI avi Matroska mkv mka WAV wav WMA 10 Pro M2 8KHz 96KHz Up to 5 1 768kbps VORBIS Up to 48KHz Up to 2 Matroska mkv mka WebM webm 3GPP 3gpp 3gp MP4 mp4 mov m4a Note Supports stereo decoding only DTS Up to 5 1...

Page 44: ... AVI avi Matroska mkv mka 3GPP 3gpp 3gp MP4 mp4 mov m4a G711 A mu law 8KHz Up to 2 64Kbps 128Kbps LBR cook 8KHz 11 025KHz 22 05KHz 44 1KHz Up to 5 1 6Kbps 264Kbps Matroska mkv mka RM rm rmvb ra FLAC 8KHz 96KH z 1 6Mbps Matroska mkv mka DRA 8KHZ 96KH z 512Kbps MPEG transport stream ts trp DTS LBR 12KHz 22KHz 24KHz 44 1KHz 48KHz up to 2Mbps MP4 mp4 mov m4a DTS XLL Up to 96KHz Up to 6 MPEG transport ...

Page 45: ...ion of max resolution depends on DRAM size up to 15360x8640 BMP 15360x8640 The limitation of max resolution depends on DRAM size up to 15360x8640 Resolution is a kind of reference design instead of hardware limitation because it is bounded by DRAM size and performance The larger resolution the bigger DRAM size The larger resolution the less performance since it requires longer time to show a pictu...

Page 46: ...ubtitle ts trp tp TS DVB Subtitle mp4 MP4 DVD Subtitle UTF 8 Plain Text mkv MKV ASS SSA UTF 8 Plain Text VobSub DVD Subtitle divx avi AVI 1 0 2 0 DMF0 1 2 XSUB XSUB File Extension Container Remark srt SubRip ssa ass SubStation Alpha smi SAMI sub SubViewer MicroDVD DVDSubtitleSystem SubIdx VobSub SubViewer 1 0 2 0 Only txt TMPlayer ...

Page 47: ...he application Using the remote control Press the 3 or 4 button to select your desired application and press the OK button to launch the application Select All Apps to access to all applications To return to the home screen tap the icon on the screen or press the Home button on the remote control The system does not support any third party applications The closed platform ensures the proper use of...

Page 48: ...n Designer Refer to X Sign on page 51 for more information BenQ Suggest Show the Android apps suggested by BenQ Refer to BenQ Suggest on page 52 for more information ES File Explorer Manage files stored on the internal memory and the connected storage devices Refer to ES File Explorer on page 53 for more information Multimedia Browse the multimedia files stored on the internal memory or the connec...

Page 49: ...connected to the lnternet Function Description Address Bar Enter the web page address to view the page Settings Tap to configure the browser settings Back Tap to return to the previous page Next Tap to go to the next page Refresh Tap to reload the current web page Favorite Tap to save the current web page to bookmarks Search Tap to search the Internet Bookmarks Tap to select bookmarks history or s...

Page 50: ...ion to view the network status or configure the network connection System sounds Select this option to change system sounds Apps Select this option to open Apps Storage reset Select this option to view the total and available storage space or to perform a reset About Select this option to view the model name and other hardware software information Date Time Select this option to set the date and t...

Page 51: ...s with X Sign Designer by their PCs or laptops After editing the contents users can import the file to the display through USB flash drive The contents will then be played automatically X Sign Designer can be downloaded from BenQ website Please refer to the postcard in the accessory pack for the instructions ...

Page 52: ...egory on the left panel to browse the suggested apps Tap an app from the selected category to view a basic description of the app Function Description Search Tap to search for an app Education Tap to show the suggested apps in the Education category Corporation Tap to show the suggested apps in the Corporation category Exit Tap to close BenQ Suggest ...

Page 53: ...n you can view or edit the file according to the available options Function Description Theme Tap to change different themes Settings Tap to access more advanced options New Tap to create a new folder Search Tap to search for files in the internal memory or external device Refresh Tap to reload the current page View Tap to toggle between the list view or icons view Windows Tap to switch between op...

Page 54: ...all files Tap picture to view the photos Tap the desired photo to view it in full screen Tap music to view the audio files Tap the desired audio file to play the song audio clip Tap video to view the videos Tap the desired video file to play the video clip Supported multimedia file formats For more information about video audio and photo specifications refer to Android multimedia specifications on...

Page 55: ...pen a file located in either the dis play s internal memory an external storage device or cloud storage 2 Tap the function menu on the top panel to access the file format s various functions Function Description Open Tap to browse and open a file Share Tap to share your files through email or other sharing applications Manage Tap to edit or manage the document The description below is for a Powerp...

Page 56: ...ransitions Tap to apply or adjust the timing of a transition Pen Tap to write draw paint or sketch to the slides Play Tap to start a slide show Save As Tap to save the presentation file on either the display s internal memory an external storage device or cloud storage Undo Tap to undo an action Redo Tap to redo the last action Close Tap to close the presentation file Back Tap to return to the pre...

Page 57: ... 16 9 Input Video Composite Video in HDMI x3 2 0 x 3 Audio L R RCA jacks USB 2 0 x3 3 0 x1 Control Android LAN TV Tuner X Output Audio COAXIAL OUT x1 Line out 3 5mm External speaker out L R X Audio Audio W Amp ST750K 8W x2 ST860K 10W x2 Internal speaker O Power Supply 100 240 V AC 50 60 Hz Consumption Max 300 W Consumption Standby 0 5 W Environment Operating Temperature ST750K 5o C 40o C ST860K 0o...

Page 58: ...e USB OTA Power Mode O Boot Source O Specifcations and functions are subject to change without notice Item ST750K ST860K System CPU ARM Cortex A53 1 5GHz Quad core System Memory 2 GB Storage 16 GB OS Android 6 0 OS This Android 6 0 operating system is not standard Android so access to Google Play is not available APK cannot be installed in the default location Without management permission install...

Page 59: ...Product information 59 Dimensions ST750K Unit mm 1681 6 1652 6 968 6 931 0 14 5 14 5 23 1 14 5 14 5 50 8 53 8 84 6 600 0 628 1 540 8 540 8 200 0 140 5 WALL MOUNT SCREW 4 M8 10L ...

Page 60: ... Unit mm USB4 USB3 USB3 0 USB2 USB1 Coaxial OUT AC IN HDMI3 HDMI2 ARC HDMI1 AUDIO R AUDIO L VIDEO AUDIO OUT AV IN OFF ON LAN S O U R C E M E N U 1934 1110 1067 1896 19 19 19 24 76 2 44 2 600 400 352 5 667 4 M 8 2 5 L 667 357 5 83 2 ...

Page 61: ...00 60Hz 1360 x 768 60Hz 1366 x 768 60Hz 1400 x 1050 60Hz 1600 x 1200 60Hz 1680 x 1050 60Hz 1600 x 1050 60Hz 1920 x 1080 50Hz 1920 x 1080 60Hz 3840 x 2160 30Hz 3840 x 2160 50Hz 3840 x 2160 60Hz NTSC 480i PAL 576i 480i 60Hz 480p 60Hz 576i 50Hz 576p 50Hz 720p 25Hz 720p 30Hz 720p 50Hz 720p 60Hz 1080i 50Hz 1080i 60Hz 1080p 50Hz 1080p 60Hz supported Blank not supported ...

Page 62: ...nd Check the following Have you turned on the mute function on the display or the input source device Turn off the mute function or increase the audio volume level and try again Are there any loose cable connections Make sure that all cables are connected firmly The computer input image looks strange Have you chosen an unsupported output resolution on the computer Refer to Supported input signal r...

Page 63: ...ointed at the display s remote control sensor window Check for any obstacle between the remote control and the remote control sensor window Check that the remote control sensor window is not under strong fluorescent lighting or in direct sunlight Check for any devices computer or personal digital assistant PDA nearby that transmit infrared signals which may cause interference to signal transmissio...

Reviews: