background image

16 

Positioning your projector  

English

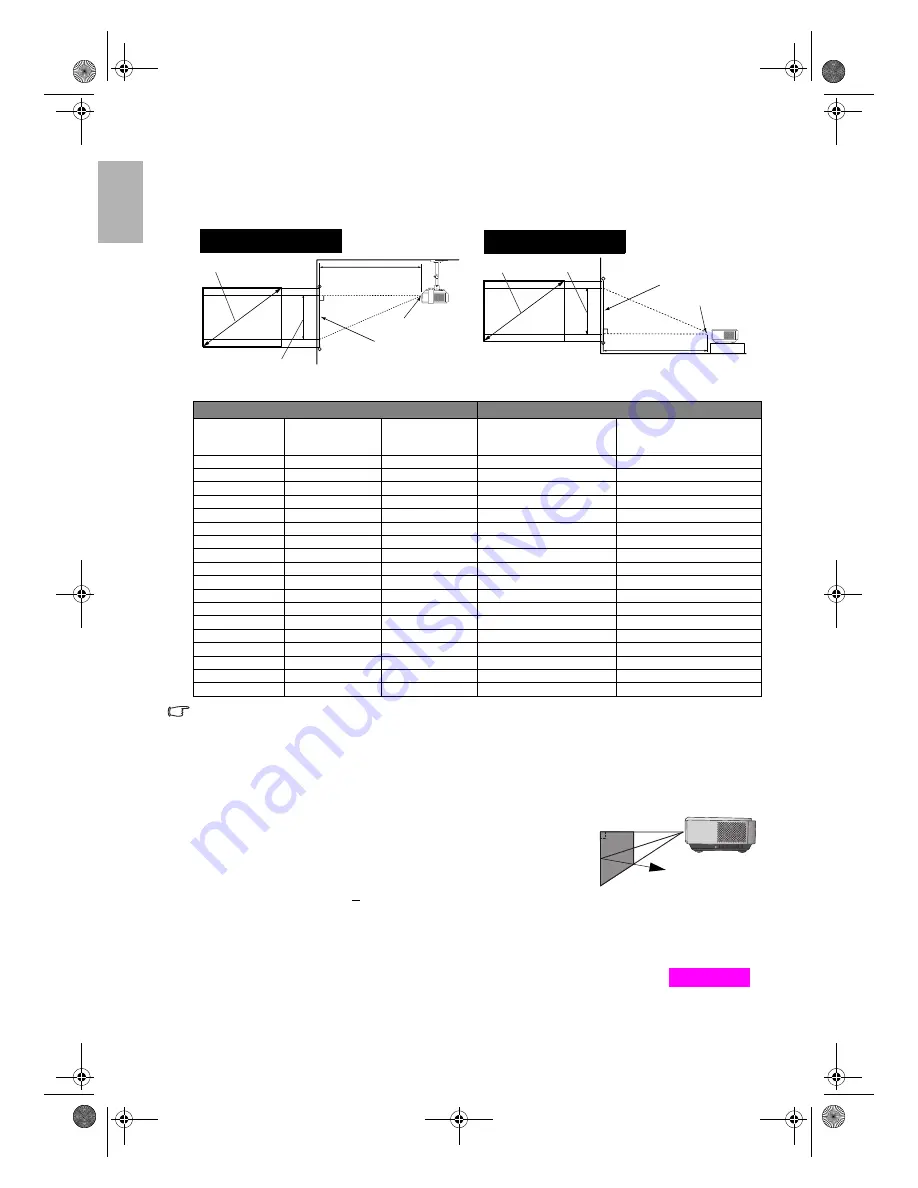
Installation for a 4:3 ratio screen

The illustrations and table below are provided for those users who already have 4:3 aspect ratio screens or intend 
to purchase 4:3 aspect ratio screens to view 16:9 ratio projected images.

4:3 (standard) ratio screen dimension table:

The above numbers are approximate and may be slightly different from the actual measurements. Only the 
recommended screen sizes are listed. If the your screen size is not in the table above, please contact your 
BenQ dealer for assistance.

An examination of the table reveals that you can place the projector lens in the range from 1.84 to 14.92m 
distance from the screen, which will give you a projected image from 50" (1.02 x 0.76m) to 300" (6.1 x 4.57m).

Shifting the projection lens vertically

The vertical lens shift control provides flexibility for installing your 
projector. It allows the projector to be positioned slightly above or below 
the top level of the projected images.
The lens shift (offset) is expressed as a percentage of the projected image 
height. It is measured as an offset from the projected image's vertical center. 
The projector is equipped with + 100% vertical lens shift. You can shift the 
projection lens upwards or downwards within the allowable range depending on your desired image position. 
When the LENS button on the remote control or LENS SHIFT buttons (

c

 or 

d

) on the projector is pressed, an 

adjustment bar displays on the screen.
To raise the projected image, press the Lens Shift 

c

 button on the projector or the 

c

 button 

on the remote control.
To lower the projected image, press the Lens Shift 

d

 button on the projector or the 

d


button on the remote control.

Screen

Image Height 

Projection Distance

Ceiling

Center of the lens

Diagonal

Ceiling Installation

Projection Distance

Floor

Screen

Image Height

Center of the lens

Diagonal

Floor Installation

Screen Dimensions (inch / cm)

Projection Distance (inch / cm)

Diagonal

Width

Height

Min distance (with 

max zoom)

Max distance (with min 

zoom)

50 / 127

40 / 102

30 / 76

72 / 184

98 / 249

60 / 152

48 / 122

36 / 91

87 / 221

117 / 298

70 / 178

56 / 142

42 / 107

102 / 258

137 / 348

80 / 203

64 / 163

48 / 122

116 / 294

157 / 398

90 / 229

72 / 183

54 / 137

130 / 331

176 / 448

100 / 254

80 / 203

60 / 152

145 / 368

196 / 497

110 / 279

88 / 224

66 / 168

159 / 405

215 / 547

120 / 305

96 / 244

72 / 183

174 / 442

235 / 597

130 / 325

104 / 264

78 / 198

188 / 478

254 / 646

140 / 356

112 / 284

84 / 213

203 / 515

274 / 696

150 / 381

120 / 305

90 / 229

217 / 552

294 / 746

160 / 406

128 / 325

96 / 244

232 / 589

313 / 796

170 / 432

136 / 345

102 / 259

247 / 626

333 / 845

180 / 457

144 / 366

108 / 274

261 / 662

352 / 895

190 / 483

152 / 386

114 / 290

275 / 699

372 / 945

200 / 508

160 / 406

120 / 305

290 / 736

392 / 995

250 / 635

200 / 508

150 / 381

 362 / 920

489 / 1243 

300 / 762

239 / 610

180 / 457

 435 / 1104

587 / 1492

0

100%

-100%

Vertical center of 
the image

c

d

Lens Shift

Content-e.fm  Page 16  Wednesday, October 25, 2006  4:26 PM

Summary of Contents for Home Cinema W10000

Page 1: ...W10000 W9000 Digital Projector Home Cinema Series User Manual Welcome copyright e fm Page 1 Wednesday October 25 2006 4 16 PM...

Page 2: ...s Instruments Others are copyrights of their respective companies or organizations Warranty BenQ warrants this product against any defects in material and workmanship under normal usage and storage Pr...

Page 3: ...nctions 12 Control panel 12 Remote control 13 Positioning your projector 14 Choosing a location 14 Obtaining a preferred projected image size 15 Installation for a 16 9 ratio screen 15 Installation fo...

Page 4: ...Screen Display OSD structure 24 Using the menus 25 Picture menu 26 Display menu 27 Options menu 27 Setup menu 28 Advance menu 28 Additional information 30 Care of the projector 30 Cleaning the lens 3...

Page 5: ...ent from that to which the receiver is connected Consult the dealer or an experienced radio TV technician for help EEC statement for European users This machine was tested against the 89 336 EEC Europ...

Page 6: ...of more than 10 degrees left to right nor at angle of more than 15 degrees front to back 3 This projector is capable of displaying inverted images for ceiling mount installation Use only BenQ s Ceili...

Page 7: ...on the projector or place any objects upon it 8 Do not place liquids near or on the projector Liquids spilled into the projector will void your warranty If the projector does become wet disconnect it...

Page 8: ...re dangerous high voltages inside which may cause death if you should come into contact with live parts The only user serviceable parts are the lamp and air filters which have their own removable cove...

Page 9: ...tive goes to negative 3 Refit the cover by aligning it with the case and sliding it back up into position Stop when it clicks into place Notes on handling batteries Do not mix old batteries with new o...

Page 10: ...vents unnecessary fan noise and is rated at less than 25dB in normal mode and a low 23 dB when in Whisper mode Sealed optical engine The optical engine uses a high quality 1 1 35x lens for maximizing...

Page 11: ...Adjustable feet 13 Ceiling mounting holes 14 Kensington lock slot 13 13 12 12 14 15 HDMI port 16 Component Video inputs RCA support Y PB PR or Y CB CR video signal 17 Composite Video input RCA 18 S V...

Page 12: ...he remote control Adjusts the motorised vertical lens by moving the image downwards on the screen in relation to the orientation of the projector 13 LENS SHIFT up Performs the same action as the Lens...

Page 13: ...splay OSD menu selection in the direction of the arrow being pressed See page 25 for details 7 ENTER button Enacts the selected On Screen Display OSD menu item See page 25 8 MENU button Toggles the On...

Page 14: ...he projector for quick setup and portability 2 Ceiling front Select this location with the projector suspended from the ceiling in front of the screen Purchase the BenQ Projector Ceiling Mounting Kit...

Page 15: ...An examination of the table reveals that you can place the projector lens in the range from 2 to 16 22m distance from the screen which will give you a projected image from 50 1 11 x 0 62m to 300 6 64...

Page 16: ...sition When the LENS button on the remote control or LENS SHIFT buttons c or d on the projector is pressed an adjustment bar displays on the screen To raise the projected image press the Lens Shift c...

Page 17: ...n the following connection diagrams may not be supplied with the projector See page 9 for the shipping contents Most cables are commercially available from electronics stores Connecting a computer Con...

Page 18: ...ockets are provided for connection to video output devices If you have a BNC type component video cable you can alternatively connect through the BNC component video sockets You should also connect th...

Page 19: ...the projector the message Unsupported timing will be displayed on the screen This message will remain on screen until you change the input signal to an appropriate source Selecting an input video sou...

Page 20: ...r viewing digital pictures in a living room Preset Gaming Mode is suitable for playing video games in a bright living room 2 Selecting the aspect ratio The aspect ratio is the ratio of the image width...

Page 21: ...ge to the width of a 16 9 aspect screen It does not alter the height Some widescreen movies have been produced with their width squashed down to the width of a 4 3 aspect and are best viewed when rest...

Page 22: ...c Group and one input from the Video Group side by side G V or V G If you want to view two images from 2 different input signals at the same time refer to the following steps to display the second ima...

Page 23: ...on the remote control or MEMORY c on the projector to recall the settings directly There are four video settings MEMORY 1 MEMORY 2 MEMORY 3 and DEFAULT The DEFAULT button can be used to restore the de...

Page 24: ...V PIP V in G PIP Off PIP master Main window Sub window G V POP V G POP Off POP master Right window Left window Video S Video Input Source Video Graphics RGBHD Component 1 PC Component YPBPR Tuning Fr...

Page 25: ...t Store Color Temp To User1 Green Offset Store Color Temp To User2 Blue Offset 3D Color Management Primary Color Red Intensity Yellow Hue Green Saturation Cyan Store to Favorite Color 1 Blue Store to...

Page 26: ...ture Settings Color Temp You can choose a preferred color temperature from among User 1 User 2 Lamp Native Warm Normal and Cool See page 29 for details about storing the Color Temperature User 1 and 2...

Page 27: ...eo S Video video signal Graphics RGBHD DTV RGBHD signal input Component 1 and 2 Component Y CB CR and Y PB PR input HDMI In the unlikely event that the image shakes when PIP or POP function is activat...

Page 28: ...le is measured from 0 IRE black to 100 IRE white We suggest that you check the input source if it is with 0 IRE or 7 5 IRE then select accordingly 5 Keystone Corrects for trapezoidal distortion result...

Page 29: ...ement Primary Color ii Choose a color among Red Yellow Green Cyan Blue or Magenta with the e or f button iii Press d to go to the Intensity Hue and Saturation menus and respectively adjust their value...

Page 30: ...1 To remove dirt or dust wipe the case with a soft dry lint free cloth 2 To remove stubborn dirt or stains moisten a soft cloth with water and a neutral detergent Then wipe the case Never use wax alco...

Page 31: ...ean artist s paintbrush to vacuum or sweep the dust away If the dirt is difficult to remove or the filter is broken you should replace it 6 Re install the filter grill and cover securely 7 Reapply pow...

Page 32: ...an s help To install the cover 1 Repeat Step 1 Step 3 in the To clean the filter section See page 31 for details 2 Place a soft item on the desk for padding Turn the projector upside down so that you...

Page 33: ...s It is strongly recommended that you use a magnetic head screwdriver to retain the screw should it come loose 5 Slowly pull the lamp out of the projector Pulling it too quickly may cause the lamp to...

Page 34: ...EMARK Orange Off Red 1 The lamp has exceeded its usage life Or 2 The lamp is not properly attached or is damaged Solution Install a new lamp Please contact your dealer for assistance Orange Red Off Th...

Page 35: ...rce device Check the connection See page 17 The input signal has not been correctly selected Select the correct input signal with the Source buttons on the remote control or SOURCE ENTER on the projec...

Page 36: ...GA XGA SVGA VGA VESA Macintosh 16 13 and 21 19 in Advanced Intelligent Compression HDTV compatible 1080p 1080i 720p 576p 576i 480p 480i Max number of display colors 16 770 000 full color display Termi...

Reviews: