background image

  15

  Positioning your projector

Eng
lish

Obtaining a preferred projected image size

The distance from the projector lens to the screen, the zoom setting, and the video format each factors in the 
projected image size. BenQ has provided separate tables of dimensions for both 16:9 and 4:3 screen ratios to 
assist you in determining the ideal location for your projector.

1. Determine the aspect ratio of your screen, (16:9 or 4:3)?

2. Select the Screen Size you desire from the 16:9 ratio screen dimension table or 4:3 ratio screen dimension 
table below, according to which screen aspect you have. Install the projector at a distance from the screen 
corresponding to between the Min. and Max. Projection Distance values in the table.

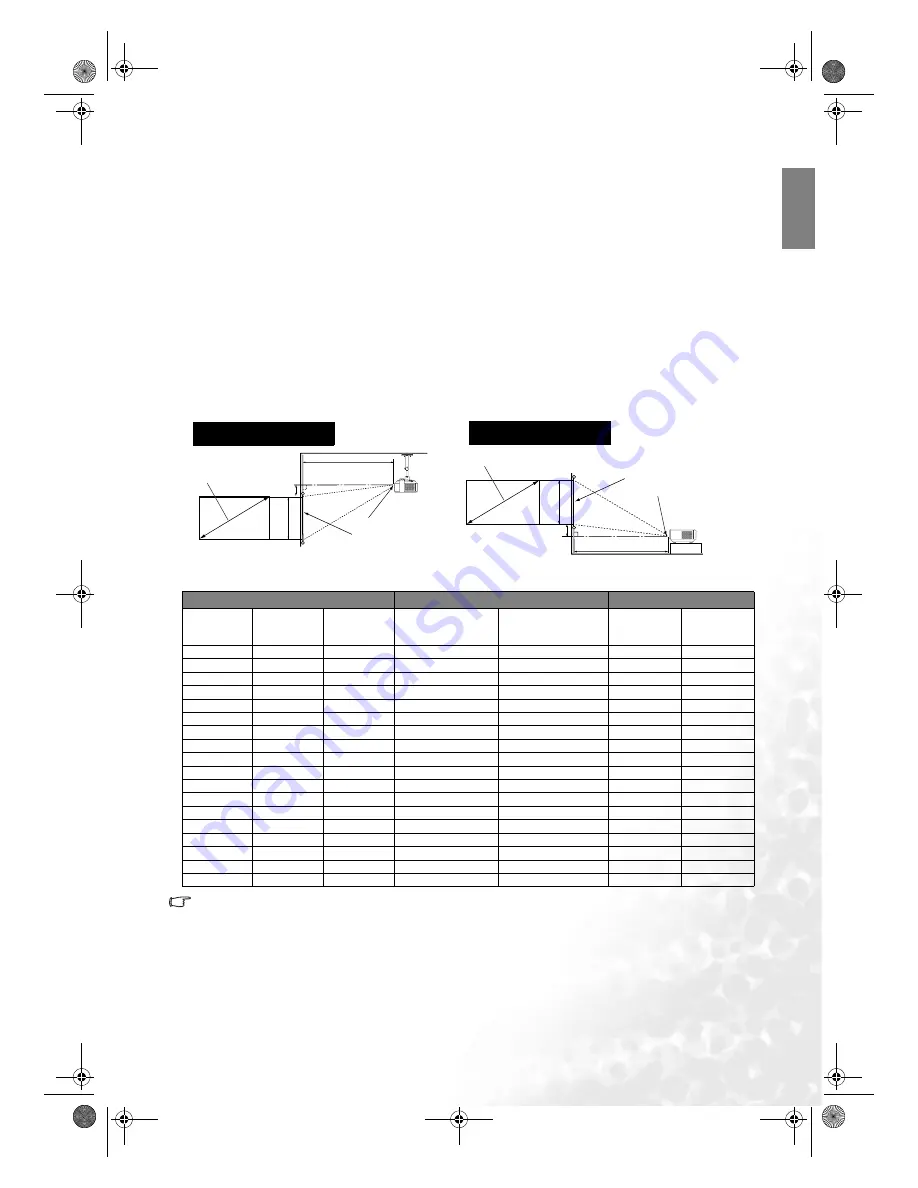
3. Decide the exact height of your projector.

This model projector has a 120% vertical height offset between the projector lens center and the angle of the 
edge of the projected image as indicated with the word "Offset" in the tables below. The PE8720 also has a built-
in motorised vertical Lens shift control for fine adjustment. 

Installation for a 16:9 ratio screen

16:9 (widescreen) ratio screen dimension table

The above numbers are approximate and may be slightly different from the actual measurements. Only 
the recommended screen sizes are listed. If the your screen size is not in the table above, please contact 
your BenQ dealer for assistance.

A

n examination of the table reveals that you can place the projector lens in the range from 2 to 10.8m distance 

from the screen, which will give you a projected image from 50" (1.11 x 0.62m) to 200" (4.43 x 2.49m) full 
screen.

Screen

H

eight

Projection Distance

Diagonal

Offset

Ceiling

Center of the lens

Ceiling Installation

Screen

Heigh

Offset

Floor

Center of the lens

Diagonal

Projection Distance

Floor Installation

Screen Dimensions (inch / cm) Projection Distance (inch / cm)

Offset (inch / cm)

Diagonal

Width

Height

Min distance 

(with max zoom)

Max distance 

(with min zoom)

Upper

Lower

50 / 127

44 / 111

25 / 62

78 / 199

106 / 270

2.5 / 6.2

-27.0 / -68.5

60 / 152

52 / 133

29 / 75

94 / 239

128 / 324

2.9 / 7.5

-32.4 / -82.2

70 / 178

61 / 155

34 / 87

110 / 279

149 / 379

3.4 / 8.7

-37.8 / -95.9

80 / 203

70 / 177

39 / 100

126 / 319

171 / 433

3.9 / 10.0

-43.1 / -109.6

90 / 229

78 / 199

44 / 112

141 / 359

192 / 487

4.4 / 11.2

-48.5 / -123.3

100 / 254

87 / 221

49 / 125

156 / 400

213 / 541

4.9 / 12.5

-53.9 / -137.0

110 / 279

96 / 244

54 / 137

172 / 438

234 / 595

5.4 / 13.7

-59.3 / -150.7

120 / 305

105 / 266

59 / 149

188 / 478

256 / 649

5.9 / 14.9

-64.7 / -164.4

130 / 325

113 / 288

64 / 162

204 / 518

277 / 703

6.4 / 16.2

-70.1 / -178.1

140 / 356

122 / 310

69 / 174

220 / 558

298 / 757

6.9 / 17.4

-75.5 / -191.8

150 / 381

131 / 332

74 / 187

235 / 598

319 / 811

7.4 / 18.7

-80.9 / -205.5

160 / 406

139 / 354

78 / 199

251 / 638

341 / 865

7.8 / 19.9

-86.3 / -219.2

170 / 432

148 / 376

83 / 212

267 / 677

362 / 919

8.3 / 21.2

-91.7 / -232.9

180 / 457

157 / 398

88 / 224

282 / 717

383 / 973

8.8 / 22.4

-97.1 / -246.6

190 / 483

166 / 421

93 / 237

298 / 757

405 / 1028

9.3 / 23.7

-102.5 / -260.3

200 / 508

174 / 443

98 / 249

314 / 797

426 / 1082

9.8 / 24.9

-107.9 / -274.0

250 / 635

218 / 553

123 / 311

392 / 996

532 / 1352

12.3 / 31.1

-134.8 / -342.4

300 / 762

261 / 664

147 / 374

471 / 1195

639 / 1622

14.7 / 37.4

-161.8 / -410.9

PE8720-en.book  Page 15  Friday, May 13, 2005  5:19 PM

Summary of Contents for Home Cinema PE8720

Page 1: ...PE8720 Digital Projector Home Cinema Series User s Manual Welcome PE8720 en book Page 1 Friday May 13 2005 5 19 PM...

Page 2: ...akes no representations or warranties either expressed or implied with respect to the contents hereof and specifically disclaims any warranties merchantability or fitness for any particular purpose Fu...

Page 3: ...unctions 12 Control panel 12 Remote control 13 Positioning your projector 14 Choosing a location 14 Obtaining a preferred projected image size 15 Installation for a 16 9 ratio screen 15 Installation f...

Page 4: ...Screen Display OSD structure 24 Using the menus 25 Picture menu 26 Display menu 27 Options menu 28 Setup menu 28 Advance menu 29 Additional information 30 Care of the projector 30 Cleaning the lens 3...

Page 5: ...erent from that to which the receiver is connected Consult the dealer or an experienced radio TV technician for help EEC statement for European users This machine was tested against the 89 336 EEC Eur...

Page 6: ...gle of more than 10 degrees left to right nor at angle of more than 15 degrees front to back 3 This projector is capable of displaying inverted images for ceiling mount installation Use only BenQ s Ce...

Page 7: ...bjects upon it 8 Do not place liquids near or on the projector Liquids spilled into the projector will void your warranty If the projector does become wet disconnect it from the power point and call B...

Page 8: ...e are dangerous high voltages inside which may cause death if you should come into contact with live parts The only user serviceable parts are the lamp and air filters which have their own removable c...

Page 9: ...e goes to positive and negative goes to negative 3 Refit the cover by aligning it with the case and sliding it back up into position Stop when it clicks into place Notes on handling batteries Do not m...

Page 10: ...he sealed light path prevents light leakage enhancing your viewing experience in darkened viewing environments and prevents the dirtying of the optical path which can cause annoying blurring or spots...

Page 11: ...11 Power cable socket 9 10 11 12 Adjustable feet 13 Ceiling mounting holes 14 Kensington lock slot 13 13 12 12 14 15 HDMI port 16 Component Video inputs RCA support Y PB PR or Y CB CR video signal 17...

Page 12: ...n the remote control Adjusts the motorised vertical lens by moving the image downwards on the screen in relation to the orientation of the projector 13 LENS SHIFT up Performs the same action as the Le...

Page 13: ...Display OSD menu selection in the direction of the arrow being pressed See page 25 for details 7 ENTER button Enacts the selected On Screen Display OSD menu item See page 25 8 MENU button Toggles the...

Page 14: ...n the projector for quick setup and portability 2 Ceiling front Select this location with the projector suspended from the ceiling in front of the screen Purchase the BenQ Projector Ceiling Mounting K...

Page 15: ...e projector lens in the range from 2 to 10 8m distance from the screen which will give you a projected image from 50 1 11 x 0 62m to 200 4 43 x 2 49m full screen Screen Height Projection Distance Diag...

Page 16: ...ected image press the Lens Shift d button on the projector or the d button on the remote control Screen Image Height Projection Distance Offset Ceiling Center of the lens Diagonal Ceiling Installation...

Page 17: ...in the following connection diagrams may not be supplied with the projector See page 9 for the shipping contents Most cables are commercially available from electronics stores Connecting a computer Co...

Page 18: ...o sockets are provided for connection to video output devices If you have a BNC type component video cable you can alternatively connect through the BNC component video sockets You should also connect...

Page 19: ...of the projector the message Unsupported timing will be displayed on the screen This message will remain on screen until you change the input signal to an appropriate source Selecting an input video...

Page 20: ...gned for viewing digital pictures in a living room Preset Gaming Mode is suitable for playing video games in a bright living room 2 Selecting the aspect ratio The aspect ratio is the ratio of the imag...

Page 21: ...t Some widescreen movies have been produced with their width squashed down to the width of a 4 3 aspect and are best viewed when restretched back to their original width using the Wide setting The Rea...

Page 22: ...Group and one input from the Video Group side by side G V or V G If you want to view two images from 2 different input signals at the same time refer to the following steps to display the second image...

Page 23: ...ns on the remote control or MEMORY c on the projector to recall the settings directly There are four video settings MEMORY 1 MEMORY 2 MEMORY 3 and DEFAULT The DEFAULT button can be used to restore the...

Page 24: ...Sub window G V POP V G POP Off POP master Right window Left window Video S Video Input Source Video Graphics RGBHD Component 1 PC Component YPBPR Tuning Frequency Component 2 Phase HDMI H Position V...

Page 25: ...Warm White Balance Fine Tuning Normal Cool RGB Gain Red Gain Green Gain Blue Gain RGB Offset Red Offset Store Color Temp To User1 Green Offset Store Color Temp To User2 Blue Offset 1 Press the MENU EX...

Page 26: ...are provided so you can optimize your projector image set up to suit your program type See page 20 for more information 8 Extended Picture Settings Color Temp You can choose a preferred color temperat...

Page 27: ...POP Master Sets the right window or left window as the active window in order to make any adjustments for it 6 Input Source Selects the input signal that will be displayed as the PIP or POP image Vid...

Page 28: ...use the projector under other extreme environments excluding the above it may display auto shut down symptoms which is designed to protect your projector from over heating In cases like this you shoul...

Page 29: ...nt color temperature About color temperatures There are many different shades that are considered to be white for various purposes One of the common methods of representing white color is known as the...

Page 30: ...ly 1 To remove dirt or dust wipe the case with a soft dry lint free cloth 2 To remove stubborn dirt or stains moisten a soft cloth with water and a neutral detergent Then wipe the case Never use wax a...

Page 31: ...clean artist s paintbrush to vacuum or sweep the dust away If the dirt is difficult to remove or the filter is broken you should replace it 6 Re install the filter grill and cover securely 7 Reapply...

Page 32: ...he projector over so that you can locate the screws that hold the back cover to the projector on the both sides Loosen the screws 3 Turn the projector back Remove the back cover 4 Manage all the conne...

Page 33: ...gers It is strongly recommended that you use a magnetic head screwdriver to retain the screw should it come loose 5 Slowly pull the lamp out of the projector Pulling it too quickly may cause the lamp...

Page 34: ...E REMARK Orange Off Red 1 The lamp has exceeded its usage life Or 2 The lamp is not properly attached or is damaged Solution Install a new lamp Please contact your dealer for assistance Orange Red Off...

Page 35: ...page 17 The input signal has not been correctly selected Select the correct input signal with the Source buttons on the remote control or SOURCE ENTER on the projector See page 19 Image is unstable T...

Page 36: ...WXGA XGA SVGA VGA VESA Macintosh 16 13 and 21 19 in Advanced Intelligent Compression HDTV compatible 1080i 720p 576p 576i 480p 480i Max number of display colors 16 770 000 full color display Terminals...

Reviews: