background image

Setting up Your Display

7

Eng
lish

Setting up Your Display

Connecting the Antenna
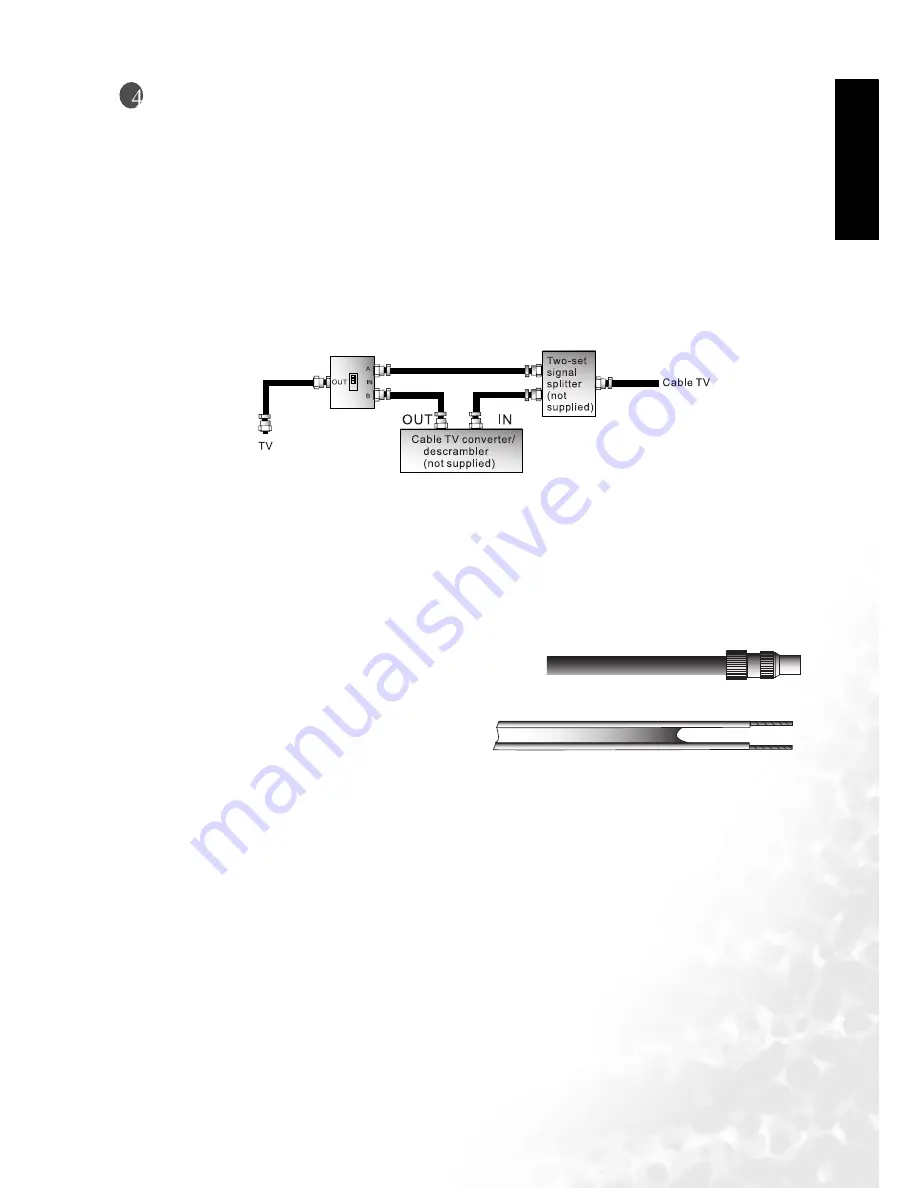
Connecting CATV

Your DV3250 LCD Display has an internal 75 ohm coaxial cable connector, so antennal hook-up 

is very easy.When connecting a 75-ohm coaxial cable, secure it firmly to the antenna connector. 

Some cable TV companies provide "pay per view" programming. Since the signal for these paid 

channels is encoded, most cable TV companies provide their own tuners/ decoders. You must 

install a tuner/ decoder to be able to view locked encoded programming. If you require special 

instructions on how to install cable service, please contact your cable TV provider. The tuner/

decoder provided by your cable TV company can be used according to the following 

instructions.
You must have an RF switch with two inputs (A and B).

The "A" input on the RF switch allows you to use the display's Channel /


buttons to view 

unlocked channels. The "B" input on the RF switch allows you to use the channel selection 

button on your cable box to view locked encoded programming via the tuner/decoder.

Antenna

The antenna equipment has far more effect on reception for color TVs than on black and white 

models. We suggest you use a good-quality outdoor antenna. Following are simple explanations 

for the connection of various types of antennas.

Installation of an Outdoor Antenna

For best reception it is recommended that an Outdoor antenna be used.
A: Use a combination VHF/UHF outdoor antenna.
B: Use separate VHF and/or UHF outdoor antennas.

1. Generally speaking, 75 ohm systems have a 

round cable with a BNL connector which 

requires no tools. Attach the cable directly to 

the input.

2. 300 ohm systems have a flat "dual lead" type 

cable. A 300-75 ohm transformer may be 

used to attach the antenna to a 75 ohm 

input.

Summary of Contents for DV3250

Page 1: ...Welcome English DV3250 LCD Display User s Manual...

Page 2: ...tions Electrical energy can perform many useful functions but it can also cause personal injury and property damage if improperly handled This product has been engineered and manufactured with the hig...

Page 3: ...anufacturer or those with the same characteristics and performance as the original parts Use of unauthorized parts can result in fire electric shock and or other danger 14 Overloading Do not overload...

Page 4: ...has been damaged in any way When the product displays an abnormal condition or exhibits a distinct change in performance Any noticeable abnormality in the product indicates that the product needs ser...

Page 5: ...due to lightning and power line surges An outside antenna system should not be located in the vicinity of overhead power lines or other electric light or power circuits or where it can collide with s...

Page 6: ...English Memo...

Page 7: ...Connecting Composite AV Video Signal SCART 9 Connecting S Video Signals 9 Connecting Component Video Signals 10 Connecting RGB Signals Mini D SUB 10 Connecting DVI HDCP Signals 11 Connecting Audio Out...

Page 8: ...cture Mode Settings 28 Selecting a Picture Mode 28 Feature Menu 29 TV Menu 32 Performing Manual Installation 33 Editing Channels 33 Naming a Channel 33 Swapping Channels 34 Locking Preventing a Channe...

Page 9: ...quid crystal display please take the time to thoroughly read this manual particularly the sections on safety Functions and Features The DV3250 has many useful functions and features including Resoluti...

Page 10: ...d with your DV3250 LCD Display If any item is missing or damaged contact an authorized dealer immediately Actual number and type of cables may vary with the location of purchase Power cord x1 Composit...

Page 11: ...up in red when the display is in standby mode 2 Remote control sensor window Receives the signal from the remote control Do not put any objects in front of the window in order not to hinder the recept...

Page 12: ...ume to decrease it When the OSD menu is on press these buttons to move the selection focus left and right or change settings 5 MENU button Press this button to display the OSD menu When the OSD menu i...

Page 13: ...of your AV device here AUDIO Audio input L R Connect the audio output of your AV device here This input is used common to both AV and S VIDEO input S VIDEO S VIDEO input Connect the S VIDEO output of...

Page 14: ...ng to PC s analog video output PC AUDIO For connecting to PC s audio output 10 DVI HDCP Digital Visual Interface DVI HDCP Digital Video Input For connecting to PC s digital video output DVI AUDIO Audi...

Page 15: ...o inputs A and B The A input on the RF switch allows you to use the display s Channel buttons to view unlocked channels The B input on the RF switch allows you to use the channel selection button on y...

Page 16: ...ff the power to the external devices for safety Connecting Composite AV Video Signal RCA Connect the Composite AV output of your AV equipment to the Composite AV3 signal terminal on the display using...

Page 17: ...to the direction of the connector on the S Video cable when inserting 2 Connect the audio output of your AV equipment to the display s S VIDEO AUDIO L R input terminals using the AV cable or equivale...

Page 18: ...g colored terminals will result in a incorrectly colour image or badly distorted image 1 Connect the analog video output of your PC to the PC D SUB terminal on the display using a Mini D SUB 15 pin ca...

Page 19: ...output of your PC to the display s DVI AUDIO L R input terminals using the AV cable or equivalent DV3250 provides extra audio output termi nals for delivering audio signal to an amplifier or other au...

Page 20: ...the Power button on the display The display will turn on The following First Turn On screen will appear 3 Press the Volume or Volume buttons on the display to select a screen display language and then...

Page 21: ...ception During dual language broadcasts Lang 1 or Lang 2 can be selected When Teletext is displayed on the screen press this button to switch to a specific page 7 Picture mode Teletext page selection...

Page 22: ...channel selection Teletext page selection Press these buttons to sequencially change channels When the TV is off press these buttons to turn it on and change channels When Teletext is displayed on th...

Page 23: ...es The use of the wrong type of batteries may cause chemical leaks and or explosion Please note the following Always ensure that the batteries are inserted with the positive and negative terminals in...

Page 24: ...anges to green Turning off the display Press the Power button on the display or the Power button on the remote control again and the display will go into standby mode The power indicator will turn red...

Page 25: ...ill depend on the TV sound system being received Using the Channel selection buttons on the Remote Control to Change Channels To select a single digit channel press the corresponding channel selection...

Page 26: ...mode press the Picture mode but ton on the remote control This enables you to select from the 6 preset memory settings Vivid Standard Movie Sports Personal 1 and Personal 2 Press the Freeze button on...

Page 27: ...en does not change but black blocks appears in the left and right sides of the screen When the input video source is 16 9 in ratio deformation will occur on the screen Letterbox Fill the entire 4 3 sc...

Page 28: ...lay PIP G on V Enter PIP mode and display graphics in video PIP V on G Enter PIP mode and display video in graphics PBP G by V Enter PBP mode and display graphics by video PBP V by G Enter PBP mode an...

Page 29: ...the display in dimly lit rooms it is recommended to set the backlight to Dark Setting the backlight to Dark will reduce the image brightness and make the dark areas of the image darker thus maintaini...

Page 30: ...ss the Teletext display button to cycle Teletext display types among Teletext only mixed display TV video image only Press the Teletext index button to go to Teletext index page Press the Teletext inf...

Page 31: ...On Screen Display OSD Menu 23 English On Screen Display OSD Menu OSD Structure...

Page 32: ...n the screen Press the or buttons on the remote control or the Channel Channel Volume or Volume buttons on the display to select items on the main menu choose functions or change settings Press the OK...

Page 33: ...e This option will become unavailable if Audio Out is set to On Use the and buttons on the remote control or the Volume and Volume buttons on the display to change selection Stereo Sound 1 Sound 2 Sou...

Page 34: ...le tones Use to increase treble tone to decrease treble tone 12 to 12 Mid Treble Adjust mid treble tones Use to increase mid treble tone to decrease mid treble tone 12 to 12 Middle Adjust mid tones Us...

Page 35: ...o 25 Advanced Picture Settings Press OK to enter Colour TEMP Adjust the color tint of the black and white part of the image Use the and buttons on the remote control or the Volume and Volume buttons o...

Page 36: ...ess the or button to select Advanced Picture Settings and press the OK button to enter the submenu 4 Press the or button to select Picture Mode and press the or button to select a picture mode you des...

Page 37: ...mode is activated Use the and buttons on the remote control or the Volume and Volume buttons on the display to change selection Left Right PIP PBP Display video and images simultaneously in either Pic...

Page 38: ...horizontally to fill the full screen When the input video source is 16 9 in ratio e g DVD signal no change will occur Anamorphic Fill the entire screen with a 4 3 video signal Some deformations may be...

Page 39: ...31 English PIP PBP Functions are available with 480p 576p 720p 1080i HDTV formats Reset All Settings Restore all settings to default values Press the OK button on the remote control or the INPUT butt...

Page 40: ...change selection English Country Select your country where the TV is installed Use the and buttons on the remote control or the Volume and Volume buttons on the display to change selection UK France...

Page 41: ...eception of TV signal 6 Optional If the SCART signal input is connected press the button to highlight Decode and then press the or buttons to select from the following options On Select this option if...

Page 42: ...ock and then press the or buttons to select from the following options Lock Lock selected channel Unlock Unlock selected channel 4 Press the MENU button to close the menus If a channel is locked it ca...

Page 43: ...be locked UnLocked Disable Child Lock 4 Press the MENU button to close menus Changing Password 1 In the TV Menu press the or buttons to select Child Lock and then press the OK but ton 2 Press the butt...

Page 44: ...election Off On Frequency Adjust display clock fre quency Use the and buttons on the remote control or the Volume and Volume buttons on the display to change selection 15 to 15 Phase Adjust display cl...

Page 45: ...too bright and there is a loss of definition in the brightest areas of the image Reduce the contrast setting The DVD player is set for a high level output The AV video signal has not been terminated p...

Page 46: ...outside antenna is not disconnected Make sure the antenna is facing the right direction The picture is doubled or tripled Make sure the antenna is facing the right direction Picture ghosting is caused...

Page 47: ...up down 85 85 85 85 Response time 12 ms typical 35 ms maximum Amplifier 10W x 2 Signal inputs TV TV tuner Video S Video Composite video RCA Composite video SCART Component video Y PB PR Audio input PC...

Page 48: ...ings from this table to obtain optimal performance Resolution Horizontal Freq khz Vertical Freq Hz Bandwidth Mhz Notes 720 400 31 47 70 08 28 32 DOS mode 640 480 31 47 60 00 25 18 DOS mode 640 480 37...

Page 49: ...Dimensional Drawings 41 English Dimensional Drawings Unit mm 190 997 123 5 533 5 711 27 592...

Page 50: ...Dimensional Drawings 42 English Memo...

Reviews: