


PART A: CONFIGURING SETTINGS FOR THE TRACKBOX
46 WAYPOINT TRACKING
WAYPOINT TRACKING
Waypoint tracking is remotely controlled by the service cen-
ter. When the waypoint tracking is turned on, the alarm mes-
sage (incl. position information) will be sent to the service
center when the device is moving out or in to the pre-de-
fined area. The device can also be configured to send the po-
sition information to the service center whenever crossing
the borderline - despite of the moving direction.
NOTE: When entering into the pre-defined area, the alarm
will be sent when crossing radius. When entering out of the
pre-defined area, the alarm will be sent when crossing radi-
us plus perimeter of 100 meters.
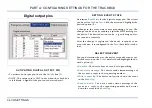
•
Name
(1): You may key in the desired name for a waypoint
. You can define up to 30 separate, circular areas: The
areas are separated from each other by an
ID number and
a
name.
•
Center point coordinates
(2): The waypoint area is defined
by keying in
Latitude
and
Longitude
and a
Radius
of an
area in meters. The radius should be rounded to tens,
otherwise the software does the rounding. E.g. by enter-
ing 67, the actual radius will be rounded to 70 meters. 50
meters is the minimum value.
•
Alarm
(3): After activating a waypoint, you can select an
alarm option for this waypoint. You have three choices:
Alarm will be turned on when arriving to a waypoint,
departing from a waypoint, or whenever crossing the bor-
derline (both directions). Each waypoint can have alarm
option of its own.
•
Activation of a waypoint
(4): To activate a waypoint, check
the
Active
box (on the same row), to deactivate the way-
point, leave the check box blank.
NOTE: The waypoint tracking does not contain automatic
switch off or duration options. The feature must be sepa-
rately deactivated when it is no longer needed.
R e s e t t i n g t h e c o o r d i n a t e s
To reset the coordinate values, click the latitude and longi-
tude data fields (the ones, you want to reset).
M a r k i n g a l l w a y p o i n t s f o r a c t i v a t i o n /
d e a c t i v a t i o n a t o n c e
Click the
Active
box on the top row (5).
Note that activation/deactivation will actually take place
only after you have transferred the information to the de-
vice.
1
2
3
4
5
Summary of Contents for TRACKBOX 2.1
Page 6: ...6 ...


