

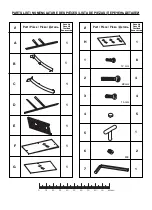


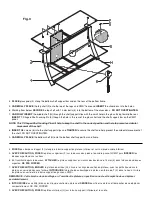


4.
PlAce
glass pads (4) along the bottom shelf support bar and on the rear of the bottom frame.
5.
cAreFully PlAce
the top shelf (F) onto the top of the legs and Cms
®
frame and
Insert
the silver discs into the holes.
6. working from below,
secure
the top shelf with 15 mm bolts (3) into the bottom of the silver discs.
Do not oVertIGHten
.
7.
cArFully Insert
the middle shelf (G) through the shelf support clips with the small hole in the glass facing toward the rear.
Insert
t- shaped shelf locking pin (5) though the hole in the rear of the glass shelf and the shelf support bar on the Cms
®
panel.
note:
This T-Shaped Shelf Locking Pin will help to keep the shelf in the correct position and help to prevent accidental
movement of the shelf.
8.
Insert
m8 screws (6) into the shelf support clips and
tIGHten
to secure the shelf and help prevent the accidental movement of
the shelf. do not overtiGHten.
9.
cAreFully PlAce
the bottom shelf (H) onto the bottom shelf support bar and frame.
4.
Poser
des tampons d’appui (4) le long de la barre support du plateau inférieur et sur l’arrière du cadre inférieur.
5.
AVec PrÉcAutIon, Poser
le plateau supérieur (F) sur le dessus des pieds et du cadre passe-fil Cms
®
puis
InsÉrer
les
disques argentés dans les trous.
6. en travaillant depuis le dessous,
AttAcHer
le plateau supérieur en vissant des boulons de 15 mm (3) dans la base des disques
argentés.
ne PAs Forcer
.
7.
AVec PrÉcAutIon, enFIler
le plateau du milieu (G) à travers les clips de soutien du plateau, avec les petits trous dans le
plateau en verre placés vers l’arrière.
IntroDuIre
la broche de verrouillage de plateau en forme de t (5) dans le trou à l’arrière
du plateau en verre et de la barre support du panneau Cms
®
.
remArQue :
Cette broche de verrouillage en T maintient le plateau en position correcte et l’empêche de se déplacer
accidentellement.
8.
IntroDuIre
des vis m8 (6) dans les clips de soutien du plateau et
serrer
pour fixer le plateau et l’empêcher de se déplacer
accidentellement. ne pAs ForCer.
9.
AVec PrÉcAutIon, Poser
le plateau inférieur (H) sur la barre support inférieure et le cadre.
Fig. 3


