background image

29

29

Configuring and Using the USB Print Server

1

2

3

4

5

6

7

8

9

10

11

12

se

ct

io

n

Using the Print Server

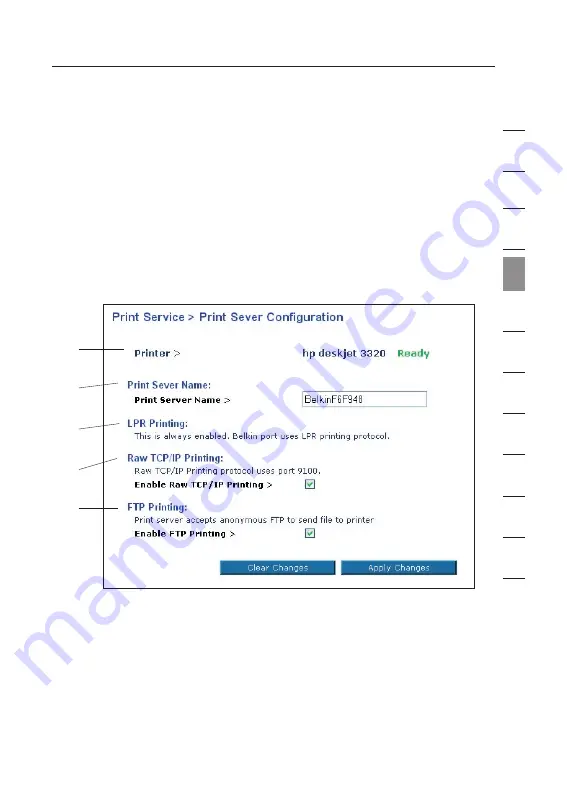
Print Server Configuration Screen

For proper operation of the Print Server, install the printer’s drivers and 
software on each computer from which you plan to print. The Belkin Print 
Server Port must also be installed on each of these computers. See page 26 
of this manual for more information and instructions. 
The Print Server Configuration screen is the central point in the Router where  
you can find the printer status (ready/not ready) and make certain adjustments.  
See page 52 in this manual for directions to access the Advanced Web Based  
User Interface.

Printer field (1)

This line shows you the name of the printer that is connected to the Print 
Server and its status.

Print Server Name (2)

The Print Server name identifies the Print Server. If you wish, you can  
change it by typing in a new name such as “My Print Server” then clicking 
“Apply Changes”.

(1)

(2)

(3)

(4)

(5)

Summary of Contents for F5D7231uk4P

Page 1: ...Benutzerhandbuch und oder Software gibt es in Ihrer Sprache NL Voor Nederlandstalige handleidingen en of software kunt u terecht op ES Los manuales y o el software est n disponibles en la lengua local...

Page 2: ...Using the Web Based Advanced User Interface 52 Changing LAN Settings 53 Viewing the DHCP Client List Page 55 Configuring the Wireless Network Settings 56 Securing your Wi Fi Network 61 WEP Setup 66 W...

Page 3: ...s among all the connected computers in your home Share documents music video and digital pictures Store retrieve and copy files from one computer to another Simultaneously play games online check Inte...

Page 4: ...contact Belkin Technical Support Note While some of the items listed below can affect network performance they will not prohibit your wireless network from functioning if you are concerned that your...

Page 5: ...from any cordless phone that operate on the 2 4GHz band check manufacturers information If this fixes the problem your phone may be interfering If your phone supports channel selection change the cha...

Page 6: ...often used to connect remotely to an office network The Bring Your Own Access program from America Online AOL which lets you use AOL through broadband provided by another cable or DSL service Most on...

Page 7: ...roduction 1 2 3 4 5 6 7 8 9 10 11 12 section For more information regarding our networking products visit our website at www belkin com networking or call Belkin Technical Support at Europe 00 800 223...

Page 8: ...tions are in operation You ll know at a glance whether your Router is connected to the Internet This feature eliminates the need for advanced software and status monitoring procedures Built in USB Pri...

Page 9: ...niversal Plug and Play is a technology that offers seamless operation of voice messaging video messaging games and other applications that are UPnP compliant Support for VPN Pass Through If you connec...

Page 10: ...o block unwanted or offensive web content before it makes it to your network Unlike other Parental Control solutions Parental Control is built into the Belkin Wireless Router so there is no software t...

Page 11: ...et connection such as a cable or DSL modem with RJ45 Ethernet connection At least one computer with an installed network interface adapter TCP IP networking protocol installed on each computer RJ45 Et...

Page 12: ...ing the Router is ready for use When data is being sent to the printer the light will blink fast OFF Router is OFF Slow Blinking Green Router is Booting Up Solid Green Router is Ready Fast Blinking Gr...

Page 13: ...ood WAN Link Blinking Green WAN Activity 5 Connected LED This unique LED shows you when the Router is connected to the Internet When the light is OFF the Router is NOT connected to the Internet When t...

Page 14: ...ovided with the modem to connect the modem to this port Use of a cable other than the cable supplied with the cable modem may not work properly 9 Reset Button The Reset button is used in rare cases wh...

Page 15: ...for at least ten seconds then release it The lights on the Router will momentarily flash The Power Ready light will begin to blink When the Power Ready light becomes solid again the restore is complet...

Page 16: ...llation procedure If your modem has only a USB port you can request a different type of modem from your ISP or you can in some cases purchase a modem that has an RJ45 Ethernet port on it ALWAYS INSTAL...

Page 17: ...ep 1 Run the Easy Install Wizard Software 1 Shut down any programs that are running on your computer at this time 2 Make sure you have the following items at the computer that is now directly connecte...

Page 18: ...cted the Router at this point If you have connected your Router please reconnect your computer directly to the modem Click Next when you are ready to move on Progress Screen Easy Install will show you...

Page 19: ...will need to know which adapter is connected to your modem Select the network card that is connected to your modem from the list and click Next If you are not sure which adapter to choose select the a...

Page 20: ...r Click Next to continue 2 3 This step instructs you to locate the power supply that is included with your Router Plug the power supply s small connector into the GRAY port on the Router Plug the powe...

Page 21: ...ask you to type in your user name and password If your connection type does not require a user name and password you will not see this screen Your user name and password is provided to you by your In...

Page 22: ...w transfer all of the configuration information to the Router This will take approximately one minute During this time do not turn off the Router or computer The Router will restart itself at the end...

Page 23: ...Router will be solid GREEN indicating that the Router is now connected to the Internet Your Router is now connected to the Internet Now you can begin surfing the Internet by opening your browser and...

Page 24: ...oftware for your printer you may be required to connect the PC directly to the printer in order to complete the installation This varies according to manufacturer You must also install the Belkin Prin...

Page 25: ...tion 3 On the Wizard menu drag your mouse over the Run Wizard button and click the words Click Here to start the Wizard 4 The first screen of the Wizard appears Be sure that you have installed your pr...

Page 26: ...to the printer to the USB port on the rear of the Router The USB port on the Router is colour coded purple Click Next 6 The Wizard will scan for and locate the Print Server in the Router Next a list...

Page 27: ...appears will allow you to test print Click on the Print Test Page button When your test page is finished printing click Next 8 You are now finished setting up your computer to print to the Print Serve...

Page 28: ...lick on the file called instportA exe Configuring Computers to Print to the Print Server 1 Install Printer Port Software on each computer by running instportA exe from the CD or by using the Wizard 2...

Page 29: ...r Router s print server name will appear Select the Print Server Click OK to close d On the Belkin Port A Properties window the name of the Print Server will appear Click OK to close e On the Ports ta...

Page 30: ...lick Configure Port 2 Select a different port from the list of available ports You must select a different port before you can remove the Belkin port 3 From the Installer menu click Remove Printer Por...

Page 31: ...more information and instructions The Print Server Configuration screen is the central point in the Router where you can find the printer status ready not ready and make certain adjustments See page...

Page 32: ...d of the Belkin Port Monitor Using Raw Printing requires that you configure all port parameters manually It is not recommended for users unfamiliar with TCP IP printing FTP Printing 5 This feature ena...

Page 33: ...inter port to File click Apply 3 Print the document using the printer that you configured A dialogue box will open prompting you to name the print file After naming the file click OK A file will be sa...

Page 34: ...the IP address of the Router default is 192 168 2 1 press the Enter key to create an FTP connection with the Print Server 6 When the connection is made the user will be prompted to enter a user name a...

Page 35: ...or example put c example printer1 8 The file will be sent to the Print Server When the transfer is complete another prompt will appear If finished type quit and press Enter to end the FTP session Then...

Page 36: ...AC address filtering WEP and WPA Enable the DMZ feature for a single computer on your network Change the Router s internal password Enable Disable UPnP Universal Plug and Play Reset the Router Back up...

Page 37: ...ter by checking the lights on the front of the Router The green light labeled WAN should be ON if your modem is connected correctly to the Router If it is not recheck your connections 1 8 Verify that...

Page 38: ...or www Then press the Enter key PLEASE NOTE If you have difficulty accessing the Router s web based interface go to Section 7 of the user manual titled Manually Configuring Computer Network Settings...

Page 39: ...For more information see the section in this manual titled Changing the Login Timeout Setting Understanding the Web Based Advanced User Interface The home page is the first page you will see when you...

Page 40: ...e indicator is automatically updated when you make changes to the settings of the Router 4 Login Logout Button This button enables you to log in and out of the Router with the press of one button When...

Page 41: ...Router s NAT firewall and wireless features Changes can be made to the settings by clicking on any one of the links or by clicking the Quick Navigation links on the left side of the screen 8 Internet...

Page 42: ...ion settings are provided to you by your ISP To configure the Router with the settings that your ISP gave you click Connection Type A on the left side of the screen Select the connection type you use...

Page 43: ...9 10 11 12 section Setting your Connection Type From the connection type page you can select the type of connection you use Select the type of connection you use by clicking the button 1 next to your...

Page 44: ...ere assigned one Your host name is assigned by your ISP Some dynamic connections may require that you clone the MAC address of the PC that was originally connected to the modem 1 Host Name This space...

Page 45: ...mation then click Apply Changes 5 After you apply the changes the Internet Status indicator will read connection OK if your Router is set up properly 1 IP Address Provided by your ISP Enter your IP ad...

Page 46: ...an Internet connection in your home or small office that doesn t require a modem you may also use PPPoE Your connection type is PPPoE if a Your ISP gave you a user name and password which is required...

Page 47: ...a specific MTU setting Making changes to the MTU setting can cause problems with your Internet connection including disconnection from the Internet slow Internet access and problems with Internet appl...

Page 48: ...n to the ISP s system Type in the information provided by your ISP in the space provided When you have finished click Apply Changes 9 After you apply the changes the Internet Status indicator will rea...

Page 49: ...by your ISP If your ISP did not give you a connection ID leave this blank 8 Disconnect after X The Disconnect feature is used to automatically disconnect the Router from your ISP when there is no acti...

Page 50: ...ext to User decide login server manually 4 and type in the address next to Login Server 5 When you have entered all of your information click Apply Changes 7 After you apply the changes the Internet S...

Page 51: ...net that translates Universal Resource Locater URLs like www belkin com to IP addresses Many Internet Service Providers ISPs do not require you to enter this information into the Router The Automatic...

Page 52: ...you install the Router its own MAC address will be seen by the ISP and may cause the connection not to work Belkin has provided the ability to clone copy the MAC address of the computer into the Route...

Page 53: ...alled Click the Clone button 1 Click Apply Changes 3 Your MAC address is now cloned to the Router Entering a Specific MAC Address In certain circumstances you may need a specific WAN MAC address You c...

Page 54: ...www then press the Enter key You will see the Router s home page in your browser window Viewing the LAN Settings Clicking on the header of the LAN tab 1 will take you to the LAN tab s header page A q...

Page 55: ...address can be changed if needed To change the IP address type in the new IP address and click Apply Changes The IP address you choose should be a non routable IP Examples of a non routable IP are 19...

Page 56: ...er so as not to exceed the 100 client limit The starting IP address must be lower in number than the ending IP address 5 Lease Time The length of time the DHCP server will reserve the IP address for e...

Page 57: ...omputers known as clients which are connected to your network You are able to view the IP address 1 of the computer the host name 2 if the computer has been assigned one and the MAC address 3 of the c...

Page 58: ...used The default SSID of the Router is belkin54g You can change this to anything you want to or you can leave it unchanged If there are other wireless networks operating in your area you will want to...

Page 59: ...ode from the Wireless Mode drop down box Then click Apply Changes 802 11g LRS Mode We recommend you DO NOT use this mode unless you have a very specific reason to do so This mode exists only to solve...

Page 60: ...able of Frame Bursting to function in Frame Bursting mode and all clients not capable to operate in normal 802 11g modes Frame Bursting mode supports both Frame Bursting enabled devices and non Frame...

Page 61: ...for the country you reside in The default channel is 11 unless you are in a country that does not allow channel 11 The channel can be changed if needed If there are other wireless networks operating...

Page 62: ...o your specific SSID an SSID of ANY will no longer be accepted Refer to the documentation of your wireless network adapter for information on making this change Protected Mode Switch As part of the 80...

Page 63: ...Encryption keys based on RC4 algorithm typically 40 bit keys More secure than 64 bit WEP using a key length of 104 bits plus 24 additional bits of system generated data TKIP temporal key integrity pr...

Page 64: ...twork your wireless networking devices will be unable to communicate with one another on your network and you will not be able to successfully communicate within your network You can enter your key by...

Page 65: ...r and WPA with radius server WPA PSK no server uses what is known as a Pre Shared key as the Network key A Network key is basically a password that is between 8 and 63 characters long It can be a comb...

Page 66: ...working devices are sharing the same Network key The Wireless G Desktop Network Card cannot access the network because it is using a different Network key than the Network key that is configured on th...

Page 67: ...C3 D4 4B C3 D4 E7 128 bit key In the boxes below make up your key by writing in two characters between A F and 0 9 in each box You will use this key to program the encryption settings on your Router a...

Page 68: ...e of numbers and letters from A F and 0 9 For 64 bit WEP you need to enter 10 hex keys For instance AF 0F 4B C3 D4 64 bit WEP key 3 Click Apply Changes to finish Encryption in the Router is now set Ea...

Page 69: ...passphrase in the Passphrase field and click Generate to create a key A hex hexadecimal key is a mixture of numbers and letters from A F and 0 9 For 128 bit WEP you need to enter 26 hex keys For insta...

Page 70: ...me Microsoft s patch only supports devices with WPA enabled drivers such as Belkin 802 11g products There are two types of WPA security WPA PSK no server and WPA with radius server WPA PSK no server u...

Page 71: ...is setting 1 From the Security Mode drop down menu select WPA Radius Server 2 For Encryption Technique select TKIP or AES This setting will have to be identical on the clients that you set up 3 Enter...

Page 72: ...to bring up the Wireless Network screen The Advanced button will allow you to view and configure more options of your card 2 Under the Wireless Network Properties tab select a network name from the A...

Page 73: ...iew and configure more options of your card 2 Under the Wireless Networks tab select a network name from the Available networks list and click Configure 3 Under Network Authentication select WPA PSK N...

Page 74: ...Wireless Network screen The Advanced button will allow you to view and configure more options of your Card 2 Under the Wireless Networks tab select a network name from the Available networks list and...

Page 75: ...Microsoft called Windows XP Support Patch for Wireless Protected Access is available for free download Please Note The file that Microsoft has made available works only with Windows XP Other operatin...

Page 76: ...sing Windows Wireless Network Utility by doing the following 1 Under Windows XP click Start Control Panel Network Connections 2 Right click on Wireless Network Connection and select Properties 3 Click...

Page 77: ...to a corporate network that supports an authentication server such as a radius server please consult your network administrator for further information 6 Select TKIP or AES under Data Encryption This...

Page 78: ...The default IP address is 192 168 2 254 and subnet mask is 255 255 255 0 These can be customized for your need 1 Enable the AP mode my selecting Enable in the Use as Access Point only page When you se...

Page 79: ...connect to a secondary Wireless Access Point Note that you can only bridge your Wireless G Router model F5D7230 4 F5D7235 4 F5D7231 4P F5D7231 4 to a Belkin Wireless G Range Extender Access Point mode...

Page 80: ...an Access Point to your Wireless Router allows you to add another network segment in another area in the home or office without running wires Connecting a network switch or hub to the Access Point s...

Page 81: ...n changing channels see page 47 of this manual 2 Find the Access Point s MAC address on the bottom of the Access Point There are two MAC addresses on the bottom label You will need the MAC address nam...

Page 82: ...ve changed your Router s IP address use that IP address 6 You will see the Router s user interface in the browser window Click Wireless Bridge 2 on the left hand side of the screen You will see the fo...

Page 83: ...with zero length RIP defect Smurf Attack Fragment flooding TCP Null Scan The firewall also masks common ports that are frequently used to attack networks These ports appear to be Stealth meaning that...

Page 84: ...the setting for that application To remove an application select the number of the row that you want to remove then click Clear Manually Entering Settings into the Virtual Server To manually enter se...

Page 85: ...IP address of the computer you wish to restrict access to in the IP fields 1 Next enter 80 in both the port fields 2 Select Both 3 Select Block 4 You can also select Always to block access all of the...

Page 86: ...he network easily for any computer without having to add and remove the computer s MAC address from the list To enable this feature select Enable MAC Address Filtering 1 Next enter the MAC address of...

Page 87: ...Use this feature on a temporary basis The computer in the DMZ is NOT protected from hacker attacks To put a computer in the DMZ enter the last digits of its IP address in the IP field and select Enab...

Page 88: ...c IP address and receiving a response from the IP address a hacker can determine that something of interest might be there The Router can be set up so it will not respond to an ICMP ping from the outs...

Page 89: ...Interface 1 2 3 4 5 6 7 8 9 10 11 12 section Utilities Tab This screen lets you manage different parameters of the Router and perform certain administrative functions Parental Control See separate Pa...

Page 90: ...ion 1 Click the Restart Router button 2 The following message will appear Click OK 3 The following message will appear Restarting the Router can take up to 60 seconds It is important not to turn off t...

Page 91: ...faults button 2 The following message will appear Click OK 3 The following message will appear Restoring the defaults includes restarting the Router It can take up to 60 seconds It is important not to...

Page 92: ...you back up your current configuration before performing a firmware update 1 Click Save A window called File Download will open Click Save 2 A window will open that allows you to select the location...

Page 93: ...Close The configuration is now saved Restoring a Previous Configuration This option will allow you to restore a previously saved configuration 1 Click Browse A window will open that allows you to sele...

Page 94: ...ke up to 60 seconds for the configuration restoration to complete Click OK 4 A 60 second countdown will appear on the screen When the countdown reaches zero the Router s configuration will be restored...

Page 95: ...new firmware you can download the firmware from the Belkin update website and update your Router s firmware to the latest version Checking for a New Version of Firmware The Check Firmware 1 button al...

Page 96: ...load the new version of firmware click Download 2 A window will open that allows you to select the location where you want to save the firmware file Select a location You can name the file anything yo...

Page 97: ...lows you to select the location of the firmware update file All firmware files end with a dlf 2 Browse to the firmware file you downloaded Select the file by double clicking on the file name 3 When th...

Page 98: ...e This message tells you that the Router may not respond for as long as one minute as the firmware is loaded into the Router and the Router is rebooted Click OK 6 A 60 second countdown will appear on...

Page 99: ...ommended that you set a password if you plan to use the remote management feature of your Router Changing the Login Timeout Setting The login timeout option allows you to set the period of time that y...

Page 100: ...MAKE SURE YOU HAVE SET THE ADMINISTRATOR PASSWORD Remote management allows you to make changes to your Router s settings from anywhere on the Internet There are two methods of remotely managing the R...

Page 101: ...ff NAT will disable your firewall functions Enabling Disabling UPnP UPnP Universal Plug and Play is yet another advanced feature offered by your Belkin Router It is a technology that offers seamless o...

Page 102: ...a new version of firmware and alert you that the new firmware is available When you log into the Router s advanced interface the Router will perform a check to see if new firmware is available If so y...

Page 103: ...a Connection associated with your network adapter and select Properties from the drop down menu 4 In the Local Area Connection Properties window click Internet Protocol TCP IP and click the Properties...

Page 104: ...t up for a static IP connection type Write the address information in the table below You will need to enter this information into the Router 1 2 3 4 Write the IP address and subnet mask from the IP A...

Page 105: ...e with your Router you will need to change your Mac s TCP IP settings to DHCP 1 Pull down the Apple menu Select Control Panels and select TCP IP 2 You will see the TCP IP control panel Select Ethernet...

Page 106: ...g Computer Network Settings 5 Close the window If you made any changes the following window will appear Click Save Restart the computer When the computer restarts your network settings are now configu...

Page 107: ...ings 1 2 3 4 5 6 7 8 9 10 11 12 section Manually Configuring Network Adapters in Mac OS X 1 Click on the System Preferences icon 2 Select Network 1 from the System Preferences menu 3 Select Built in E...

Page 108: ...ll need to configure your Router for a PPPoE connection type using your user name and password 5 If Manually is selected your Router will need to be set up for a static IP connection type Write the ad...

Page 109: ...recommended settings in this section Internet Explorer 4 0 or Higher 1 Start your web browser Select Tools then Internet Options 2 In the Internet Options screen there are three selections Never dial...

Page 110: ...settings Use automatic configuration script and Use a proxy server Click OK Then click OK again in the Internet Options page Netscape Navigator 4 0 or Higher 1 Start Netscape Click on Edit then Prefe...

Page 111: ...Install Wizard screen does not appear within 15 20 seconds open up your CD ROM drive by double clicking on the My Computer icon that is located on your desktop 2 Next double click on the CD ROM drive...

Page 112: ...firewall settings to function properly when it is turned on Please refer to the instructions provided by the publisher of your firewall software for instructions on configuring the firewall to allow...

Page 113: ...l as your user name If you continue to have no Internet connection reference the section titled Manually Configuring Network Settings page 89 of this manual for alternative setup method Problem The Ea...

Page 114: ...onnect to the Internet The Routers WAN light on my Router is on and the Connected light is blinking Solution If you cannot connect to the Internet the WAN light is on and the Connected light is blinki...

Page 115: ...stalled on the computer attempting to access the Internet Examples of third party firewall software are ZoneAlarm BlackICE PC Protection McAfee Personal Firewall and Norton Personal Firewall If you do...

Page 116: ...ottom right hand corner of the screen If you re using a Belkin wireless card the tray icon should look like this the icon may be red or green 3 The exact window that opens will vary depending on the m...

Page 117: ...ower left hand corner of your screen should turn green indication a successful connection to the network Problem I can t connect to the Internet wirelessly and my network name is not listed Solution I...

Page 118: ...liances As a result the typical indoor range of your wireless devices will be between 100 to 200 feet Note also that connection speed may decrease as you move further from the Router or Access Point I...

Page 119: ...ommends using one of the following products to extend wireless network coverage throughout large homes or offices Wireless Access Point A wireless access point can effectively double the coverage area...

Page 120: ...on the left of your screen Select the Encryption or Security tab to get to the security settings page 2 Select 128 bit WEP from the drop down menu 3 After selecting your WEP encryption mode you can t...

Page 121: ...ccess Point uses the key 00112233445566778899AABBCC then the client card must be set to the exact same key 1 Double click the Signal Indicator icon to bring up the Wireless Network screen The Advanced...

Page 122: ...ware that support it At the time of this FAQ publication a security patch download is available for free from Microsoft This patch works only with the Windows XP operating system Download the patch he...

Page 123: ...echnique select TKIP or AES This setting will have to be identical on the clients that you set up 3 Enter your pre shared key This can be from 8 to 63 characters and can be letters numbers or symbols...

Page 124: ...usiness environment 1 From the Security Mode drop down menu select WPA with server 2 For Encryption Technique select TKIP or AES This setting will have to be identical on the clients that you set up 3...

Page 125: ...utton will allow you to view and configure more options of the card Once the advanced button is clicked the Belkin Wireless LAN Utility will appear This Utility will allow you to manage all the advanc...

Page 126: ...will allow you to view and configure more options of the card Once the advanced button is clicked the Belkin Wireless LAN Utility will appear This Utility will allow you to manage all the advanced fe...

Page 127: ...cturer supports WPA and that you have downloaded and installed the latest driver from their support site Supported Operating Systems Windows XP Professional Windows XP Home Edition Enabling WPA PSK no...

Page 128: ...tware Be sure that you have installed the printer drivers and software on each PC from which you plan to print In some cases while installing the drivers and software for your printer you may be requi...

Page 129: ...or wireless networks If more than one network is found choose your network from the list and connect to it 4 Wireless Computers If you are using wireless security such as WEP encryption WPA security o...

Page 130: ...ible with 802 11b Incompatible with 802 11b or 802 11g Range Depends on interference typically 50 300 ft indoors Depends on interference typically 50 300 ft indoors Less interference range is typicall...

Page 131: ...uch as low paper low toner etc when using the Print Server A No The print server is not bidirectional Messages from the printer cannot be displayed on the PC Q Why do I have to install the printer s d...

Page 132: ...CC Rules These limits are designed to provide reasonable protection against harmful interference in a residential installation This equipment generates uses and can radiate radio frequency energy If n...

Page 133: ...he European Community Compliance with this directive implies conformity to the following European Norms in brackets are the equivalent international standards EN 60950 IEC60950 Product Safety EN 300 3...

Page 134: ...employee is authorized to make any modification extension or addition to this warranty BELKIN IS NOT RESPONSIBLE FOR SPECIAL INCIDENTAL OR CONSEQUENTIAL DAMAGES RESULTING FROM ANY BREACH OF WARRANTY...

Page 135: ...ke Windows update and Antivirus programs This type of program may cause the connection to stay active not allowing the automatic disconnect feature to engage It is also very important to realise that...

Page 136: ...d Express Business Park Shipton Way Rushden NN10 6GL United Kingdom Tel 44 0 1933 35 2000 Fax 44 0 1933 31 2000 Belkin B V Starparc Building Boeing Avenue 333 1119 PH Schiphol Rijk The Netherlands Tel...

Reviews: